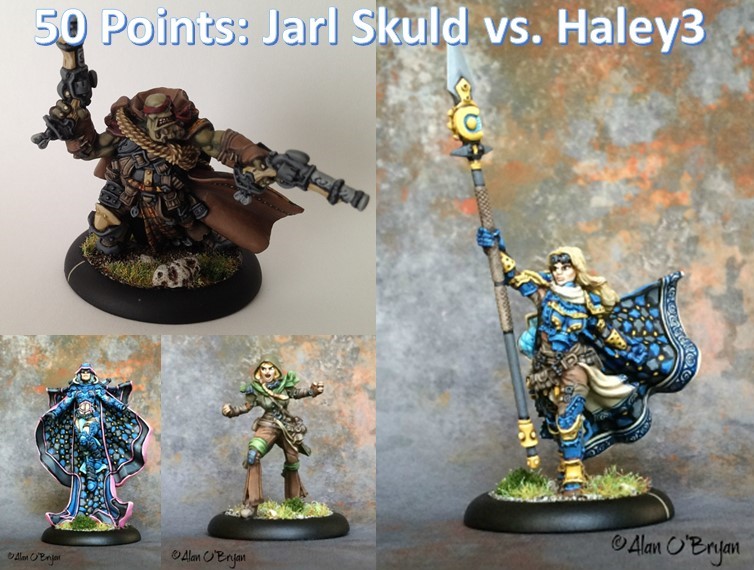
50
Points: Cygnar (Haley3) vs. Trollbloods (Jarl Skuld)
Hello
once again! Alan O’Bryan (Arizona_Troll) with another guest battle
report on Dice
of the First Degree.
You can find me on Twitter at @Irish_Al or check out more pictures of
my models at www.whpictures.blogspot.com.
I hope you enjoy this report!
Finn
approached the command tent, knocking mud off of his boots before
entering. He glanced to his left to where Sylas Wyshnalyrr sat by
himself under a tree apparently meditating. “Always keeps to
himself, he does,” Finn mumbles to himself. “Spooky bastard.”
Finn
entered the tent to find Haley sipping tea and looking over maps of
the area.
“Finn.
Thank you for coming. There is a large Trollbloods force marching in
our direction.”
“I
haven’t heard any reports-“
“They
are keeping to the woods, moving through cover. They will be here by
the morning.”
“How
do you know this?”
“It
has already happened.” She looked up at him. Morrow! She’d been
extremely odd ever since regaining consciousness. And growing an arm
back. And, well, I guess one might expect her to act odd considering
everything she’d been through.
“I’ll
alert the men. Should we dig in?”
“I
don’t believe that is wise. This Trollkin leader. He is…tricky.
If we dig in, he will simply move around us. We need not beat them.
But the remains of Siege’s army is in full retreat from its battle
yesterday. If this force is allowed to pass unmolested, the armies
will collide in two days and what’s left of Siege’s forces,
including a Stormwall, will be lost. We must hamper and bloody this
force to slow them. Deploy the cavalry on our flank and wait for my
orders.”
“Aye,
ma’am. It will be done.”
###########
Jarl
Skuld took a sip from his flask and scratched at the edge of his
eyepatch. The damn thing was always painful in the morning. He wasn’t
sure why. His stomach grumbled. The army had been moving as fast as
possible to reinforce and resupply Grim Angus. Those Mountain Kings
were sure good in a fight, but they created all sorts of supply
issues. It was difficult to say the least to prevent them from eating
everything in sight, including all of the food and ale for the troops
and, for that matter, eating the army itself.
Wrathar,
the eldest brother of the Fell Caller family under his command,
pulled him out of his thoughts. “Skuld!” The Trollkin always
sounded a bit like he was yelling. “Cygnar troops spotted. And
they’re arrayed for battle. Apparently they knew we were coming.”
Turgor, Jarl’s trusted Impaler, tightened his grip on his spear,
sensing Jarl’s anxiety. He pushed it down, and Turgor relaxed a
bit. He was still not used to fighting these straight-up battles and
spared a moment to reflect on his days leading small bands on raids
through the forest.
“I
don’t suppose they’re here to surrender? Or maybe they’re just
dropping off some ale? Tea party, perhaps?”
Wrathar
looked confused. “I – I don’t believe so, sir. I think-“
“It’s
a joke, Wrathar.” Goddess above, this ‘kin had no sense of humor.
Where’s Rhudd when you need him? “Alert the column, Wrathar.
Double time it into position, and let me know if those Swans start
moving.”
“As
you say!”
Jarl
drew his pistols and checked that they were loaded and loose in their
holsters.
He
gritted his teeth in determination and began to march forward. Behind
him, Runkter, his Mauler, let out a might roar of anticipation.
###########
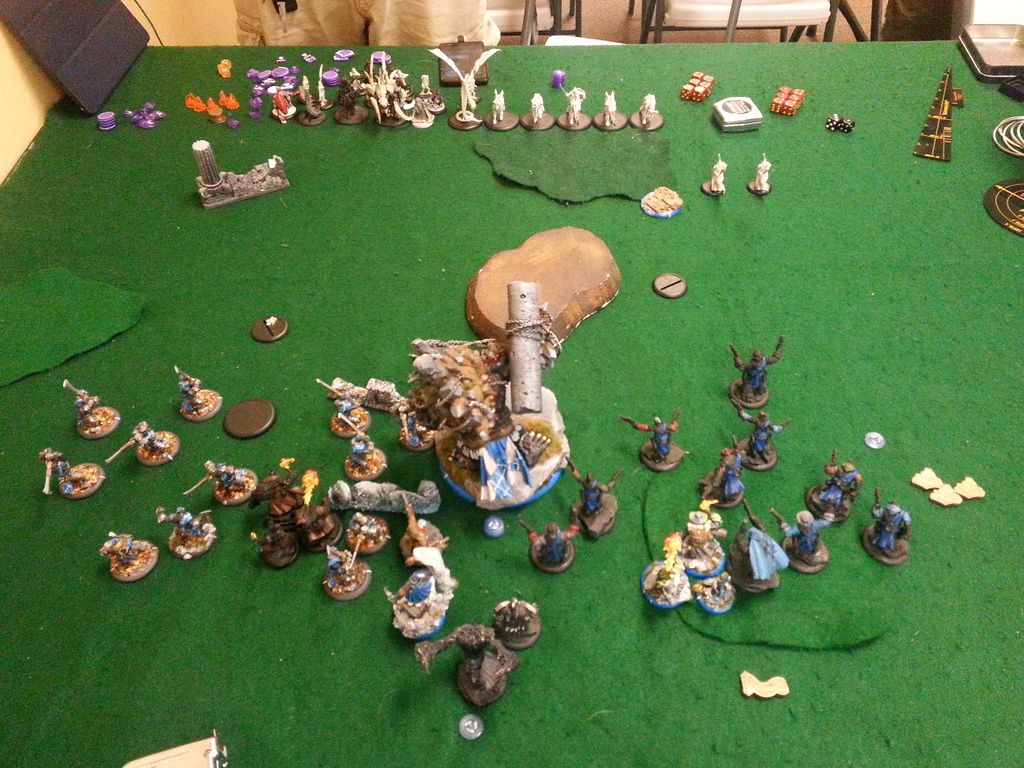
SCENARIO
AND DEPLOYMENT
Scenario
4: Fire Support
Two
flags (dominate friendly flag for 1 CP, control/dominate enemy flag
for 1/2 CP)
Two
objectives (destroy or remove from play enemy objective for 1 CP)
First
player to 5 CPs wins
Travis
has had a very hard time coming up with an answer to this particular
Jarl list in the past. He has been working on this list as a
potential counter since Haley3’s rules were first spoiled, but this
is our first time testing the match-up after he beat up on our other
local players for the last few weeks. Because 1) we’re somewhat
lazy and 2) we were testing this matchup more generally and not
relative to any specific scenario benefits, we opted to “break the
rules” and just play with generic objectives (DEF 5, ARM 18, 15
damage boxes) instead of one of the Steamroller-specific ones.
Alan
won the roll to choose first player or board edge (4 vs. 3), and
elected to take 2nd player and side.
It’s
probably worth noting here how we set up terrain. We have a chart (1:
obstruction, 2: forest, 3: hill, 4: wall, 5: shallow water, 6: no
terrain), and we roll a die for each of the six areas of the board
(imagine cutting up the board into a 2x3 grid creating six areas).
Whatever we roll, we place the appropriate terrain so that it “fits”
the board and scenario well. We don’t totally observe the distance
restrictions outlined in the Steamroller packet, although we do keep
obstructions and walls out of the zones and somewhat apart from flags
and objectives. What we like about this is that it creates
asymmetrical boards and usually a clearly superior table edge. This
makes it a much harder choice to go first or second than with terrain
chosen to make the table “balanced” and has also lead to some
really interesting battles with terrain combinations we might not
have otherwise ever tried. Note that we never allow less than four
pieces of terrain, so if we roll too many 6s we reroll them.


TURN
1: BATTLE OF THE SMOKE CLOUDS!
Top
of Turn 1: Cygnar (Travis)
The
Trollkin army had barely begun to assemble when orders went out.
“Blazers,
move out! Harass their flanks! Trenchers, move up and cover the army!
Stormlances, advance. Forgeguard, move up to support the trenchers!”
Haley relied on Finn to execute her battle plan.
She
took a look around her at the men and Dwarfs who would fall today.
Such a terrible thing, war. These men must die, but their deaths
would save others. The thought brought her no comfort. In fact, she
felt very little. This battle had already happened, after all.
Haley
walked forward, summing her echoes. The army would need them this
day.
Across
the field, an unnatural fog began to rise from the surface of a pond.
Before
starting his turn, Travis carefully checked that he deployed his
entire list. If you read our last battle report, you’ll know why he
was paranoid about this. :-)
No
Focus is allocated.
1.
Tempest Blazers: Run up on the flank.
2.
Maxwell Finn: Moves up, gives desperate pace to the Trenchers.
3. Trenchers:
Advance a lay down a wall of smoke. Travis left a small gap between
two of his clouds (and knew he was doing so). The gap was between the
third and fourth cloud. The building at his deployment line
interfered with his normal troop placement for this unit. I think he
probably could have rotated his clouds and closed the gap. But I
don’t know.
4.
Stormlances: Move up a bit.
5.
Lancer: Walks forward.
6.
Forgeguard: Run forward maintain groups of Dwarfs base to base.
7.
Journeyman Warcaster: Casts Arcane Shield on Haley and walks
forward.
8.
Piper of Ord: Moves up and gives Tough and Fearless to the
Forgeguard.
9. Haley: Moves
forward and puts both echoes into play. She casts Tactical Supremacy
on the Trenchers through the Lancer and casts Temporal Flux.
10.
Sylas: Advances.
11.
Trenchers Tactical Supremacy: Move back out of the clouds.
Travis
immediately realized that he had some tough decisions to make.
Knowing how vulnerable Haley and her echoes are to Magic Bullet (and
with Jarl having the only Magical Attacks in the whole list), Travis
opted to use Arcane Shield, coupled with Temporal Flux (and, later,
+1 DEF from the Piper) to protect the unit. However, he is concerned
about his cavalry. Because if Jarl isn’t shooting at Haley, then
his shots are going somewhere, and he can’t have Arcane Shield
everywhere…
In
his testing, he has found that he likes to have both echoes in play.
Future Haley has a great gun that comes in handy when needed plus
Revive to bring cavalry back into play, and Past Haley has been his
major game-ender, landing multiple assassinations on the feat turn in
past games. In addition, he’s hoping that the smoke wall will slow
down my Fennblade charge and provide poor targets for Jarl to shoot.
Bottom
of Turn 1: Trollbloods (Alan)
The
Cygnar army was already in motion as the Trollbloods arrived at the
field.
“Damn
Swans,” Jarl grumbled. He had already begun summoning fog from the
nearby pond. Trenchers in the front lines deployed smoke grenades,
screening Jarl’s view of the battle.
“Well,
two can play that game.” Concentrating, Jarl summoned more and more
fog, the mist rising from the pond and blowing across the field in
the direction of the Cygnaran forces.
“Move
up behind the fog, lads! Skaldi, take your boys and watch our flank
for those ponies!”
As
the army moved forward, Jarl caught a glimpse of a Trencher moving
behind a thin point in the smoke cover. Quickly drawing his
right-hand pistol, he fired and caught the Trencher in stomach. The
bullet ricocheted into the head of the man next to him.
“Ugh.
A shot to the gut. That’s a painful way to die, friend. Sorry for
that,” he thought.
He
reached out with his arcane powers to give speed and stamina to the
Fennblades on his flank. Nothing to do now but wait for the smoke to
clear.
1.
Fennblades: Run forward, but not maximum distance.
2.
Fennblade Kithkar: Runs forward on the left flank.
3.
Fennblade Kithkar(2): Runs forward in the center of the army.
4.
Sons of Bragg: Run up behind the Fennblades.
5.
Imapler: Advances and forces for 2 Fury to give Far Strike to Jarl.
6.
Fell Call: Advances and gives Pathfinder to the Warders.
7.
Runebearer: Advances and uses Harmonious Exultation.
8. Jarl Skuld:
Advances, casts Magic Bullet for 1 Fury with Harmonious Exultation.
He shoots at the Trencher he can just see through the gap in the
clouds, boosting to hit (thanks to the proximity of Haley’s unit,
he is DEF 15). The shot hits and the Trencher is killed. Magic Bullet
kills the Trencher to his right (Jarl’s left). Jarl uses Swift
Hunter to move back a bit, then casts Quicken on the Fennblades. Jarl
then made the Swans “SMELL MY TROLL FEAT!” by summoning 5 clouds.
9.
Warders: Run forward into the pond.
10.
Mauler: Riles for 2 Fury, then runs forward.
11.
Champions: Run to the right flank next to the edge of the cloud.
Having
seen him deploy both cavalry on one side of the table, I deployed
most of my army diagonally away from them, especially my Fennblades
who are very vulnerable to the Blazers and the assaulting, charging,
electro-leaping attacks of the Stormlances. My plan was to present my
Warders as charge targets for the Stormlances, hopefully not losing
too many of them, and to present my Champions as targets for the
Blazers. With Jarl supporting whichever unit needed it more, I should
be able to handle the cavalry, and my Fennblades and Sons of Bragg
should be able to handle the Trenchers and Forgeguard (I hoped).
It’s
also worth noting that I decided not to dedicate myself to the
scenario during the early turns. I had a feeling that he would not
commit the entire Haley unit to his flag in order to dominate it
(because they would be in a vulnerable position to Jarl’s guns and
because he would want them to be spread out to give extra defense to
his army with Temporal Flux. So as long as he couldn’t control or
dominate my flag I knew I would be okay. Setting up heavily on that
side of the table basically guaranteed that wouldn’t be a problem.
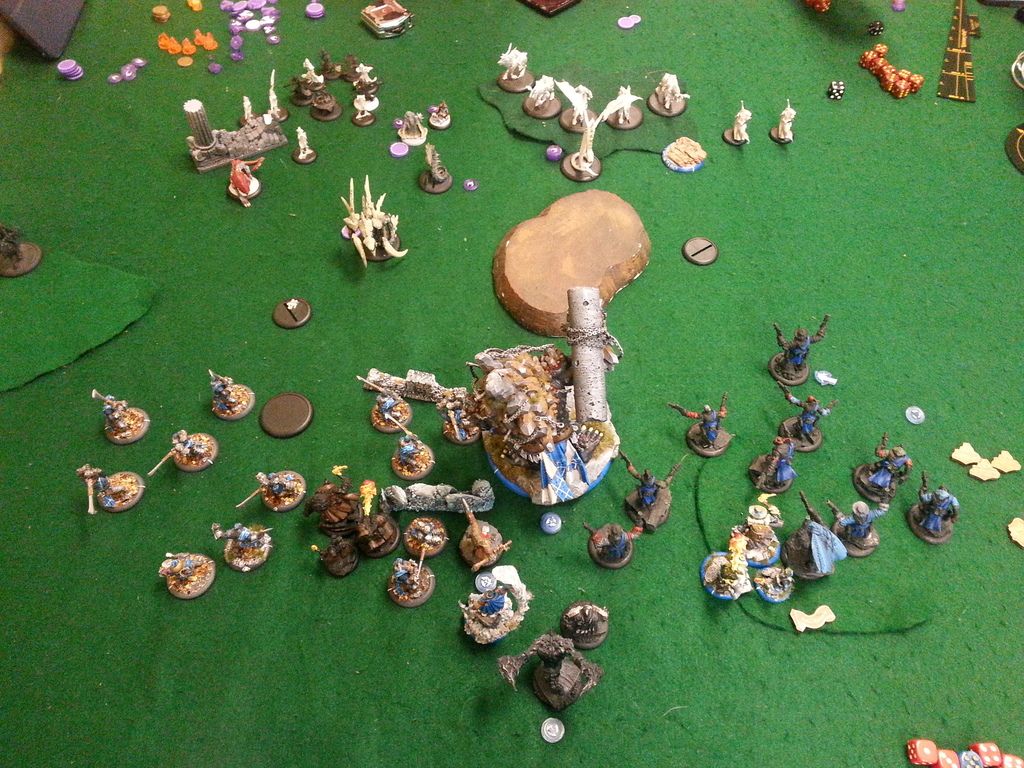
TURN
2: DON’T FIRE UNTIL YOU SEE THE WHITES OF THEIR EYES!
Top
of Turn 2: Cygnar (Travis)
The
fog had become so thick and dense, mingling with the Trencher smoke,
that Haley couldn’t see anything. Her captains looked to her,
confused about what to do with no enemy targets in sight. She relayed
orders through Murdoch and Finn to prepare for the Trollbloods’
attack. In the meantime, the Trenchers continued to deploy their
smoke cover while the Blazers began to nip at the enemy’s flank.
Upkeep
Arcane Shield on Haley’s unit from the Journeyman Warcaster.
Maintain
both echoes.
Upkeep
Tactical Supremacy for free from Sylas.
No
focus allocation.
1. Tempest Blazers:
Move towards the Champions and shoot at the one on the end. Two are
in range, and both hit with Brutal Damage. The first shot does no
damage, the second shot does 1 damage. They then use their light
cavalry move to retreat.
2. Trenchers: Move
forward and create a smoke wall. Right after doing this, he realizes
that he should have activated Haley first so that he could revive a
member of the unit and get an extra cloud.
3.
Stormlances: Move forward slightly.
4.
Finn: Runs at maximum speed back behind the Cygnar battle line.
5.
Forgeguard: Run forward and maintain pockets of base to base
groupings.
6.
Piper: Gives +1 DEF and Terror to Haley’s unit.
7. Haley: Moves MPV
Haley up a little bit, Future Haley moves towards the center of the
board, and Past Haley shifts to stand next to the Stormlances. Future
Haley Revives one trencher and MPV Haley casts Temporal Flux. The
echoes currently sit at DEF 19, ARM 21.
8.
He
doesn’t really activate and move any of his other models.
9.
Trenchers Tactical Supremacy: Move back out of the clouds.
He
doesn’t have a lot to do this turn because of the feat. He shoots
at what he can and sets up to assault me next turn.
Bottom
of Turn 2: Trollbloods (Alan)
Jarl
ordered the Fennblades to advance through the smoke screen. Not
knowing exactly what awaited them, he said a brief prayer to Dhunia
to protect them and, if they had to die, to speed their
reincarnation. To their credit, the lads surged ahead without fear,
chanting their terrifying battle cries. Their Kithkar moved forward,
encouraging the unit and keeping an eye out for anything emerging
from the smoke.
Jarl
heard chanting behind him, and turned to see his Runebearer’s eyes
glowing with magical energy. Looking in the direction of Skaldi and
the Champions, he was about to give them orders to hold the flank,
but they were halfway across the field. The Runbearer just shrugged
and smiled.
“Skaldi,
Skaldi,” Jarl chuckled. He must have asked the Runebearer to give
them speed. Well, that ‘kin knows how to fight. He should be fine.
Runkter
the Mauler was straining at his bond, rabid and frenzied to attack.
“Whoa, boy. Whoa.” Jarl sent calmness and restraint through the
bond. It was like trying to hold back a waterfall, but for the time
being the Mauler remained in his control.
Jarl
upkeeps Quicken on the Fennblades.
1.
Fell Caller: Moves up and gives +2 MAT to the Fennblades
2. Fennblades:
Use the “No Quarter” mini feat and the front line walks forward 8
inches, engaging both the Trenchers and the Forgeguard. Both pass
their morale checks against the Terror (Darn!), and they kill two
Trenchers. The others have moved up a bit.
3.
Fennblade Kithkar: Runs forward on the left flank.
4.
Fennblade Kithkar(2): Runs forward in the center of the army.
5. Runebearer: Uses
Power Glyphs to cast Quicken on the Champions.
6. Champions: Run
12 inches towards the Blazers. One even manages to barely engage the
lead Blazer.
7.
Sons of Bragg: Move forward behind the Fennblades.
8.
Warders: Run forward to form a strong center for my lines.
9.
Impaler: Moves forward and is forced for 2 Fury to give Jarl Far
Strike.
10. Jarl: Moves
forward and shoots the nearest Stormlance. Boosting the attack and
damage roll, he kills the cavalryman. He uses Swift Hunter to shift a
bit, then fires a boosted attack and damage shot into the next
closest Stormlance. The shot does 4 damage, 1 shy of the necessary
amount to kill him.
11.
Mauler: Riles for 2 Fury and runs forward.
I
debated using No Quarter this turn. I certainly wasn’t going to use
most of the bonuses, but I was pretty sure that I could force two
Terror checks. If even one of them failed it would be a huge swing.
Alas, both passed. But getting my Fennblades through the smoke screen
helped make sure that the smoke was done for the game. Other than
that, I positioned myself to minimize the damage he could cause and
maximize my counterattack in Round 3.
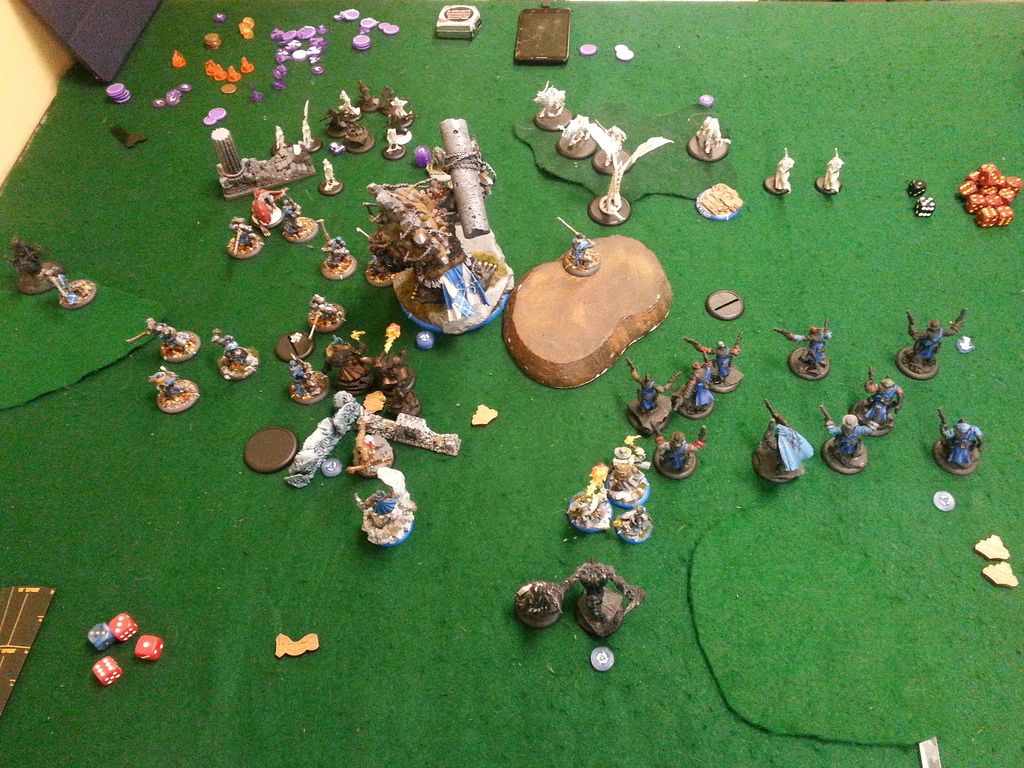
TURN
3: SPEED KILLS, BUT CYGNAR AIN’T AFRAID!
Top
of Turn 3: Cygnar (Travis)
Haley
watched as her forces absorbed the attacks of the Fennblades emerging
through the smoke. The line it would hold. She already knew that
their bravery would last. She could hear Murdoch shouting orders to
counterattack, and along the line Trollkin were cut down.
In
an effort to give the Forgeguard a reprieve, she ordered the
Trenchers forward into the Trollblood lines. This would buy the
retreating army nearby previous minutes to escape. The brave
Trenchers did their duty without question, even though they had to
know that this would be their end.
Haley
refused to allow herself to dwell on their fates. There would be time
to mourn later.
Upkeep
Arcane Shield on Haley’s unit from the Journeyman Warcaster.
Maintain
both echoes.
Upkeep
Tactical Supremacy for free from Sylas.
No
focus allocation.
1. Trenchers:
Charge/Assault and kill two Fennblades and leave two others knocked
down after they make their tough checks.
2. Haley: Future
Haley moves and casts Revive on the Stormlances, bringing one trooper
back with 1 unmarked damage box. MPV Haley casts temporal flux and
shoots one of the knocked down Fennblades, who survives after making
another tough check.
3. Stormlances: Two
(the ones with 1 unmarked damage box each) charge the Warders. The
other three hang back. Between some missed shots and less than
excellent damage rolls, he fails to kill either Warder. One Warder
takes 6 damage, the other takes 5 damage. An electro-leap kills the
nearest Fennblade.
4. Forgeguard:
Dwarfs walk forward and kill two more Fennblades. One more makes two
tough checks and survives.
5.
Piper: Gives +1 DEF and Terror to Haley’s unit.
6. Finn: Runs into
position on the hill.
7. Tempest Blazers:
He begins to move the ones not engaged around the edge of the
Champions. However, he forgot that Skaldi has Countercharge. When he
moves the third Blazer (leaving him in Skaldi’s front arc), Skaldi
charges and kills him. Due to the angle, however, he was not engaging
the other two nearby so they could still attack. Using Brutal shots,
the Blazers pepper the Champions but fail to kill any of them. The
Champions have the following numbers of unmarked damage boxes: 7, 1,
7, and 4 (Skaldi). The unengaged Blazers move away with their Light
Cavalry move.
8. Trencher
Tactical Supremacy: Move forward into my lines and pass the necessary
morale check against Terror.
Travis
starts his turn by saying, "You never leave me any good options,
man." As I wrote down this quote, I asked if he meant to call me
something more colorful than “man”. He said, “It’s me. So,
yeah, that’s implied.” Some friendly ribbing between good
buddies.
He
was really annoyed at forgetting that Skalid has Countercharge, and
when I declared the attack he was certain that it cost him that
flank. While in a way I agree with him, I’m also not very scared of
the Blazers in this list. If they did manage to get through my
Champions, Jarl and Magic Bullet could make short work of them. I was
pleased at how well the Champions held up against the Blazers. They
did the job I needed them to this game and all of them survived.
For
Travis’s part, he just didn’t kill enough this turn, and the
counterattack will be strong and swift.
Bottom
of Turn 3: Trollbloods (Alan)
Jarl
watched as the Fennblades felled the last of the Trenchers. He turned
his attention back to the center of the battle in time to see the
Stormlances bearing down on his Warders. Despite the ferocity of the
charge, the lads held formation and kept their feat. He took aim and
peppered the two lead Stormlances with a hail of bullets until they
fell from their saddles.
He
eased up on the mental restraint he had placed on Runkter
the Mauler, and the Mauler’s primal fury emanated from him,
empowering the nearby Kithkar. Instinctively knowing what to do, the
Kithkar, encouraged by the chants of the nearby Fell Caller, charged
the remaining Stormlances.
“Warders!
With me! Charge!” The Warders followed him into battle, and the
Stormlances were cut down trying to turn and retreat.
I
choose not to upkeep Quicken.
1. Vengeance and
Righteous Vengeance: The Fennblades and one Kithkar kill the
remaining Trenchers with Vengeance.
2. Champions: Move
and kill two Tempest Blazers. They pass their morale check. However,
this leaves the Blazer on the far flank out of formation.
3. Fell Caller:
Moves up and gives +2 MAT to the Fennblade Kithkar in the middle of
the table.
4. Fennblades:
Charge and kill 3 Forgeguard.
5. Fennblade
Kithkar: Runs up on the left flank behind the Fennblades.
6. Impaler: Moves
forward and is forced for 3 Fury to give Far Strike to Jarl.
7. Runebearer: Uses
Harmonious Exultation.
8. Jarl Skuld:
Casts Magic Bullet for 1 Fury with Harmonious Exultation. He
sacrifices his movement to aim, and shoots one Stormlance engaging
the Warders. He boosts the damage roll and kills the Stormlance, but
the Magic Bullet attack fails to kill the other Stormlance (rolled
even to his armor). Takes his second shot at the Stormlance, boosts
damage, and kills him. Uses Swift Hunter to adjust his position
slightly.
9. Sons of Bragg:
Run up next to the flag.
10. Mauler: Moves
up and is forced for 2 Fury to give Rage to the Kithkar. [Note that I
failed to account for this ahead of time, so Jarl can only collect 3
Fury next turn but there are 4 Fury on his warbeasts. Unless Jarl is
hit and has to transfer damage, one of my beasts must make a
Threshold Check next turn.]
11. Fennblade
Kithkar(2): Charges the rearmost Stormlance and, with War Cry and
Rage, obliterates the cavalryman. He puts his second attack into the
Stormlance on his right but misses.
12. Warders:
Receive a Charge!
order and kill the remaining Stormlances. This was important because
I didn’t want him to be able to revive them on the next turn.
It
was really important to me that I finished off the Stormlances. If I
failed to kill all of them, then he can start to use sneaky Revive
tricks to bring them back in inconvenient places, bypassing my
defenses and getting deep into my lines. So I moved to hold ground on
the left flank and focused all of my resources towards getting rid of
them.
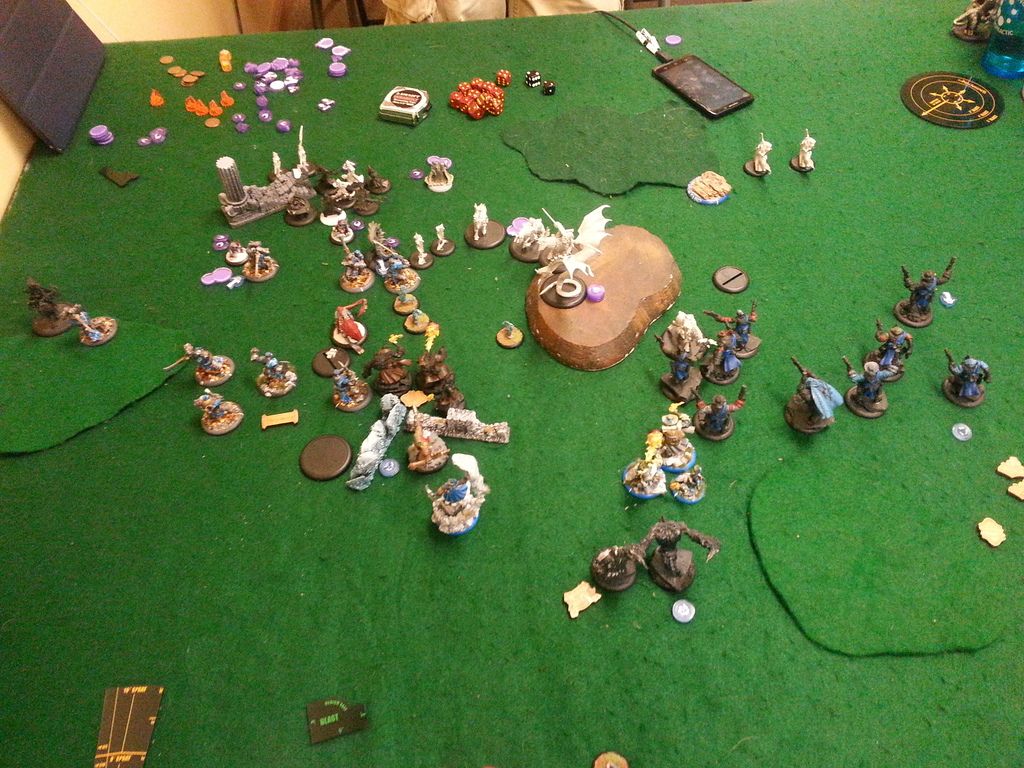
TURN
4: GHOSTBUSTIN’
Top
of Turn 4: Cygnar (Travis)
Haley
ordered her young echo through the lines to distract the Trollkin
warlock and his troops while her older echo bolstered the Dwarf
lines. Haley herself took a shot at a Warder knowing exactly where to
place the bullet to maximize the damage. In the distance the Blazers
struggled with Trollkin Champions while close by the Forgeguard held
fast against the dwindling Fennblades, causing massive casualties on
that flank.
“It
is almost time,” she said to no one in particular.
The
Journeyman Warcaster upkeeps Arcane Shield on Haley’s unit.
Haley
maintains both echoes and camps the rest of her Focus.
1. Finn: Moves up
and rolls 3 shots. His first shot at the Kithkar on the flank misses,
but the second shot hit and rolls box cars for damage. The Kithkar
makes his tough check, but Finn’s third shot finishes him off.
2. Haley: MPV casts
Temporal Flux. Past Haley moves up through the Trollbloods lines and
casts force hammer at Rhudd of the Sons of Bragg. The spell lands,
and he is slammed back into Tor. Both are knocked down, Rhudd takes 6
damage and Tor takes 5 damage. Future Haley revives one Dwarf in a
position that will allow him to get to the Sons of Bragg. MPV Haley
shoots and kills the Kithkar near the Warders after boosting damage.
3. Lancer: Walks up
and spears a Warder, killing him
4. Journeyman
Warcaster: Stands still to shoot at the Warder nearest the flag. He
rolls snake eyes and misses.
5. Piper: Gives +1
DEF and Terror to Haley’s unit.
6. Forgeguard: Walk
forward and kill most of the remaining Fennblades, who pass their
morale check by rolling an 8. One Dwarf walks up to Tor and kills
him, but the Son of Bragg passes his Tough check.
7. Tempest Blazers:
He moves the Blazer who was out of formation into formation, and the
other one shoots at Skaldi and does 3 damage. Skaldi has one unmarked
damage box remaining.
At
the beginning of his turn, Travis said, "Can I even salvage
this? I don't think so.” The tide was definitely turning against
him, and he had no choice but to try to put Past Haley into a
position to kill me next round if I missed her with the shots from
Jarl. I had too large of a manpower advantage at this point and he
didn’t have much left that could kill my high armor troops. Will
Past Haley survive a round of shooting from Jarl…?
Bottom
of Turn 4: Trollbloods (Alan)
This
was it. The pivotal moment of the battle. Having seen that young
woman run THROUGH his troops to knock Rhudd and Tor to the ground
with a magical explosion of energy, Jarl didn’t hesitate to put a
bullet in her. Willing the Sons to be okay, he sent mental images
through his bond with the Impaler. The Impaler ran over and speared
the Dwarf just before he could strike Tor for a second time. With a
mighty shout from Wrathar, Tor and Rhudd stood up and all three Sons
began to sing one of their ferocious songs as they charged towards
the remaining Forgeguard.
“Go
get ‘em, you beautiful bastards! Go get ‘em!”
Jarl
takes all of the Fury from the Impaler and 1 Fury from the Mauler.
The Mauler passes his Threshold check.
1. Vengeance:
Vengeance kills one Dwarf and the Drummer moves up.
2. Fell Caller:
Moves to his right, gives +2 MAT to the Warders. He then sprays the
center Dwarf in the line of three Forgeguard towards the middle of
the table and catches all of them. With the armor bonus and the
defense bonus from Temporal Flux, all three attacks either miss or
fail to break armor.
3. Impaler:
Moves up behind the Sons of Bragg and, boosting to hit, kills the
Dwarf in front of them.
4. Champions:
Skaldi kills both remaining Tempest Blazers, and the other Champions
move to the inside edge of the hill.
5. Warders: Charge
the Lancer. With Set Defense and the defense bonus from Temporal
Flux, the Warders have a hard time hitting. Only one of the four
attacks lands, and the Lancer takes a handful of damage. Note that
Past Haley had a potential Free Strike on one of the Warders, but he
elected not to take it because it would have removed incorporeal from
her. [To be honest, I just needed her unengaged. I hadn’t even
thought about that!]
6. Jarl:
Sacrificing movement to aim, he boosts an attack and damage roll into
Past Haley and kills her.
7. Fennblades: The
one knocked down sacrifices movement to stand up. They failed to kill
any Dwarfs, but that’s okay because they just needed to clear a
path for the Sons of Bragg.
8. Sons of Bragg:
Use their Fell Call to stand up without penalty, then charge the
Dwarfs. The assault spray misses both the Dwarf and MPV Haley, but
the charge attacks kill four Dwarfs.
At
this point things were looking very good for me. My Fell Caller could
get to the flag next turn and start controlling it, and I could move
my Champions and Mauler towards Haley without any way for him to deal
with them. Haley would be dead pretty soon or I would start getting
an unstoppable edge on CPs.
CYGNAR
CONCEDES: VICTORY FOR THE TROLLBLOODS!
With
her past echo removed, Haley sounded the signal for retreat.
“If
we stay any longer, the lives we lose will be more than those we
save. It is time.”
Travis
conceded the game at this point for four reasons.
1)
Things were looking very bad. I was about to start scoring CPs
without any way for him to stop me.
2)
He mostly wanted to see if this list was an answer for Jarl. Clearly
it wasn’t, at least not in this game, and he had seen all he needed
to see.
3)
It was 9:30 p.m. and the store closed at 10:00 p.m. and we needed to
pack up soon anyway.
4)
We have a ritual of heading to our favorite local watering hole
(http://www.thebeerresearchinstitute.com/)
after our Thursday night game nights, and some of our friends were
done with their game and ready to head over soon.
So
we shook hands. Another victory for both of us, actually, because the
most important thing is to have a good time with good friends. And in
that regard, we both succeeded!
My
Thoughts on the Game:
Two
games in a row without any CPs scored…definitely not normal for us.
But…
Thoughts
on the game…
1)
I don’t think Haley3 is the answer to Jarl, even though Travis
really, really loves her (she has become hands down his favorite
Warcaster to play). Travis really thought that high armor and defense
(plus clouds) would make the echoes safe from Jarl, who was the only
model with magical attacks. While in a way that part was true, he
never really forced me to have to deal with them when they had all of
their buffs stacked together. When he finally moved Past Haley up to
threaten Jarl, he chose to try to remove the Sons of Bragg with her
spells. But this reduced her armor when Jarl retaliated. It turned
out that I rolled something stupid for damage (like a 15 on three
dice), so she would have died anyway, but he certainly didn’t
maximize his chances that she would survive to try to kill him the
following turn.
2)
It’s the little things that get you… Travis forgot that Skaldi
has Countercharge, and as soon as I declared the attack he realized
that it likely won me that flank. While it’s impossible to remember
every rule in a game with this amount of depth and complexity,
forgetting an important ability like Countercharge can really cost
you.
3)
Pay attention during your opponent’s turn. So, to be fair, I was
taking notes as fast as I could type on my phone, so I had a bit of
an excuse to lose track of a model here and there. But I didn’t
notice what he did with Finn on Turn 3, and that lost me my Fennblade
Kithkar on the left flank.
4)
Holy crap, Temporal Flux is an amazing spell when you can spread it
out that far with three members of the unit.
5)
I love Jarl so much. He is far and away my favorite Trollblood
Warlock, and I’ve gotten very good at playing him. So much so that
I’ve mostly retired him from play with our local group. So getting
an opportunity to get him back on the table was a lot of fun for me.