Showing posts with label Guildball. Show all posts

Friday, January 5, 2018

Guildball Batrep #3 – Butchers vs. Morticians


   Welcome back for another Batrep.  I hope you enjoyed the holidays.  We have, but we're excited to get back into the games.  Adam's Butchers showed up, as did my Morticians.  Between borrowing a friend's and getting my own, I'd snuck a handful of Mortician games in while this is Adam's first round with the Butchers.  In light of that, we probably owe this matchup a second round as there's several things we could have done better.


  JD's Lineup


  I have been looking at Morticians for awhile now, especially with the low-def Blacksmiths and Farmers on the rise and I really feel that Morticians are only a good buff or two away from being where they need to be.  I don't think the end of Season 2 nerf to Obulus was uncalled for, but I think it showcased how the rest of the Guild really just supported Super Solo Obulus.  They're not in a horrible spot in the meta currently, but they're not one of the top dogs anymore, and generally show up in the bottom area of a lot of tournaments currently.  As tight as Guildball is though, I don't think they're unplayable by any stretch.  They do need a player that knows the other team as well as his own though because, as with any control team (Hunters), you have to know what to control in order to know how to wreck it.


  I also feel that Mist is a key member of the Morticians right now, as easily their best striker, and it's going to be difficult to fill his place when he's gone.  Hemlock2 is hopefully good.


  That said, Scalpel didn't interest me at all, so she's not in the lineup.  I have since changed my mind because in those games I played, while Obulus was fine into the Butchers, against Engineers I felt like I struggled to kill Engineers faster than they scored.  So I could see a Scalpel lineup being somewhat tempting.  It's worth trying and I wish I had ordered her.


  I have Obulus, Dirge, Silence, Ghast, Casket, Bonesaw, Cosset, Graves1 and Mist in my roster currently.  My 10th option would be Brainpan and Memory but they're not here yet.  When Mist leaves, I'll have Scalpel by then for my 10, but I don't know how I feel about it.


  Adam's Lineup

   So, I've really come to understand that as a Hammer player, I love punching things. It's very satisfying to make models disappear from the board for me so I ended up looking into the Butchers. Since JD got the Morticians, I ended up picking these guys up myself. I think they do pretty well against a blacksmiths guild, when they catch apprentices, and ignore armor. Models like Shank, and Meathook, seem to really hurt some of the low defense models. It seems to me that they're better at opportunistic scoring and I think both captains are pretty solid.

   Brisket 2 is a model I really like in this guild, especially with her ability to give an extra 2 influence to the pool on a score, which makes the Butchers do more Butcher things. I also feel like I'd bring Rage as of right now, for Filet since he does the same basic thing Boar does, but can also apply bleed.

    Picking my ten was kind of difficult, because I still don't know the Guild that well. I end up taking Filet, Ox, Princess, Boiler, Boar, Vet Brisket, Shank, Meathook, Vet Ox, and Tenderizer. I end up leaving Truffles and Brisket 1 off. However, I probably would change this going forward, since the Butchers really seem to lack knockdown. I like Truffles for this, and I definitely feel like Brisket 1 is a good model on a Kick off.  

  Rolloff and Plotcards.

  I lose the rolloff to Adam.  I kept Wingback, Good Marker and Composure for plot cards.  I didn't feel like I had great options, but Wingback is solid for returning strikers and Good Marker is actually great for Morticians.


  Adam: I win my first roll off in what's been like 4 games, so I'm excited to have the chance to choose what I want to do here haha. My plot cards were, Heroic Landing, Knee Slider and Brace for Impact.


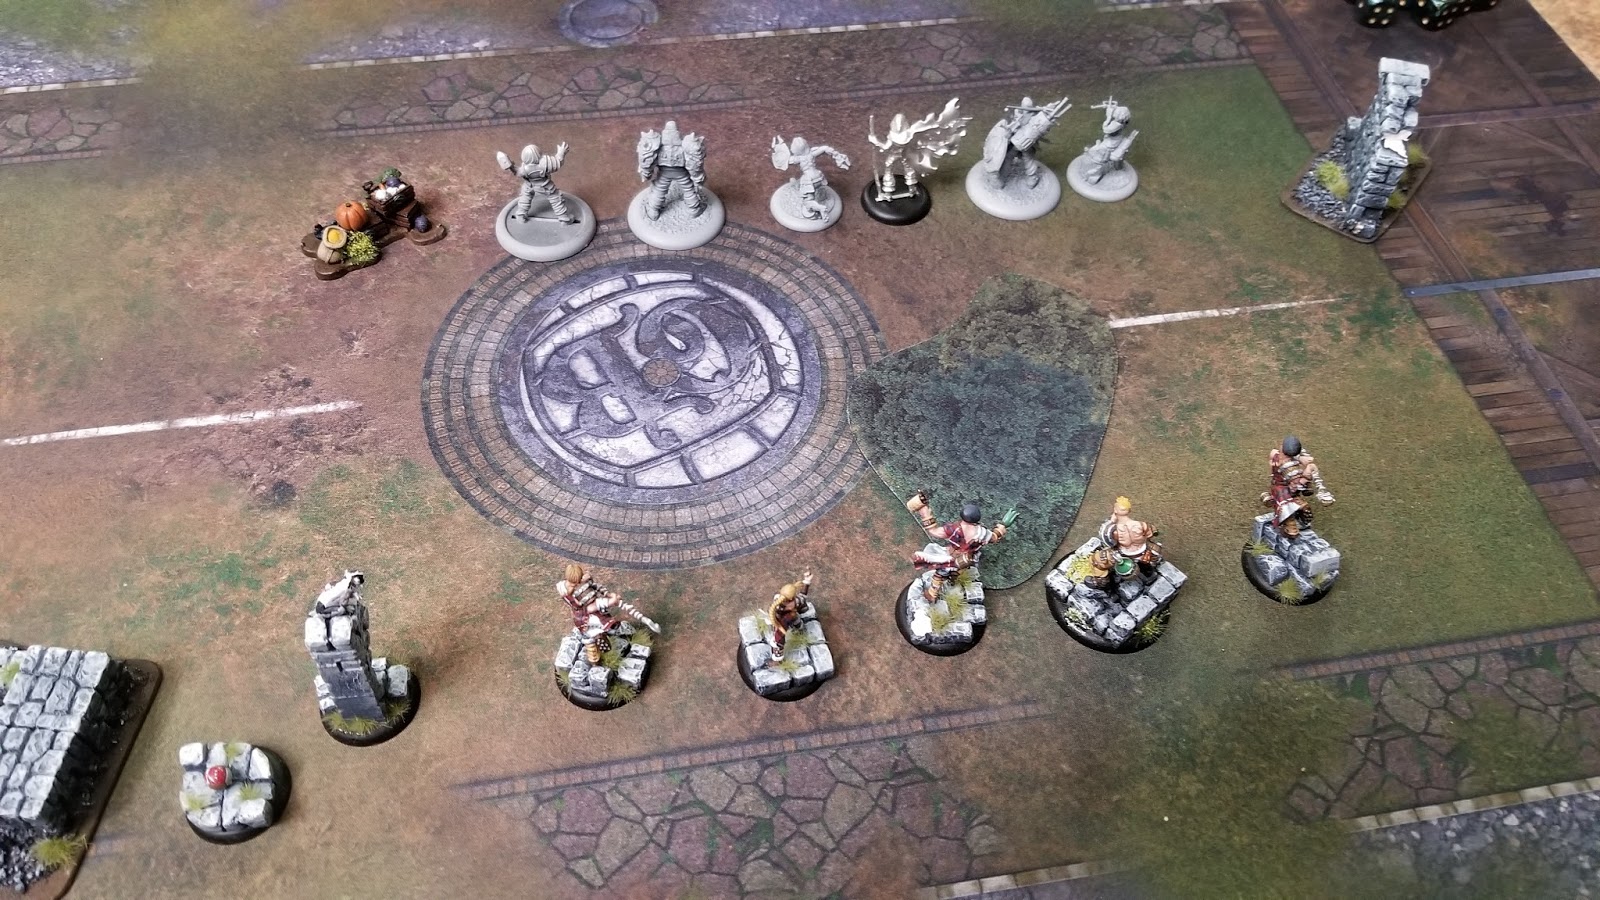
  The Draft:  Adam takes Fillet and Princess, and I take my only two options, Obulus and Dirge.  His lineup, from left to right in the below picture, is Meathook, Brisket2, Princess, Fillet, Ox2 and Board.  We'll have to get some paint on these guys next time since they're hard to distinguish in that flat black, but once the lines get drawn on the game, they really stay in the same spot so I think we're ok this game. 


  Left to right on the bottom is Dirge, Obulus, Bonesaw, Silence, Mist and Ghast.


  JD:  Against Butchers, I have to play ball and I feel really comfortable into it with Mist and Bonesaw both.  I also feel like Butchers will really struggle to catch Obulus, and between him and Silence, I can dictate their flow a bit.  I also picked Ghast because I felt like his Fear ability would be very good into Butchers.  My GIC is Ghost Shot for this game as well, though I feel that overall the Morticians got gypped on the GIC thing.

  Adam:  Going into Obulus, I know this man will be hard to Catch, so I take Filet, and Princess as my mascot. I figure Filet should be able to track most morticians down better than Ox. However, I forgot that while she gives an extra 2 inches of movement, it's not actually a dodge, just a flat 2/2 MOV buff. I took Boar, and Vet Ox for the 2 inch melee, and Meathook to support with bleed conditions, and Brisket 2 since I'm going to be receiving the ball, to hopefully get a first turn goal.

  JD:  I line up somewhat left, shooting through the opening in terrain and give Mist the ball.  Adam deploys across from me, but only leaves Brisket2 across from Mist to retrieve the ball.  Mist jogs up to be near cover for the 2/2 MOV buff and kicks across the field into the enemy cover.  The ball scatters six inches to the right, perfectly, and out of reach from Brisket2 unless Fillet can buff her MOV.  Fillet is on the wrong side of the table, and Mist will get the ball before Brisket2 will be able to reach it.  Mist will be out of range to kick it directly to one of my own players, but we'll get there.  I also have no idea why that token is laying out there next to the ball.

 INF is allocated.  3 to Brisket2, 2 to Meathook, 1 to Boar, 2 to Ox2 and the rest to Fillet.  I give Mist 2, Obulus 5, Bonesaw 4 and Silence 2.


    Adam immediately realizes he over allocated on Brisket2, knowing he couldn't reach the ball.  She gets as close as she can but stays in cover.  I originally had slotted Mist 4 INF as a first turn scorer, but there wasn't any way to make that happen, so with his 2 INF, he acrobats up 2'' staying in cover, and sprints to the ball and back two and a half inches.

  Princess shuffles up the board.


  Obulus move up to within 8'' of Mist.  He puppet masters Mist or a kick which is successful, and Obulus punts it to Ghast, also successfully.  So far so good.


  Meathook runs up the board.  Ghast drops the ball in front of Bonesaw and jogs forward.  Boar sprints up, staying out of the rough ground.


  Then I get excited and skip pictures because I'm a loser.  It's pretty simple though.  Dirge moves into cover, staying in range of Silence.  Ox2 moves up, staying out of rough ground.  Silence picks up the ball, sprints up and kicks to Bonesaw who dodges up 4''.  Fillet sprints forward and puts down Pain Circle on Bonesaw and Silence.  She misses Bonesaw but pegs Silence.


  Bonesaw charges into Boar and Princess and lands the Unexpected Arrival.  This shoves Boar back 4'' into Fillet and into the rough ground, but he leaves Princess where she's at.  He's under an inch away from goal, so he swings at Princess, needing a single net hit (so two, after armor) to get the momentous dodge on one to move up and shoot but misses.  With his last INF, and kissing goodbye to first turn goal and therefore extra INF turn two, he buys another attack into the dog and gets the momentous dodge then.  The turn ends and I have 3 or 4 momentum, and win to go first next turn.


  This is mildly disappointing since I expected to go first next turn anyways, but I would have had the chance to recover the ball on the first activation with Bonesaw or Mist, score again and still have a Striker and Obulus both to go for the third goal later. 


  I allocate 3 to Bonesaw, 4 to Mist, 5 to Obulus and 2 to Silence again.  Brisket2 gets two, Meathook 3, Board 1, Fillet 5 or 6 I think and Ox2 gets 2. 

  Bonesaw open the ball with a swing on Princess, who counter attack.  Bonesaw gets the momentous dodge and dodges back, wasting the Counter attack.  He then moves around to the back of Princess, abusing his 50mm base to be in melee range of her and tap in range of the goal.  He buys another attack into her for another momentum and fires into the goal, and I land a screamer for two momentum too.  Bonesaw then dodges off to the right trying to stay away from the murderball on the left.  Score is 4-0 Morticians.

  The ball scatters and lands on Brisket2, where Adam is attempting to score with her.  Meathook activates and charges Mist.  Mist Defensive Stances and Meathook whiffs the dice, missing everything.  With his last attack, he hits and does a little damage, applying bleed.  She heroics, which gives a -4/4 MOV debuff to everything bleeding in 3'' of her.  This was something I was not aware of, and I think an excellent play.  It hamstrings me considerably for the rest of the game and I spend most of my time trying to avoid that nonsense.

  I originally intended to activate Mist next and immediately score with him, but everything I need him to do is kind of chancy without some help.  I have some momentum, but not enough, so Obulus activates.  He moves up, stays in cover and beats up Meathook a bit.  I don't do more than 4 or 6 damage, but I dodge two or three inches.  Either way, I pick up a momentum for every single INF Obulus had, and I think I Legendary at this point too, to get two more. 


  Fillet charges Silence and does a number on him.  I, again, Defensive Stance and that mitigates it considerably but she still kills him, removing his INF from the board as well.  She dodges back to the safety of the wall.  4-2 Morticians.

  Mist activates.  He acrobats out of Meathook's range, and then hits Fillet.  He gets the tackle on the first one, then cranks the dice on the next one for a double dodge.  He hits her again for another momentum and bonus times a kick to Bonesaw.  I spend the momentum to snapshot, and bonus time that as well.  It works, and the score goes to 8-2, Morticians. 


  Adam puts the ball way out in left field, literally.  He then activates Ox2.  Between a cheaper charge from "Vindictive: Male" and his GIC, Ox2 charges Ghast for free and does whirling chains to suck him in.  I counter attack and shove him back two inches but whirling chains caught me and Ox2 is able to buy another attack.  However, while he ignored fear on the charge, he pays it for the second attack.  He does only a few damage.  I shoved Ox2 back in a way though that means Boar can't get into Ghast, which I think is neat. 

  Feel free to correct us internet if we did that wrong.  We're ok with the outcome unless it means Ox2 could have gotten a charge and two more attacks instead of just one.  That would be good to know.


  Dirge activates, and I seriously consider using him to get the ball, but I feel like he auto dies to Boar, so I run him towards center.  Princess moves into contact with Bonesaw.  Ghast just hangs out really since I don't want him to give up center.  This leaves Boar to charge Bonesaw.  This is problematic, and I wish I had left the option of Ghast available because I would much rather him charge Ghast than Bonesaw.  Bonesaw defensive stances but it still hurts. 


  Brisket2 then moves in and finishes him off pretty handily, taking the score to 8-4 Morticians still.  Adam is way up on momentum, so he wins the initiative roll and goes first.  Fillet gets fully loaded, Boar gets 1, Ox2 2, Brisket2 just one and I think Meathook gets setup ok.

  I bring Bonesaw and Silence both back on the left side.  Fillet is right there and can kill one of them at least, so I try to put Silence in the way but I really can't since Bonesaw is faster, and I need him as far up as I can get.  I just have to hope for the best.  I give him 4, Obulus 5, Mist just one or two, Ghast two, Dirge 1 and Silence 2.  The 2 goal INF are really helping.  I'm still only a goal away from the win and I feel like Adam has some serious catching up to do, but Mist is in a bad spot.  Bonesaw and Silence are both half dead near Fillet and I really don't know if I can get the ball this round.  If I can't, I'm pretty sure that's game because I wasted Obulus's Legendary early.  It got me the second goal but I don't think I needed the measly 2 momentum I got for it.

  Fillet immediately walks into Bonesaw, which I expected.  I declare a counter attack.  She easily cranks damage on the first hit, and Bonesaw dodges back and inch with the counter attack.  However, being base to base on the initial attack, Fillet is still in melee with him and I really feel like this is it.  She hits again and does Blood Rain.  Then she misses.  Then she does bad and only gets one damage.  Then she misses again and Bonesaw is alive on one.

  So you're saying there's a chance.

  At this point, we are low on clock.  I have about 10-15 minutes on Adam, and I'm feeling pretty good after that turn.  Even if I can't retrieve the ball, he was in the tank long enough on the last four activations of his that if I just keep my time tight, I don't think he can beat me.  We would probably still play the game out though since he's new to Butchers and clocking out on an early game kind of sucks.  So I want to go strong here. 

  I need the ball though.  Silence activates.  Fillet never engaged him, so I'm planning to sprint to the ball and then here I go into the tank for a few minutes, immediately breaking my clock agreement to keep my time tight.  I originally was going to retrieve the ball and kick to Bonesaw.  Silence gets an extra dice because he's near the bird, but I need 5s to succeed on a kick to Bonesaw because Fillet is in the way.  So rather than picking up the ball, Silence throws a Shut Out at Ox2 because Ox2 is the only player on that side of the table that can finish Bonesaw off.  If he's shut out, I have time to build momentum and be able to heal Bonesaw before he makes the goal run.  If Silence misses, he can snap the ball, and hopefully Obulus can puppet master it off of him later in the turn.  None of these options are great though.  Silence throws the shut out and gets it, locking Ox2 down.  I put him near the ball and it goes to Adam.

  Adam now is on a timer, both because of his clock, and because Bonesaw is just a matter of time.  Boar charge Mist and struggles against the 5/0 but does decent damage.  Dirge flies over Ox2 and hits him once for Singled Out.  Fillet goes to town on Mist.  He's already bleeding so she annihilates him and uses the dodge to get into Obulus without triggering Unpredictable Movement.  This takes Adam to 8-6, still in favor of Morticians.  Meathook uses her last INF to damage him and then heroics onto him again for that -4/4 MOV nonsense. 

  Ghast moves into cover and then hits Ox2 twice.  He KDs him and then does some damage.  I don't care what at this point, I just want Momentum.  Hilariously, the damage from Ghast triggers "Lash Out" on Ox2, doing one damage to Ghast.  This in turn triggers Rising Anger as best we can tell since it doesn't specify Attack, Character Play or anything like that, just enemy model. 


  Brisket2 sprints up near Obulus, but that's bout it.  I have enough Momentum at this point to do what I want to do, so rather than activating Obulus to farm some more and let Adam run Princess up to block the goal from Bonesaw, I activate Bonesaw.

  He spends one momentum to heal immediately.  Then he swings at Fillet, who counter attacks.  Bonesaw gets the 1'' dodge though and misses the counter attack.  He sprints for the ball and picks it up.  Then he bonus times a kick to Silence successfully.  Silence bonus times the kick back.  With 5 dice on the kick thanks to Dirge and bonus time, it's also successful and Bonesaw dodges up four more inches, putting him range of goal.  He bonus times the shot and scores, taking me to 12-6, Morticians. 


  Thoughts on the Game

  JD:  I think that game was much tighter than the score lets on.  If Fillet's rolls had gone differently on Bonesaw, he'd of gone to 8-8 pretty easily, and then Silence is really struggling to get away without dieing and I don't know if Obulus can get the ball and score too.  It's tight.  With only 5 INF, probably not since he'd likely need to sprint to be in range.  He'd be able to pick it up but that's it and I doubt I would go first.

  I also might should have retrieved the ball with Dirge, but looking back, I'm still sure he would have died and the ball would still be up in the corner.  The gamble with Bonesaw and Silence was still probably my best plan.  I wish I had backed up a bit more though.  If Fillet couldn't charge them, it's possible I could have still gotten the ball back to Bonesaw with Silence.  I don't know.  I knew I was going to have to survive Fillet regardless, and I think I planned for it poorly.  At the very least, just bring Bonesaw and Silence in and let Obulus, Ghast and Dirge go for momentum all day and try to go first.  I'm lucky Bonesaw survived that.

  I also thing I benefitted from a really solid kick scatter at the beginning.  Not allowing Adam to use the ball at all for movement or momentum was really the worst of both worlds when going first or second.  I was still pretty sure I could recover with Mist and score first turn, and I'm a little miffed that Bonesaw didn't.  Scoring first turn, then going first and scoring again could easily end the game by the middle of round 2 and against Butchers, I have to end it fast.  Bleed and just the massive amount of damage combined with Mortician's crappy GIC heal rate means I just lose the attrition fight. 

  Adam also deployed horribly.  Fillet, who has very strong threat range, was out of the fight for a good chunk of the early game.  I'm pretty ok with Boar, and was happy to see him rather than Shank.  Meathook was surprisingly annoying and that's one cat I'll have to watch out for in the future.

  Adam:

  The Positioning in this game makes me cry. There were just a ton of little mistakes on my part that really could have changed the way this game goes. As I've learned with the Blacksmiths, and now here with the Butchers, the position of my players is always key. Going back I would have definitely deployed filet over to the side with mist and put meathook with her as well. Then I would have at least been able to get the ball, and Dodge Brisket 2 up to try and score. I would have also shuffled Ox and Boar around here.

  Another big mistake I make at the end of this game is the Bonesaw situation. He should have died, I'm not sure why I used blood rain, thinking that making him bleed would outweigh two more attacks. If I had done that. It would have been a 8-8 game like JD said, and then Boar or Meathook would have ended Mist, putting this into a 10-8 game making this much closer. I had a lot of Filet's abilities mixed up in my head while playing and taking more time to read over them now, I may have even taken Boiler with me here, because of princess, and the bleed effect. I think that would have been better for Filet over all. Granted, Boar does some good damage here.

  After turn one, even though I was down about 8 I really never felt too much pressure. It's interesting playing with the butchers just because of the fact that, catching up doesn't seem to be so bad. Granted, it's nice to not have to catch up but, I was kind of surprised how easily I could just drop models. I really got a lot out of Meathook as well, she did solid damage, and really debilitates a model. Being able to take defense down, give someone bleed, casually put on 6-9 damage on a player, and then make it to where there move is reduced by -4/-4 is really great to me.

   My GIC, which was Take it to' em was also very helpful in this game, Brisket gets a free charge from the wing, Vet Ox can get a free charge on a Male, it was handy every single turn, and I always found a way to use it. However, due to the team only being able to heal three, I could see myself also taking blood thirst into a team that really wants to fight with me. This way I could get the Life Drinker ability, which allows me to heal 1 after every playbook damage result. 

  After it was all said and done, I really enjoyed the Butchers, I definitely see myself playing them more in the Future. I actually didn't find losing too frustrating with them, just because I would get excited every time something would just get eviscerated, when I was on the war path.

 JD:  We followed this up with another Butcher game, this time into me playing Blacksmiths and it was another tight game.  Adam tightened up his positioning but a couple of turns in the tank put him over on the clock again.  I've played against Butchers many times, and it continually surprises me how fast they kill.  This Mortician vs. Butcher game was a lot of fun, and I enjoy Morticians, but I don't know that they're a playstyle I want to play every game, unlike Union or Farmers.  Or even Blacksmiths.  Great game though, and I'm looking forward to pushing new Guilds.

  We have a tournament coming up at the end of this month, so the next few Batreps may have us on our home turf.  Adam will probably swing back to his beloved Masons, which we haven't had on the batrep yet, and I'll go back to my Farmers.  I may sneak a Union game in there but we'll see.

  Enjoy the batrep, feel free to leave comments, critiques and rules corrections.  Enjoy your weekend!


Wednesday, December 27, 2017

Guildball for the New Guys - Surviving your Opponent's Next Activation


  In the last New Guys article, we covered surviving your own activation.  Getting through a charge or an attack without getting sidelined and wasting an activation.  Today, we get to deal with the repercussions of your opponent's next activation, and how you can be the one to sideline and waste their activation for a change.


  We'll rehash a couple of things, like Counter Attacks and Defensive stance and we'll delve a bit more into when to use them, rather than planning against them.  We'll also start working on the next layer of the game, where you're thinking an activation ahead hopefully.  I'll break it into two categories.  Reactive Measures and Preventative Measures.


  I'm straight up making these terms up as I go, so bear with me. 


  I'm defining Reactive Measures as what you can do during your opponent's turn, and Preventative as things you do during your own activation.  We'll deal with Reactive first because it's hard to do Preventative without understanding how to use your Reactive abilities, and therefore enhance their effectiveness.


  Reactive (Counter)Measures. 

  For starters, most of this is dependent on you having Momentum.  My first activation, I ideally want to either net 3 momentum or score a goal or both.  Usually, netting 3 momentum is the best available option for a variety of reasons, most of them being I don't have the ball.  However, I'm a big fan of fighting teams, and a lot of times I can generate that momentum by killing a model so now I'm 2 VP up, 1-6 momentum in the bag, and I have nearly guaranteed last activation for myself unless I in turn lose a model. 


  Scoring a goal usually is better, especially if you have the ball.  Otherwise you're leaving yourself open to having it taken off of you and all sorts of things.  I usually refrain from scoring only if I'm behind on points against a team that can immediately counterscore.  Regardless, you need some momentum to score effectively and you're going to have to farm some anyways.


  I say 3 momentum as a goal for a few reasons.  Right off the bat, it lets me do everything I want in the next two activations.  It lets me Defensive Stance and/or Counter Attack during my opponent's next activation, and lets me clear conditions on my next activation or use a heroic.  3 is a good goal. 2 is ok.  1 can hamstring you pretty badly, specifically in factions that are very Heroic dependent (Brewers) or against a condition team (Alchemists) where you can count on wanting to clear conditions at the start of an activation.


  So if you're not scoring, you need to generate momentum with the first activation.  This is easy in teams where there's momentous damage.  You can kill a model and get momentum at the same time.  Win/win.  Masons struggle a bit more because their high damage is non-momentous, so they'll have to weigh momentum vs. killing a model.  If you kill a model and only gain 1 momentum out of it, does it mean you just handed a model to the opponent?  That's really the question you have to ask.


  Defensive Stance

  Defensive Stance is +1 DEF against charge attacks, or, if you're already at DEF6, it's -1 TAC on the charge.  I personally feel like the value of Defstance goes way down after DEF6, so if I'm low on momentum it's rare I'll use it.  +1 DEF affects every single dice, while -1 dice just affects one. 


  What does it change?  Let's pick an example.  I like picking on Hammer, so we'll use him.  Regardless of the model, you know there's +4 TAC extra because it has to be a charge in order for us to use Defensive Stance.  So unless it's a mascot, you're looking at around a minimum of TAC8 on the charge.  Hammer will be TAC11 on the charge.  Since most of the time you charge, you're looking for high playbook results, so we're looking at 5 or 6 hits initially. On a DEF 4 model, there's a 50% chance of 6 hits at Hammer's TAC11, and 72.55% of 5 hits.  If I defensive up to a 5, it drops to 12.20% for 6 hits, and 28.89% for 5 hits, and this is before ARM so you're talking a 76.58% chance for 2 net hits after ARM if you want somewhat reliable results.  DEF4 and DEF5 are, I think, the winners for using DEF stance.


  DEF3 has 96.13% chance of 5 hits before ARM and 87.79% of 6 its.  DEF stance gets us to the numbers we saw a minute ago, 73.55% for 5 hits and 50% for 6.  DEF2 just gets worse from there.


  Given the effectiveness of it, or lack thereof on models like Stave at 2/0, We start having to do things like math and knowing our opponents cards. 


  Why Defensive Stance? 


  1.  Because you're going to counter attack is a great reason.  The best, even.  It's expensive at 2 momentum, but if this is a key model you need alive (Unactivated, has the ball, or is a really nice paintjob that looks bad on the sidelines) then the 2 momentum is worth it (1 for Defstance, 1 for Counter Attack).  In order to counter attack though, you need to stay standing.  Let's talk Hammer again.  Hammer is a problem here at a KD on 2.  Defensive stancing from a 3 to a 4 still has a 96.72% chance of getting the 2 net hits after ARM for the KD.  In fact, you have to get all the way up to DEF6 with 1 ARM (Or cover) before the chances are in your favor.  So against Hammer, it's not as good. 


  Ox, on the other hand, doesn't see his KD until column 4.   Deffing up from 3 to 4 with 1 ARM gets you down from 88.67% to 72.55%.  Not great, but if I have the momentum, I'll do it.  From 4 to 5 though, he goes to a 28.89% to get the 5 hits he needs to hit his KD after removing a hit for ARM.  Def up from 5 to 6 is just money in the bank.  We're seeing real value of defensive stance against Ox rather than Hammer. 


  This goes for a Tackle too.  Hammer has a Tackle on 2, but against Mist, going from a 5 to a 6 takes him to 56.93% for that Tackle.  We're right at a coin flip here and asking our opponent some tough questions because as soon as this attack fails, we counter attack.  Mist has a Push Dodge on 3 and a Dodge on 2.  Against Hammer or Ox, if they're not base to base, Mist is probably gone.  Against a model like Stoker... Hey, let's talk Stoker.


  Stoker's a 3/2.  We're kind of talking lousy def stats, but at 3/2, they need that extra hit.  Ox's KD on 4 needs 6 hits against Stoker to work, and at DEF 4, that's exactly 50%.  If Stoker doesn't go down, he counter attacks with a double push on 1 and Ox is out of the fight.  Hammer probably still gets it with an 88.67% chance of getting the four hits he needs for that Column 2 KD, but this is why we learn our opponent's models.  Ask for that card before you make a decision.


  Speaking of Ox and knowing cards, I'm aware he has "They Ain't Tough" for -1 ARM that he can either apply in combat or from 6" away.  This leads me to my next point.


  2. To waste resources.  We'll cover this a bit more in the Counter Attack segment, but it's a valid point here too.  I might not counter attack with a lot of models, but still Defensive Stance against a kill.  If I can prevent a wrap or a high playbook result like a momentous 7 damage from Sledge, it's worth me defensive stancing if those odds put me into the "Likely to survive category".  Now he's wasting resources on this kill.  Same goes for a high Tackle. Spending more INF to kill me, or take the ball if he doesn't get the hit he needs on the charge can hurt the dice math a lot.  Especially since the Charge is usually the most important attack.  It's the most dice, the most resources.  In many cases, it's the best chance they have of getting the high result they need (Tapper's column 4 Commanding Aura is a great example, as is Ox's KD on 4) to finish out that model this activation.  If Tapper fails to get CA, his dice math go downhill.  He really wants CA and a wrap to the KD but that doesn't happen often.  If you have the Momentum, you can really ruin some otherwise good odds of killing your model.


  The goal is to force them into a decision where is it better to walk in with lower TAC on lower DEF or charge in with higher TAC on higher DEF?  Some models at TAC6 or 7 can do it on a walk but when you start looking at TAC5 and lower, it becomes a dilemma.


  Why Counter Attack?

  This one is easier to answer.  In fact, some of the discussion here is Why wouldn't you counter attack?  We'll do the Why first.


  1.  To Neutralize the Threat is the obvious answer.  We talked a lot about this in the previous article, but from the perspective of what to watch for when they counter attack.  Many models in the game are designed as strong counter attackers.  Stoker, as we mentioned before, is a great example at 3/2 and a double push on 1.  You absolutely have to KD that guy if you don't have 2'' melee, or you're gone. 


  This also helps you position your models if you understand what makes a good counter attack.  I can be fairly brave with Stoker and offer him up as the easiest model to get into (he's slow, so I often need that anyways) because I'm fairly confident he can weather the attack from a 1'' model.  Stave is similar with 2'' melee and unpredictable movement.  With a low push, he can dodge out from a model, counter attack and be out of the problem. 


  So what are we looking for?  Unpredictable Movement is nice defensive tech, but it's not enough.  Good counter attacks are going to be pushes, dodges, KDs, double pushes and double dodges and lastly, a few guildballs, within the first two columns.  TAC6-7 can have good options up to column 3 but in most cases, you want no more than column 2.  You're also wanting a combined DEF stat of 5.  So 3/2, 4/1, 5/0.  2/3 is...ok but a charge is probably going to get what it wants regardless against a 3/3 under defensive stance.  This is before defensive tech and positioning.  So, combined DEF of 5 and good options no later than column 3, but really, column 2.


  Single Push/Dodge on one or two is the beginning, but it doesn't make a good counter attack.  If your opponent did not base to base you, great, awesome.  If he did though, this is not going to disengage you.  Use it to push them into melee with another model if possible.  Single dodges are slightly more useful because you maybe can dodge into cover or out of a crowdout but these are still not amazing uses of a counter attack.


  Knock Down.  I use to think this was the peak of Counter Attacks and this is really not true at all.  Knock Downs are cute, but all it does is force them to use a momentum to stand up, and they can quite likely get momentum on the charge.  So they declare a charge, you declare a counter attack and instead of taking the non-momentous higher damage, they take a lower momentous option.  A push maybe and push 0''.  Then you KD them, and they spend that momentum to stand right back up.  The upside to this is that you traded 1 momentum for their 2 INF.  That is one nice thing about Brewers and their momentous KD.  They can dodge the counter attack and get momentum for it anyways, but it's still hard on the math when they're trying to kill a model.  The exception to this is if a model began it's turn with conditions and had to clear them before attacking.  Now, KD is the best thing on the market.  Keep that in mind when you're deciding your opponent's next move.  It might be worth getting a random KD on his loaded basher so you can have a good Counter Attack later.


  Double Push, Double Dodge, or Push Dodge.  These are probably the best, most accessible Counter Attack results.  It completely negates 1'' melee and requires a base to base 2'' melee model to deal with.  This means you can position just outside of their base to base range and even though they can get to you, you can push them out if you have a reliable counter attack.  Or dodge out.  Or push dodge out.  Whatever gets the 2'' distance you need.  I find these to be the most consistently reliable options.


  Lastly we have Guildball options.  Specifically, the strong ones are Where'd they Go? (Flint, Greyscales, Ulfr, Shank, maybe some more), Ball's Gone (Spigots, Greyscales, Brisket2, Bushel off the top of my head), or really anything that has a strong push like The Unmasking on Ghast and Fangtooth.  Those will disengage abruptly.  Ferrite has a sneaky one now too called "Disarm" which is -2 TAC.  That'll hurt your dice math pretty badly. 


  These options and the defensive stats we mentioned make a solid counter attack model.  These are the guys you want to dare your opponent into because of their ability to neutralize the threat.


 2. To waste resources.  We have covered this a little bit, but I'll counter attack to force the KD.  I'm more than happy to make you KD me for little to no damage and dodge that column 6 high damage option on the charge.  If you get the damage, I'm a few attacks from dead, but now I'm relatively safe in many cases.  Less so against Captains but still. If you don't KD me, I escape.  This is a useless dare if you don't have any good counter attack options.  If I'm base to base and you're unlikely to get above Column 2's single push, meh.  Do your best.


  The pickle in all of this is tackles.  You charge in for the ball and I declare a counter attack.  You can't KD me though because the ball scatters.  Sucks to be you, this is a lose lose decision unless you have close control on your charging model.  Then you just hope I don't have an early KD or Ball's Gone.


  3. For Setup on future activations.  Now we're thinking ahead, but this is one of my favorite things to do.  There's three things here.


  A.  Incidental damage.  Maybe I can get a couple damage on a model early on so my next activation is more assured of killing that model.  This is a rare occasion but it has happened.  Usually it's someone that goes into my Captain knowing they can't kill them, but knowing I can't escape either.  Either they waste INF on the KD, or I counter attack and apply some out of activation damage.


  B.  Playbook Guildball options.  This is my favorite way to get Singled Out applied.  If the model being attacked has a great debuff like Weak Point, or Thousand Cuts, or Dirty Knives, anything like that, it might be worth counter attacking because now, you've applied this debuff out of activation for one momentum.  Clone is also a great option on Vitriol, Snakeskin and... that's it I think.  Clone's actually really solid since they'll do the charge or whatever, you counter attack and then the next attack is just wasted, and you get a 2'' dodge away, and if they choose not to take another attack it's still good for the rest of the turn.


  C.  Sturdy/Gluttonous Mass/Close Control, go away.  This is my best anti-Corsair tech.  Pop that Sturdy or Close Control, whichever is more important.  Get it gone now.  Sure, he's going to beat you up and he knows you can't push him away or dodge out with Tapper, so he just does damage because he needs all the damage he can get to finish you.  So you counter attack, get the KD and it does nothing.  Now, however, next activation, any single Brewer can KD Corsair.  He's pretty vulnerable now, or he has to spend an INF to gain sturdy again.  This is great on models like Esters, Compound, Flint or really anyone with one of those three defensive techs.  Get them gone while you can so the next activation doesn't have to deal with it.  Efficient use of resources, right here.


  NOTE:  In case you didn't know, you can bonus time a Counter Attack.  If you're rich on momentum or desperately need the Counter Attack to work, this is an option.


Why wouldn't I counter attack?


  Now the tricky part.


  1. Because there is no hope.  Sure, Stave has a KD on 1 with TAC6.  Seems ok except he's 2/0.  He can Defstance up to 3/0 but we're still pissing in the wind.  Even Harrow at a 3/0, Defstance up to 4/0.  Hammer's KD on 2 is still going to get there.  Let's not throw momentum away.


  2.  Because we need the Momentum.  Counter attacks are great but sometimes you need that momentum really bad.  I've made this mistake many times where I have a mediocre counter attack and one momentum.  So I take the counter attack, down to 0 momentum and the counter attack doesn't do anything decent and now, my model is KD and I could have really used that momentum t stand up and do something.  That's the normal scenario.  Before you spend that 1 momentum you have on a Counter Attack that isn't a sure bet, make sure that it isn't more important to have it for a heroic or to clear conditions.


  3.  Because you have Close Control.  Let them waste the tackle.  Now they attack again.  Counter attack now.  They tackle the ball, you tackle it back.  It takes 3 INF to finally keep the ball.


  4.  Because you might counter attack on the second attack.  Their KD is on column 4 or 5, so they need the charge to get it done, but you don't declare a Counter Attack.  So they do straight damage and then you declare a counter attack for the next swing.  Surprise!  This is also gambling and illegal in some states.  On the plus side, it's kind of a win win.  If they KD you on the charge just to be safe, you cost them 2 INF for free.


  5.  Because you don't want Knocked Down at all, actually.  You're pretty sure you can survive the activation and you'd rather start it standing than knocked down.  So weather the storm and don't give them any incentive to do otherwise.  This does not work against factions that have KD in nearly every playbook and bonuses to KD models (Brewers, specifically, but Farmers have a lot of KD too)


  6.  It won't accomplish anything for the goals of the game.  They're not going to kill you this activation.  You can't escape them if you did counter attack and you don't have the momentum to just hand out freely.  So buckle down and wait your turn.  Don't throw away Momentum you don't need to.


   When to Defstance and when to Counter because I've got all the momentum of an uphill-traveling slug.

  In a lot of cases, Defensive Stance is really only useful if you can immediately Counter Attack.  Without that follow up, Defstance starts losing it's worth.


  So when is it more valuable than a counter attack?


  1. When the DEF is already high enough to really negate the charge results.  Mist is a good example.  At 5/0, he can go to 6 and +4 TAC on the charge is looking rough.  The rest of the results are going to struggle to reach high enough into the playbook to do the job because you negated the best chance they had at doing work.  In most cases, he's trying to hang onto the ball.  Against Close Control, do Defstance.  Against low DEF stats, do counter attack.  One note is that on someone holding the ball, it's unlikely they'll KD you so you have good chance of getting a Counter Attack off.


  2.  When a counter attack is pointless.  Using Mist as an example again.  At TAC4, there's a lot of models he's pretty much useless counter attacking against UNLESS they take the ball and you can retrieve it.  Then it's maybe ok.  The other way it's pointless is if they have Close Control.  Mist can't even get it back, and really, you're better off staying in melee so they have to risk a Tackle to leave or spend INF on a dodge of some sort (Where'd they Go, Acrobatics, Quicktime). 


  3.  When they're not likely to stay there for more than one hit.  A lot of times, I'll charge someone, bounce off with a Momentous Dodge or Double Dodge, or my favorite, a Tackle Dodge like what Brisket3 has.  So I hit once, take the ball an I'm gone.  This kind of slides into a Pointless Counter Attack like in option 2, but if it's not really the same.  Especially if they already have the ball.  Shark is a really good example here.  Shark likes to charge into a model, get his double dodge and bounce into range of the goal with some momentum to spend on the kick.  If you don't have 2'' melee, you can't even reach him, and what you need to try to do is negate that Momentum.  Defstance is the answer.


  So now, onto Part II.
 
Preventative Countermeasures


  We understand the Counter Attack and Defensive Stance Basics now.  Let's back up an activation and see what we can do to further maximize their efficiency. 


  It's inevitable that your models are going to be attacked.  That's the game.  That's how it works.  The idea is to force the opponent into scenarios they don't like.  This isn't always possible but you would be amazed at how much more efficient your defensive gameplay becomes when this is in the back of your mind.


  By maximizing our defensive efficiency, we're talking about several methods.  There's defensive tech like Character Plays and Passive Abilities.  There's terrain, and there's positioning.


  Let's talk about the basics, the little things.  When you pick a model up and you move it, you have to get away from the Point A to Point B mindset.  If you have played another miniature game prior to this you've probably already got some idea of that but many, many people are new to this genre entirely so let's talk about it.


1.  Terrain.


  Terrain is a big deal.  There's less in Guildball than say Flames of War or for sure Infinity.  Games like the Batman Miniature Game and Infinity are both more invested in the terrain than the minis themselves.  Yay, I got Batman and 5 henchmen for 60$.  Now I need 300$ in terrain.  GB doesn't require that much investment in terrain, but if you're not playing with any, you need to start.  Terrain benefits many models in the game like Mist, Sakana and many others with passive abilities. 

  It also blocks charge lanes and grants cover.  When you look at an 11 dice charge into Stoker at 3/2, Defstanced up to 4/2 and standing in cover and needing 4 net hits (6 before ARM) to reach the KD in Ox's playbook, cover drops from 50% to 37.69%.  Cover can be a big deal.  I said before that minus one dice by Defstancing a 6/0 model is kind of a waste of resources, and I agree with that still, but doing it for free in cover is great.  Cover is more efficient against the following normal attacks though too.  TAC6 down to 7 against a 3/2?  That sucks.


  I mentioned charge lanes.  This is some fine positioning, but make note of the models with INF allocated to them and what their jobs are.  If Mist has 4 INF and is within a foot of you, moving to where there is terrain between you both negates it pretty considerably.  An obstruction or a barrier stops the charge completely.


  In the example below, Mist (technically Alloy in this particular game, but in this case it's the same effect) is stuck up behind cover.  Hooper has the ball and is well within range of Alloy/Mist but he can't charge over terrain, which is an immediate 2'' drop in threat range.  Technically he could dodge out around cover and then charge, but that's why Friday is right there, to block that.  Friday's a 4/1, in cover, and to engage her he has to be engaged by Tapper too.  So now we're talking being down 2 dice before swinging.  And, if he breaks loose and gets into Hooper, Hooper is a 3/2 with Tough Skin and in cover, and will Defstance up to 4/2 and counter attack.  It's a tough nut to crack.


  Everybody ignore Cinder, since she solves this problem.  I dislike her immensely.


  However, this is some ok positioning on my part, taking advantage of the available terrain and my opponent's mistakes. 


  Forest and Barriers also block Line of Sight.  No charge if you can't see the model.  Forests force a model to glide as well, so they're sprinting through and attacking.  You can't defensive stance that but you're definitely dodging a charge and you don't have to deal with +4 TAC.  Rough ground is ok defensive terrain but once the momentum starts accumulating it's benefits go way down.


  Here, I've got Stoker, with the ball.  He's within kicking range of Friday, who could easily score at this point from where she's at on the pitch.  The problem is Mist.  Friday could take the 4'' dodge back  but the large bubble is just Mist's movement + acrobatics.  He has another 2'' melee after that.  It's doubtful the dodge will get her out of range, and if Mist has access to momentum and he likely does, he'll glide.  If Mist has no momentum, the pass to Friday is probably not a bad move.  However, in the event that he does, Stoker's going to sprint away to the trees so that he still moves forward.  It's not that he's out of range of Mist at this point, but Mist will have to acrobatics forward, sprint and buy an attack because currently, he has no line of sight to Stoker in the right picture.  That's 3 INF, and Stoker will be at 3/2.  It's doable, but not great.  And then Mist is stuck out there with the ball and Friday can come get it.  The important thing to note is that while it's tempting to get into cover with Stoker at the treeline and go to 3/2 w/ cover, if he does that, Mist gets line of sight and can charge.  Right now though, tucked in like he is, Mist can't see him.  The other option is for Stoker to back up to the box and give up ground.  This is probably the safest play, but if it fails, Mist will be in range for a goal.


  If you're hiding behind Fast Ground, I can't help you.  Please make better life decisions.


2. Positioning around models


  While we're on the positioning soap box and have that first picture, you can hide behind your own models.  Heck, you can even use his models to block charge lanes.  Friday is extremely safe because Tapper is there to crowd out.  That means nearly any of those models have to deal with negative 1 TAC for Tapper, and another negative 1 TAC for cover, plus the resulting Counter Attack from Friday will have +1 TAC for her.  This is before we factor in Commanding Aura being up on Tapper.  Recognize the opportunities.  Friday's where she's at because of a conscious decision.  She could have been over a bit more to have better accessibility to the board but she is far safer where she's at.  Use your other melee ranges to cause problems for other models.  Farmers are really solid at this with so much 2'' melee, as are the Fishermen.  I like to leave a ball on Jackstraw at 5/0 and tuck him in around Harrow or Grange or Tater.  Anyone with 2'' melee, if not two or three models.  Come and get it.  Negative dice for you, bonus dice for me.


  Here, Mercury has the ball and Ballista wants it.  Ballista can get to Mercury, but not without being engaged by Vitriol.  This can be potentially solved by Ballista shooting Vitriol for the 2'' push and KD but now we're throwing 2 precious INF at a side target that's got 5 DEF.  I haven't removed the possibility of him taking the all from Mercury, but I've certainly discouraged it by simply positioning near Vitriol.


  A small thing to remember too.  The best workaround to most counter attacks is to base to base a model so even if they push you out, you can probably still reach them.  So when you're placing a model, consider leaving it in range so you're farther up the board, but positioned in a place where they can't base to base you.  Either just back out of that range, or behind something slightly so that in order to charge in the required straight line, they have to leave a gap.


  Here, Boar can reach Harry with that wonderful Furious charge, but he can't get base to base.  Heck, he can't even get within an inch.  Harry's a 3/1, then he'll Defstance up to 4/1 and have cover.  This takes Boar's 3rd column KD down to a 62% chance of success, and he'll have to take it because if he doesn't, Harry will only need 1 success to push Boar 1'' away and waste his next 2 to 3 attacks.  If Boar was closer, he could base to base and be pretty safe.  Take the momentous damage, get pushed or get Knocked down and stand back up.  He'd be within 2 either way and be fine for his next three attacks.  Harry's positioning alone prevents that though.


  These are the little things, where positioning in the inches matters immensely. 


3. Defensive Character Plays


  Then we have Defensive Tech.  I talked about Hooper's Tough Skin, getting him up to a 3/2 before Defensive Stance.  I like Hooper to go early on the first turn to run up and Tough Skin whatever model is farthest up, plus it lets me burn activations while accomplishing something.  Friday also gains +1 DEF if Spigot is around, so between those two, Friday is at 5/2.  She may look enticing at the halfway point on the board, but with a combined Defensive Stat of 7, you should think twice about it. 


  I keep using Brewer examples, but there's so many.  Mash gets +1 ARM near his wife, Esters, and she can also give him +1 DEF.  Then Hooper gives him +1 ARM and he already has unpredictable movement.  So he's a 4/3 with UM.  Good luck.  This is also a very resource intensive strategy but Mash is really good at Snap Shots so people like to sprint him way up the board.  With stats like that, it's not an entirely terrible strategy.


  There's a lot of defensive tech out there.  Nimble for +1 DEF.  An Engineer player tucked Velocity into my lines, daring me to kill her turn 1.  It didn't happen.  There's Clone, which we've talked about.  There's Defend the Ground from Tower and Ploughman for the free Defensive Stance.  There's a lot of character plays out there that can really buff the survivability of players.  The issue is when to do it. 


  I only do it first activation if it can really discourage my opponent's plan.  If I know my opponent's first activation is to kill Velocity, then activate and use Nimble for the +1 DEF.  Now you've activated and haven't lost an activation if they kill that model, and they may not even kill that model.


  I usually wait till second or third activation though.  If the turn is building up for someone to go into a model towards the end and really go for the win on the momentum race, I can burn an activation getting some defensive tech onto that player.


  Those are the simple things.  Things like Defend the Ground, Tough Skin, things another model can put onto the model you're trying to protect.  Other ones like Nimble, Clone and Decoy are little trickier because you feel like you're wasting INF when you want to do things but when it works, it works.  These character plays are also normally players you want to hold a ball with too.  Greyscales with Decoy and Unpredictable Movement can dodge out to max against a 2'' melee player, probably get the dodge on column 1 and he's gone.  You only have to worry about 2'' melee models too since with Unpredictable movement, 1'' melee models have to catch him over multiple turns.


   4. Offensive Character Plays.

  Now we look at things you put on the enemy, or at least throw out there.  Things like Gut and String, or Disarm.  Stuff that Hamstrings (Also an option) the model that your opponent wants to use.  Blind is getting really popular with that -2 TAC.  Get that on Thresher or Hammer and you've really cut them down.  Mist coming for your ball? Blind him.  He's pretty useless at TAC2, but that's if you can get a 2 dice character play onto a DEF 5 model.  But look at your character play options and see what shuts down an opponent.  Jaecar is really good at this with Gut and String and Back to the Shadows.  Dude charges in, knocks your MOV for 4/4 and takes you to -1 DEF.  His next attack damages you and after he's done he dodges away 4''.


  Playbook Guildball results are great options sometimes too, especially if they're ranged.  You can get something like "Skewered" (Hearne1/2) onto a model by hitting it on the playbook rather than casting it for 2 INF.  Sometimes this is better if Hearne is going into a model that's already crowded out, set up for getting beat on but if it's pretty fresh model, you might be better off just going for the 2 dice roll.


 There's also several AOEs out there.  Poison and Bleed aren't really dangerous but Fire is.  -2/2 MOV is hard on threat ranges.  The trick isn't to hit the model with it and give them a chance to clear it, the trick is to place it front of them so they accrue it during the charge and can't clear it before failing the charge. Blast Earth can do the same thing and cause Rough Ground but then you can glide over it.  However, it's pretty momentum intensive and if the other guy is low on momentum, you may be forcing him to choose between Glide or a Heroic. 


  Using the Harry and Boar example from earlier, Harry can prevent the charge entirely from Boar by dropping the Molotov AOE in the way.  If Boar charges through it, he loses 2/2 MOV immediately, and he can't clear it.  If I had hit Boar with it and lit him on fire, he could clear it at the start of his turn and his threat range is restored.  There's no way for Board to get to Harry right now without a speed buff.


  Lastly, lets touch on Character Plays one more time.  Control.  There's not many of these.  There's Lure (Siren1 and Cosset off the top of my head), Tucked and Shut Out (Silence), Puppet Master (Obulus), Pinned (Theron) and Goad (Spigot2, Marbles, Harry the Hat, Jac.  Maybe a few more).  These are more than debuffs, they control directions you can move, activations and can take over your model for a moment.  This is a great way to shut the enemy down.


  The Morticians player, Silence, is king here.  Shutout and Tucked are amazing if you know the other team.  Shutout the striker so he goes last, giving you time to get the ball, or Tuck Rage2 before he can get the 2/2 MOV buff from Grace to get to you.  If you do it wrong and tuck a model that was going next anyways, you've wasted it.


  Puppet Master is weird.  You can use it walk them away from you or attack.  It's expensive but powerful.  You can walk them into you as well but for defensive purposes that's not great.  Lure and Goad are both like that.  If Siren is sitting at 4/1 near Kracken for that ARM, in cover, and this is a guy she's targeting, she's 5/1 with Cover.  Lure that guy over so he's either out of range of what he wants to attack or he's engaged with a model that he doesn't want to deal with.


  Goad doesn't force a walk, but it limits where you can go.  Because of it's range, that usually means they can get to you if you get the Goad, but if you can get it before you move (Good Marker is great for this) and then walk away, it's pretty solid.  You can do it from behind cover too, or from deep in a crowdout situation.  Harry is awesome here.  I like to use Goad to protect Brisket3, I don't care if you go into Harry.  He's got Rising Anger even.  Free 2 Momentum for me.


  The example here has Decimate, instead of Brisket3.  Decimate's Knocked down and on 8 health.  Boar will likely kill her within two attacks.  However, Harry goads him at the start of his activation, then walks out of charge range and to cover.  Boar is completely neutered here.


  5.  Take a Breather/Come on Mate

  Last, but certainly not least, don't forget that you can heal in this game.  If you've already been beat up a little bit, consider bringing that health up by four again.  The GIC is likely to this some, taking Engineers down to two in some cases or three and etc, but it's worth considering.  On models with health in the low teens, 4 health back can really help.  Jackstraw is a really great example.  At 5/0 plus Reanimate, he's a pain to bring down even with only 10 boxes, which is why I love throwing him up there.  All I want him to do is put down two harvest markers every turn anyways, which he can do from the edge of the pitch if necessary.  So I toss him up there, leave him as 'easy' pickings except at 5/0, he doesn't go down easy and a momentum or two, or three if I can spare it is an efficient and effective use of my resources to negate theirs.  I've seen Hammer go after him, five, six attacks in and that 5/0 is slowing him down.  Can't quite get him but he's close.  So he activates, pops out two harvest markers, teleports away and heals.  Now he's out of the scrum Hammer built.  He's away from the crowdouts and he's got 50-60% of his health again before reanimate.  Is this 5/0 model really worth the three activations and 12 INF it takes to bring him down for 2VP?  Probably not.  But those are the situations you want to create for your opponent.


  So remember to heal.  I think it's less valuable the lower your DEF is since the investment required for the necessary damage is so much lower.  Sure, you can heal Stave, but I'm wrapping every time I hit him so... good job on not changing anything.


  Condition removal is here too.  Against teams like the Brewers and Hunters that like to apply those conditions that give them bonuses, keep the conditions off.  Smoke is another story, she applies everything all the time.  You just have to tank it out.  However, you leave a model knocked down in a game where Spigot1 has activated yet and you have made a horrible mistake.  Are you knocked down and snared?  Seenah's going to eat you alive.  Get rid of those conditions if you want to make it.  Trying to keep conditions off is always a good idea, but in particular situations it's pretty crucial.


  Summary

  That's about it.  We can cook up all kinds of examples all day long and run the dice math, but this is the gist of the options available to you.  Keep an eye on your momentum, make sure you have some available.  It's not all about going first next turn.  There's not a lot they can do sometimes if you've staged correctly and you always have that one momentum at the beginning.


  Hopefully this had made some sense and helped out.  It's a bit more spread out than the previous article on getting through your own activation but that's pretty cut and dried.  You made the decision to go in, you know what you're getting into and you make all the decisions about how you're going to do it.  Here, you have to anticipate the threat.  You have to take your best guess and cover your angles.  It's a gamble a lot of times.  The biggest thing is to focus on your positioning first.  Use that cover.  Deny the charge lanes.  Hide near a 2'' melee model for those crowdouts.  Little things that aren't important when you move the model, but could be very key here in an activation or two.  It's a mindset that you have to pick up.  It's also a really great thing to go back through a game you've won/lost, but usually lost and say "Yeah, if I'd gone back to cover" or "Yeah, rather than kneesliding as far away from the scrum as I could, I should have tucked into cover and my other model over there." 


  The hardest part is recognizing when it's a good time to quit while you're ahead.  Do you spend the INF on that Clone? Or try and get it off the playbook while you still have the INF for it?  Does Mist charge and hit this model three times while he has the ball and go for momentum to win first turn rolloff, maaaaaybe, or should he just sprint away and hide where it's difficult to get to him?


  Esters is like that every turn.  The +1 Damage or +2/2 MOV is really enticing, especially since it's free.  But a lot of times, it's more efficient to put +1 DEF on someone.  It's hard to recognize when, and it's no fun when you do, but it bears consideration. 


  That's about all I've got on this topic.  This was a requested topic from some local players as a follow up to the last article and it was a great suggestion.  Really appreciated it.  The next one looks like it's going to cover various positions in Guildball.  They're listed on the cards as Midfielders and Backs and nonsense like that, but we'll look at what makes a Striker a good Striker.  What's a Kickoff Model?  What makes a model good at exerting control pressure?  We'll get into that next time.

  Merry Christmas, and enjoy the holidays!


Sunday, December 17, 2017

Guildball Batrep #2 – Blacksmiths vs. Brewers


  We got next to no feedback on the previous Battle Report, so clearly we're meant to do more.  Or we enjoy it more than you do and your feedback is impervious to our pats on eachother's backs.  Either way, we're back.  Still Adam and still me, JD.


  Today's matchup is Adam playing his Butchers if he can assemble them in time, or another crack at the Blacksmiths.  I'm going to swing into the Brewers and try to bring something different today instead of my beloved Farmers or Union.  There's been no great changes to the Brewers, but occasionally I have to pull them out again to remember that they make me mad enough to put them back.  I don't feel like they're that far out of the game.  Certainly not enough to create a meme page on facebook with triple digit contributing members just to bemoan their hilarious inequality to the rest of the game.  We'll leave that kind of failure with other games.


Brewer rant, be forewarned

  The Brewers just don't seem to have it in this meta though.  It feels like a gameplan issue.  The players that are successful with Brewers have molded them into a playstyle identity they enjoy and have a consistent strategy with them.  Pat, with the great, highly recommended podcast "Strictly the Worst", is a prime example of this.  Most Guilds, you really already know what the strategy is.  The Brewers have lost that identity since S2, specifically during the "All score, all the time" period.  The Brewers are something of a bashy guild, but not as bashy as the Butchers and not as good at scoring as... even the Masons.  Morticians, Hunters and Butchers are really the only teams worse at scoring.


  Used to, the Brewers and Masons had this "Adaptability" identity.  They both could bash and they both could score.  The idea was to score better than bashers and bash better than scorers, with Brewers better at bashing, and the Masons better at scoring.  The game hit bashing really hard though in season 2 and it became very difficult to do well consistently with a fighting team.  It's only been very recently that fighting has kind of come back, and mostly due to the Shark/Siren/Midas/Vitriol nerf.  Those two teams could win 3-0 very quickly, and the only way to keep up was generally scoring.  Now that they've been set back a little bit by the errata, fighting has a shot. 


  The Brewers are still struggling though.  They've been outpaced it seems.  The recent two acquirements are PintPot and Lucky.  Both are very good, but it still seems to struggle with not having a Captain that can really lead a team in.  Tapper struggles to put a model down without his old heroic and Esters has an extremely poor INF > MOM conversion rate that really just leaves her as a support model while you hope Friday, Spigot1 and PintPot can carry the day.  This also leaves them with almost no 2'' melee, so you almost have to bring Tapper to deal with many problems.  Or Hooper, who is a set of his own problems.  So lets talk about lineups.  Enough ranting. 


JD's lineup.

  First and foremost, I'm a Tapper guy.  His non KS sculpt is the sculpt that got me into the game.  He will most certainly be my main Captain.  I will bring Esters because I think she does have game into a few lineups.  Specifically Fillet, Smoke, Burnish probably, and other condition heavy games.  But that's about it, and I don't like her.  Against Butchers, I'd probably go for a scoring game, at which Esters is possibly better than Tapper.  Against Blacksmiths though, I probably need to bash since I don't have any good ways to keep a ball against the likes of Cinder. 


  I'll also bring Scum.  I think Pat has ruined Quaff for most people even though I used to play him exclusively.  The cat missile has become a Brewer staple though, and is the best way to pick up momentum turn one.  If you're not aware of what it is, hopefully I can demonstrate but the gist of it is that Friday, at some point while she's forward, calls the cat to her.  The cat then hopefully makes use of "Sic' em" if you have it and charges some model within 11''.  At TAC7 on the charge, the cat has a chance of wrapping once, maybe twice, and if you put influence on the cat, you can get a few more attacks in for momentum.  It's not uncommon to see four momentum from Scum.  This is before any buffs like Commanding Aura, Tooled Up, crowdouts, any such nonsense.  If you're super lucky, the cat uses the momentous push on column 2 like four times to push a model within range of a basher and then the game is really on.


  Required models are pretty straightforward.  Spigot1 brings too much support to leave home without.  I don't often get Tooled Up on Tapper because Tapper is a perfect first activation, but Tooled up is great on other models like PintPot or Stoker.  Friday is my nearly only striker, and she is fantastic at it.  She also enables the previously mentioned cat.


  I think Hooper is required, unfortunately.  I dislike him, but he has 2'' melee which is necessary for certain matchups.  Unpredictable Movement, lots of 2'' melee (Fish, Farmers, etc) and he's ok into the condition game.  In every way but Melee range/threat though, he's outclassed by Stoker who has a far better toolbox and doesn't require a heroic to get a useful TAC.  The Brewer GIC helps with this but still.  So Hooper and Stoker are coming.


  PintPot is also coming.  Between PintPot and Stoker, Hooper really struggles to see the table in my games.  PintPot is also amazing for INF efficiency.  Easily one of the best rulesets in the Brewers.  In an Esters lineup, PintPot is doing the work. 


  Mash is coming.  He's really not a striker, but more 2'' melee, and against some teams an ok ball holder.  Against real scoring teams, they have the dodges to deal with him and he has no close control.  Close control and we'd be talking, but no.  He does bring 2 INF though.


  That's 9 models.  This leaves me with a fun model spot, which is Lucky, Spigot2 or Stave.  I haven't played Lucky yet, but I'm kind of itching to put Spigot2 on the table too.  However, I've played Spigot2 a bunch (believe it or not) and not my nearly painted Lucky yet, so Lucky it is.


  Tapper, Esters, Scum, Pintpot, Stoker, Hooper, Mash, Friday, Spigot1 and Lucky.


Adam's Lineup - So I've come to this conclusion that there is no way you wouldn't want Alloy and Hearth in a line up. No matter the guild I'm playing these two add so much to the blacksmiths kit. I can't wait until I have the second box so I'll actually be able to use the models. Going into the Brewers, and knowing they like to smack people, I have this plan in mind that I want to play ball. I haven't really decided how well the Blacksmiths can hang in a scrum with the Brewers at this point due to inexperience. I've said it in my last rep with these guys, and I'll say it again here, the pressure that Cinder, Hearth and Alloy put on a ball is insane. It's an incredible good set up to take the ball off someone on one success from 14" away. I'll always be taking Them with me, into every line up.

  This also adds Furnace into the mix, who I think is a solid master as well. The brewers aren't the fastest moving team, and the ability to remove armor, and limit more movement speed with burning is great. My next choices are Ferrite and Iron. They play ball together really well, and who doesn't like a momentous 7 damage? Ferrite also has one of the best legendaries to me of this squad, especially for scoring goals. She's also great at just debilitating players. Which comes into play later on as well. My Final 4 picks are Anvil and Sledge, since they do allow you to shift to a more fighting team if you wish, and the potential with Hearth, and Anvil, to allow Sledge 5 net hits on his way to a momentous 7. And Lastly I end up with Farris and Cast. Cast has this great ability called Shield throw that allows me to knock the ball off someone without having to tackle at all. Farris has a huge amount of movement and seemed like a nice addition to a ball heavy team. I need to spent more time with some of these other models to really know which ones should make it into a ten man team.


JD - Against Blacksmiths, I feel like I can't outball them with Brewers.  At all.  So Tapper, and Scum are my Captain/Mascot pick.  Adam picks Ferrite/Iron.


Adam - I don't really want to fight the Brewers, so I pick Ferrite and Iron as my captain and apprentice. The flexibility of a captain pick is really nice here, especially when that model gets to have an extra two influence it can be allocated. As well as her legendary changing giving everyone hobble on top of a move buff. Any time you damage someone when you have hobble this gives -2/-2 movement to them. This with the Burning can really hurt the Brewers in my opinion.

The Rolloff - I roll a 2 to Adam's 4 and he elects to receive.  I do swap board edges, as you'll notice in a few pics.  The side I chose was more open, and I generally need that for slow Brewers and their desire to scrum.


The Draft.

  Adam leads off with Hearth (Granite).  I take Friday, both of us leading the draft with obvious, non-telling decisions.  He picks Alloy (Mist), I go Spigot1, he picks Furnace, I pick PintPot, he takes Cinder and I take Hooper. 


  JD - I hesitated a lot on Hooper, but I decided I needed his 2'' melee against Cinder's UM and the other three 2'' models in the list (Counting Alloy).  Otherwise, I like my lineup.  I debated hard between Hooper, Stoker or Lucky, and I think either one is better than Hooper except for the 2'' melee. Mash, even with his 2'' melee, was right out.  I normally like him against semi-bashy teams to hoard the ball with his 2'' Unpredictable Movement, but Cinder's ability to just ignore that whole thing with Hot Shot means Mash has no place in a fighting list. 


  As far as Plot Cards, I have Good Marker (Fairly important for Brewers I think), Heroic Landing (Also important), and Match Fixing (Less important, but I fully expected a goal kick from Cinder so I felt like it was a decent card to have).  There was no Knee Slider or Sic' Em in my hand, so I expect Adam got them but since he's playing Blacksmiths, Sic' Em goes to discard.  What a waste.  I expected Knee Slider though. 


  My GIC is Another Round, for the free heroic, the main thing I wanted to try in the Brewers this game.


Adam -  My Line up is fairly linear. Like I said earlier, Hearth and Alloy go great, especially with Furnace and Cinder. They all lead into each other in my opinion. Hearth is my big support key here being able to hand out 2" melee to people and giving plus two net hits on playbook results is a huge deal for me. I was satisfied with who I took overall. I put a lot of thought into if I would take Cinder or not, I debated between her and Cast. Especially since Cast gets extra damage from burning and could be tooled up, so she could hit pretty hard. However it really came down to this idea, that I wanted to play the ball here more than fight.

   My plot cards for this one were, Knee Slider, Wingback, and Brace for Impact! Knee slider being a really big deal to me here, because I don't know if you if you've seen Iron and his ridiculous movement capability, but a 10" slide back to safety is incredible. I had a feeling I was going to get the hurt laid on me at some point, and with the Apprentices being super squishy, Brace for impact seemed like a solid choice. Wingback seemed helpful in theory, but never really saw use.

JD - Holy cow, you had Wingback? Was neither Alloy nor Ferrite in range of Wingback all game? Or when you were considering a charge with Iron early on? I'm surprised I didn't see that one come through.

 Adam - Yeah, I thought about using it for awhile but no one really needed to charge.

  My GIC is Tough as Nails, which allows me 5 healing and +1 arm on a friendly guild model who is knocked down for the turn. Most of my models have 2 armor, or three if they are by a master, so immediately removing 3-4 dice from the equation was really nice

The Kick - Friday moves up, kicks.  She walks the full 6'' and tries to put it way over and does ok.  Enough to force Alloy to retrieve which is something. In the future, I may try to force Iron to receive to prevent him being the first turn goal scoring model, but either Iron does it, or Alloy does it.  Both are very capable.


  On that note, Iron gets 4, Ferrite 1, Furnace 1, Cinder 2, Hearth 1 and Alloy 3 I think.


  Pintpot gets 1, Scum gets 0, Friday 4, Tapper 4, Spigot 2, Hooper 2. 


   Alloy acrobats up, sprints to the ball, back and kicks to Cinder.


  Spigot uses the GIC for his heroic and gets Time's Called down, affecting Friday, Tapper and Scum.  He tools up scum, the cat with no Influence. 


  Cinder moves up, passes to Ferrite and shoots Friday for 1 damage and Searing strike.


 Hooper sprints up and into cover, trying not to block his charge lanes.  I wanted to get Tough Skin onto Friday, but it was more important to be farther forward for better charge lanes on round 2 than it was for Friday to be 5/2 near Spigot.


  Furnace tools up Iron, moves forward and drops his AOE on Cinder, very aware that Cinder is a prime target for Friday since Hot Shot is 6''.  Even on fire, Friday can walk there.


  PintPot sprints forward.


  Hearth moves up, uses Instruction on Cinder.  This was disappointing to me because it guaranteed Cinder a double dodge counterattack on Friday.  However, both of us had forgotten at this point that Cinder has Unpredictable Movement and Cinder was safe from Friday anyways.  Instruction on Cinder actually benefitted me since I changed gears and began looking at Hearth instead.


  On that note, I've decided it's Friday's turn due to some order of activation issues.  Iron is coming to town, and I kind of want Tapper to go into him after scoring. There's two problems with this.  A) Tapper needs to go before the cat so I can Ol' Jakes 2 INF onto him, and I have no momentum for that heroic, and Tapper can't produce any in his position.  B)  I'm pretty sure Adam has Knee Slider, so even if Tapper goes last, I'm quite likely to have wasted a perfectly good pat cat activation on a gamble that Tapper will be in range of Iron.  It's not worth the bet so I activate Friday.


  Friday shadow likes forward, calls Scum up and charges Hearth.  Adam camps the momentum, so no counter attack and Friday does a two non momentous damage and two momentous pushes over the course of the charge and two follow up attacks. 


  Ferrite moves forward, calls Iron up and successfully kicks to him. 


  The surprise in all of this is that Friday's two pushes are enough that Hearth is in range of Tapper, thanks to "Time's Called" on Spigot.  This is unexpectedly fantastic news.  Tapper heroics 2 INF onto Scum, and charges Hearth.  He declines the KD because of Sturdy, and ends up just doing 3 momentous damage twice and a push.  I pass on Commanding Aura since the only benefit would be on the cat and it's not really worth it.  3 momentous damage is as much or more than the cat would accomplish.  Right?


  Iron looks long and hard at trying to get a momentum off of PintPot or Spigot, but the counter attack potential is too great on both, so he wastes a few INF.  He just uses Impetus, sprints an kicks for a goal, making it handily. 


  The ball bounces out and lands right on Tapper who declines to snap it.  Iron uses Kneeslider and disappears off to my left.


  Scum shadow likes forward and walks into Hearth.  I'm a little worried about positioning and blocking up Tapper for what I have in mind, but I'm pretty sure Hearth will be out of the way quickly so I don't worry about it.  Scum hits Hearth twice, wrapping both times.  I opt for a Momentous 2 and non-momentous 1 both times, which with Tooled Up, takes it to a 2 and a 3 for a total of 10 damage.  This easily puts me ahead on momentum, no competition, and I will go first.  The score is 0-4 Blacksmiths.


  Tapper gets fully loaded, so does Spigot.  Hooper gets one, Friday two and Pintpot zero along with the cat.  Originally, I had planned on snapping the ball to Tapper, but it occurred to me that my first activation would be Tapper into Hearth, and even if she couldn't survive, it was worth her counter attacking for control of the ball or KD, so Tapper left it off of himself.  In four hits, Tapper kills Hearth and triggers Commanding Aura.  I want the next attack on Cinder, but I need to sprint to get into goal range so I use the last two INF for that instead, finally snapping the ball, and score for a 6pt activation.

  This is good news for me since I've now got Commanding Aura up on two apprentices and Instruction is off of the table.  Of all the Masters to bring down, Hearth with 2'' melee on a stick, free 2'' melee for Alloy and 1 INF cost "Instruction", she's the one to bring down.  Furnace is nice, Ferrite is great, but Hearth is really the Apprentice's Toolbox. 


  As expected though, the ball bounces out to Ferrite.  I use my Match Fixing plot card to reroll the perfect scatter and Adam gets another perfect scatter.  Both snap onto Ferrite.  She immediately sprints and scores, taking the score to 8-6 Blacksmiths.  She slides back to cover.


  The Goal scatter poses a problem.  I need to hide the ball here, but I can't go too far to the right and forward because Alloy can pretty easily move an score.  I have him blocked in with Friday and cover but he can still move around quite a bit.  Even worse is Cinder with a 14'' tackle against Brewer Defense.  I try to put the goal kick to my right corner.  Far enough forward it can't scatter behind my own line, and far enough to the right to put it out of reach for everyone.  It scatters six inches to the one, right into the cover near Hooper.  Right where either Cinder can pick it up.

  If I leave the ball, Cinder picks it up, kicks to Ferrite and scores.  I can't kill her because she's got Unpredictable Movement and Hooper only has 1 INF.  Hooper ends up walking around the cover to pick up the ball and using Tough Skin on himself.  I feel ok about this.  Cinder is engaged by Tapper, and Hooper is a 3/2 now, plus cover.  Cinder needs two successful hits for this to work.  It has to be Cinder because Alloy is locked up.


  Furnace moves up, puts 2 damage into Tapper, KDs him and puts the crowdout AOE on Cinder, but not himself since he wants to help Alloy kill Tapper.  With Tough hide, it's pretty sketchy but still in the realm of possibility since he's a 2/0 now against Alloy.  

  Friday calls Scum to her to block Alloy's path and dodges into Cinder to ignore Unpredictable Movement.  I need one more momentum to stand Tapper up, and Friday gets it with a nice push that tucks Cinder into the pocket with Tapper, Furnace and Friday. 


  Cinder counterattacks, dodges away.  Friday stands up Tapper, hits Furnace for another momentum and walks into range with Cinder, causing her to unpredictable movement away.  This is what I want though, so now Spigot or PintPot can kill her. 

  Cinder has other plans.  She moves within 6 of Hooper, bonus times the shot up to TAC6, back down to TAC5 because of cover.  She needs four out of five successes to tackle the ball and gets it.  She also gets a successful kick to Iron who dodges back out of 8'' of PintPot.

  Spigot activates.  I can't get PintPot to Iron to disrupt him from a top of 3 score, but I might could use Spigot's heroic to boost him.  However, I can't be within 4'' of Tapper for Commanding Aura on Cinder, and be with 4'' of PintPot for Time's Called.  I decide to try to kill Cinder because I don't think I can get it done without Commanding Aura.  So he moves into CA, kills Cinder in 3 hits (KD, wrap and wrap.) and wastes an INF.  Score is 8-8.

  Alloy moves through Scum's area, producing Unpredictable Movement there, hitting Friday for damage and Dirty Knives.  He almost ends his activation but remembers back to the Shadows at the last second and does it, putting him out of PintPot's range.  Which is good, because I think under CA, PintPot kills him. 

  Pintpot really needs to go into Iron though.  If I could get there I could KD him, and the ball scatter would either come back to PintPot or better yet, go off the edge of the board and I win, but I can't get to him.  So I go into Ferrite, KD her and do incidental damage because Adam remembers his GIC and gets a third ARM for the activation, taking her to a 2/3 against a TAC5 model. 


  Iron sprints into the corner, staging for Round 3 and my cat idles.


    I win the rolloff pretty easily, ahead by 3 momentum.  I decide to go second, forcing him to fight for momentum and give me a chance to damage a model or something.  He activates Ferrite, standing her up, hitting Pintpot with a momentous Disarm, who Counter attacks and gets a push, barely at TAC4 now.  Ferrite's stuck there, acrobats away but Adam clocks before he can call Iron up.

  This is game.  Tapper goes for the kill on Furnace, knocks him down but Adam does his GIC again and Tapper just can not get up his columns enough to get CA down until the fourth hit, at which point he hasn't done enough damage at all.  Iron scores, taking the game to a 9-12 Blacksmith win.


Thoughts on the Game

  JD - I actually enjoyed getting my Brewers out again.  These are some of my favorite models, I love their sculpts, I'm happy with how I painted them, and I enjoy the playstyle.  I really did enjoy this game.  I also have not changed my position on Brewers and the main reason they are out of the bag is for batrep variety, and so Adam can play Blacksmiths into a team that's not the Farmers, or the Union I've played religiously for a year.  Despite the meta swinging back from the straight up ball game, I still don't feel that Brewers can kill faster than the other team can score.  This is further excacerbated by the Blacksmiths where hiding the ball is almost impossible.  That said, I made some errors here that cost me the game, while at the same time, it's evident that Adam is learning his Blacksmiths quickly. 

  Pros are that I got an ok cat attack off, never went second, killed Hearth and really felt like I was keeping up until the goal kick scattered into Hooper's turf.  After that, there was very few ways to keep the ball away from Cinder and Alloy.  I think Hooper was the best decision, but it didn't feel like a great one.  I could have kicked it away with Hooper, but the odds of him failing the kick, and putting the ball closer to Alloy, or into the backfield were somewhat high and I couldn't risk it.  At 3/2 in cover, I felt pretty safe, and even Adam was pretty concerned about that roll he needed for the tackle.

  The Cons of my decisions come down to a couple.  Tapper probably should have kicked that ball off into the backline rather than scoring.  Let them spend a few activations trying to get it back into play, and waste Alloy's activation.  Maybe.  I don't feel like I played horribly there as I needed the Goal influence.

  I still dislike Hooper.  I didn't need the 2'' melee as much, or it wasn't relevant.  Lucky or Stoker would have been a far, far better option.

  The two big problems were the Spigot and PintPot activations.  I got greedy, and wanted to use Commanding Aura against Cinder for the kill.  That wasn't necessary, and in fact it was overkill.  I should have stayed closer to PintPot for the heroic and put PintPot into Iron.  That was the far better decision. 

  Secondly, I didn't realize PintPot actually has dodges.  He's only one of two Brewers to have dodges (Spigot2 is the other).  If I had known that, I would have charged Ferrite, dodged out and gone into Iron for the KD, or at least pushes.  At least be engaged with him, but with 3 attacks it should be ok to get the KD.  And with PintPot's heroic where he ignores the next attack, Iron can't do anything about it.

  Lastly, I should have gone first on the last turn.  I knew the game was over and was curious what Adam would do going first.  I don't think it would have changed anything, but I should have gone first. 

  Adam - Going into this game I didn't feel like I was going to just end up kicking and scoring repeatedly. My thought process in my line up was just to play solid ball and be able to get a couple kills in between. The allure of a momentous 7 damage and a non momentous 5, really make me feel like I'm gonna do some fighting here. However, more often than not, I found that challenging these guys is a bad idea, and I really needed knockdowns instead of damage to ensure I wasn't put in the dirt. I don't thing that they're bad at fighting, but, I definitely feel like they smash ball teams, with how weak they are in the fighting game a lot. I think they have a real leg up on teams that play the ball personally.   I have really enjoyed the Blacksmiths so far, and I've actually had a hard time with what models to bring, other than alloy and hearth anyways. I can't wait to paint up my my team, and get the next set of models so its completed. 

  Something I can't stress enough when playing this team, is deployment positioning. It's so important and something I talked about last rep Jd and I did. Changing the way I deployed, changed the whole game to me. Putting Alloy on the left wing, and Iron on the right wing, with Cinder in the middle, give me a ton of ball threat wherever this ball goes. Not to mention where the Masters deploy being equally important. Hearth being within 6" of alloy and cinder, allowed both of them to get the benefits I wanted. Furnace, still is able to be by Cinder, and Ferrite by Iron. Depending on your line up, dictates how you deploy and where these models go. Positioning is key with this guild, and I can't stress enough how important it is for the deployment of this team. They all feed off each other. I should have changed Iron and Ferrites placement. So I could have gotten two inch melee on Iron, and not wasted an influence

  I left Hearth alone when the attack came and I really shouldn't have done that. I didn't expect that cat to hit like a truck, and he just evaporated my health. I was really confident in her large health and armor. Which comes back to hurt me in the second turn, especially since it took away instruction, and all of Alloys extra abilities. I felt really good about the second turn goal however. It went about as smoothly as it could. Match Fixings was terrible here though. I couldn't have had a more perfect roll, and I had to do it again. I also didn't expect to get the tackle off on Hooper with Cinder and put myself in position to score The roll was dicey, but I felt like I had to take the chance or else Cinder was going to get obliterated before she could take the ball. Which she does right after she finishes her pass. I also should have taken the full dodge after the pass to iron, to get him way out of Pintpots range. If he would have had the speed buff I would have been in a really rough spot.

  By the time the third turn rolls around I just load up Ferrite and Iron and stop caring about anyone else, Ferrite gets easy momentum, but I miss the clock time and don't get far up enough to make sure I can get Try hard off, which would have given me a goal, on 2 or higher dice roll.

   One of the things I was happiest about during this match was remembering a lot of my abilities I forgot about last time. Back to the shadows saved Alloy's life, and My Gic made a lot of my characters tough to kill for sure .

   All in all I've come to really enjoy what I've played with the team so far, and I'm definitely enjoying them. Until I play Thresher again anyways, and he just turns me into his personal harvest. The Blacksmiths feel like Masons in a way, but they seem much more ball focused to me.


JD - Again, I really enjoyed this game.  For all the issues I have with Brewers, this game was pretty close and could have gone either way at a few points.  I do feel that as Adam gains experience at the Blacksmiths, I won't see opportunities to exploit his mistakes with them nearly as often.  Things like Alloy being strung up behind cover, or over extending Hearth and allowing me to get both Tapper and Scum into her.  Or leaving Iron within range of a buffed Pintpot and I just didn't take the opportunity.  I don't see many great ways to hide the ball in Brewers though maybe just tucking it onto Scum and sending the cat into the far corner is an option.  I don't know.  Again, I don't think the Brewers hide the ball and kill players faster than any scoring team can score.  This is still true against the Blacksmiths who possess the widest array of ball retrieving tech in the game.  The Apprentices go down easier, but fast enough to stop them from scoring? It's sketchy. 

  The next question is if it's a Blacksmith problem or a Brewer problem.  I don't know that it's a Blacksmith problem.  It's very good, but I need to see it against Union or Farmers some more before I have an opinion there.  Brewers have always struggled to control the ball, and when Shark was running the roost was the period I put Brewers away because they just couldn't stop the scoring.  So you have a very, very good team in the Blacksmiths going against a low tier team like the Brewers.  There's no room for error.

  Adam's Butchers are in, and nearly assembled so I'll be surprised if I don't see them across the table next Batrep.  I will likely hold off on my Union or Thresher Farmers for that game.  After reading some of Vincent's ramblings, I might try a Smoke team for kicks and giggles, even though I detest Smoke's gameplay.  With the recent OPD change, I'm going to play Grange more, and may be up for playing that into Butchers.  Is there any matchup into Butchers that would interest you guys? Or any matchups in the future you'd like to see? Possibly not even Captain specific, but a certain player combo you would like to see into a matchup.  Curious about a Hunter team into Blacksmiths? Obulus into Thresher? Throw your suggestions our way and if something piques our interest we may pick it up and give it a shot. 

  Thanks for reading, and enjoy your week!  Merry Christmas!