Monday, April 25, 2016

Basic Necessities for Painting Part II: Advanced Assembly

 By Advanced, I mean more than just pouring glue on stuff til the Nyss quit falling apart.  We'll cover some more detailed expectations of the models you're dealing with and some further insight into assembling a clean model.  For a final touch, and to keep Part III from being too unwieldy, we'll cover attaching the model to the base and the priming, and the pros/cons to priming before or after assembly/basing etc.

  Let's rehash.  I posted probably six articles in August, and have done nothing since.  Things got busy, but it's time to push this particular series through.  So, I listed the following:

1.  Glue
2.  Exacto Knife
3.  Pliers
4.  Greystuff

  Pretty simple.  That's more than enough to build a model and put it on the table.  But lets go from fielding a model, to cleaning a model and having it completely prepared for a good paintjob.  We can break this into further categories.  Cleaning, Attaching/Pinning, Priming.

  Further tools we'll need is a pinning drill, bits, and pins to go with it.  GW and PP both manufacture a drill kit and PP's pins and bits are probably the best for the job without running around and getting them from multiple other locations.  A vise can also be handy but I haven't used one yet.


  Cleaning

  One of the major downsides often brought up in PP's resin style of manufacturing models is the horrible mold lines left behind in models.  Warders have been particularly denounced in this regard, mold lines in the middle of faces and etc.  Recent molds have been vastly improved, but this does nothing for older sculpts.  The exception to this has been Convergence.  The Convergence sculpts have been pretty rough. So, we need to recognize these seams and deal with them.

  It's pretty easy to identify a mold line.  It's usually a raised seam along a model.


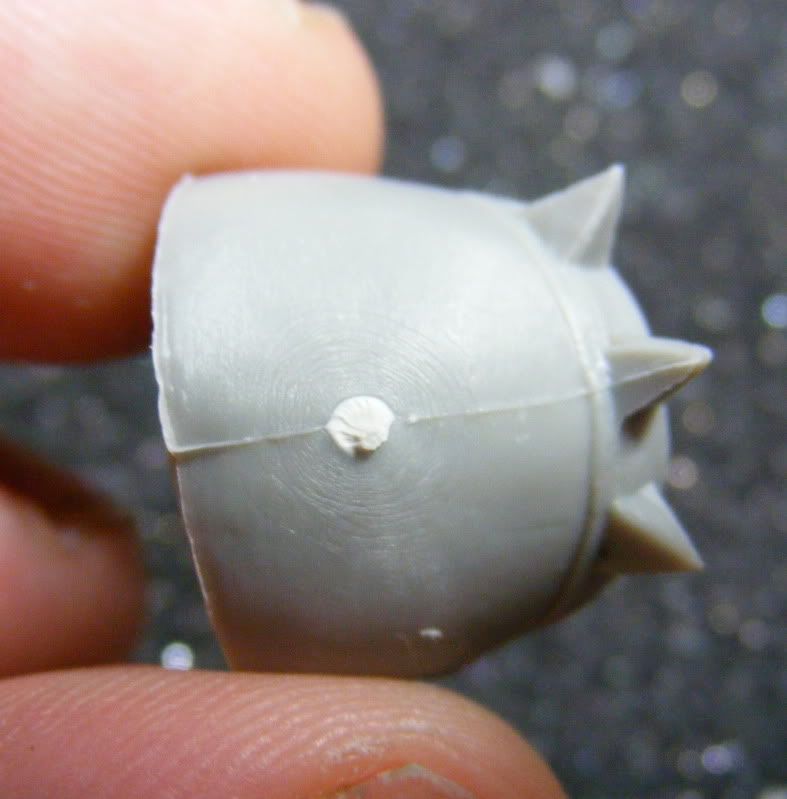
  In both cases it's pretty easy to recognize.  Sometimes, the mold itself wasn't aligned perfectly, so one edge is offset from the other.  Those are a bit harder to deal with but it can be done.  

  So, the Exacto knife is the first way to deal with this.  Cut off the biggest pieces, in some cases a cylinder port where the resin was filled in.  This is particularly bad on Colossals/Gargantuans.  So, once we've cut this stuff, we can sand it.  Instead of actually getting sandpaper, start with scraping your blade on your knife across.  Sometimes this can scratch off a seam, and in particularly tight places with no lateral movement for a sanding motion, it's the best thing.  If that doesn't work, Hobby Lobby and other such stores have sanding sticks.


  Get some.  They're sweet.  Some different styles but the main thing about most of them is they have different grit on either side.  They're pretty cheap and generally easy to find.  If your local hobby store (Michaels, Hobby Lobby, Hobbytown, etc) support model kits at all, E.G., tanks, planes, cars, they'll have these sticks.

  Pliers are also nice to have for the cleaning.  I like to keep the tabs on the model until I'm ready to glue it to the base,  However, at some point, I have to cut that tab off and that takes some significant force.  If you have a lot of fragile bits on the base, then don't glue them on before you cut that tab off.  However, if you cut it off early, you'll get a lot of fingerprint oil on the model that you should ideally clean off before painting the model.  On the resin ones, that's not nearly as important.  On the metal ones it becomes significantly more important.

  For actual washing, soapy water and a blowdryer is pretty standard.  Scrub as much as you can carefully but attempt not to lose parts down the drain because that makes this process significantly more difficult.

  Actual Cleaning/Assembly

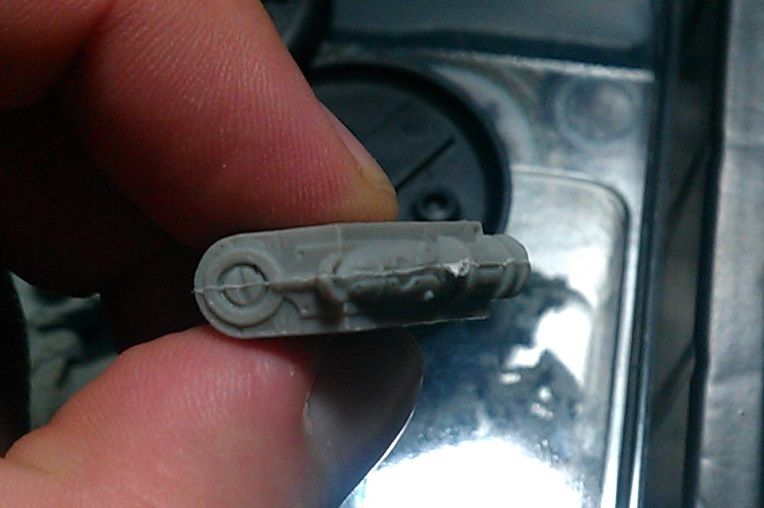
  Someone gifted me a Goreshade1 resculpt model at a convention recently, and I'm not a Cryx player, but it's a really pretty model, and a small diorama throughout this series would help to serve a lot of points.  So we're going to cover tools as we just did, and then move into the process where I can show what we're doing and worrying about.

  So, here's the model we got.


  My final vision for this model is to utilize the strolling stance he has, and have him and the deathwalker casually walking down from the rocky bluff, with three or four bodies laying about.  Some Alexia blisters or something.  Have the deathwalker strolling from one of the bodies specifically.  

  The terrain will be pretty varied.  I'd like to get rocks, insulation foam, tree bark, ballast and all kinds of stuff involved so I can cover a lot of different techniques.  It'll be probably desert based but I may change my mind.  Haven't decided for sure yet.  That's the next article, and it's taken probably six months for this one.

  So, let's build this guy.  We're going to stay pretty stock, no modding.  Just clean edges.


  Right off the bat, theres some extra flashing on the pointy things.  I'm going to break off the flashing and sand those points a bit.  The bottom of the cloak has similar issues but the sanding stick fits in there just fine.  The main thing is cut the big chunks of flashing.  Clean it with the sanding stick.


  Here's a particularly large piece of flashing on the hilt.  There's a little more on the back edge of the blade tip, and then there's a fine line down the front of the handle too.  So I'll hit that largest offender with a knife.


  That'll leave a small edge, so I'll hit it with the rough grit on the stick, and then the softer grit.


  I also took the knife to that flashing at the blade tip and scraped it off.  I sanded it with the light grit to finish it off. 


  Now you see the edge running down the handle.  Just a thin line but it's frustrating because of the amount of detail.


  I scraped very selectively with the knife and then sanded lightly.


  That piece is done.  I'll touch up the bottom of the cloak the same way.

I'm planning on washing the whole model anyways, so I'm going to cut off the feet tabs now.  Get it set against your cutting bad and rock the model back and forth carefully to work your blade through the metal and then sand the rest.


  Finally, there's a thin line on top of the shoulders of the torso.  I'll sand them lightly.  The spikes on the backpiece were the same way.  Only one was noticeably bad flashing.


Assembly

  Alright, so now we're into the assembly side of things.  If you're going to clean them, soak them in soapy water, brush them with a toothbrush, blow dry them or let them sit on a paper towel.  Pick it up tomorrow after they're dry.

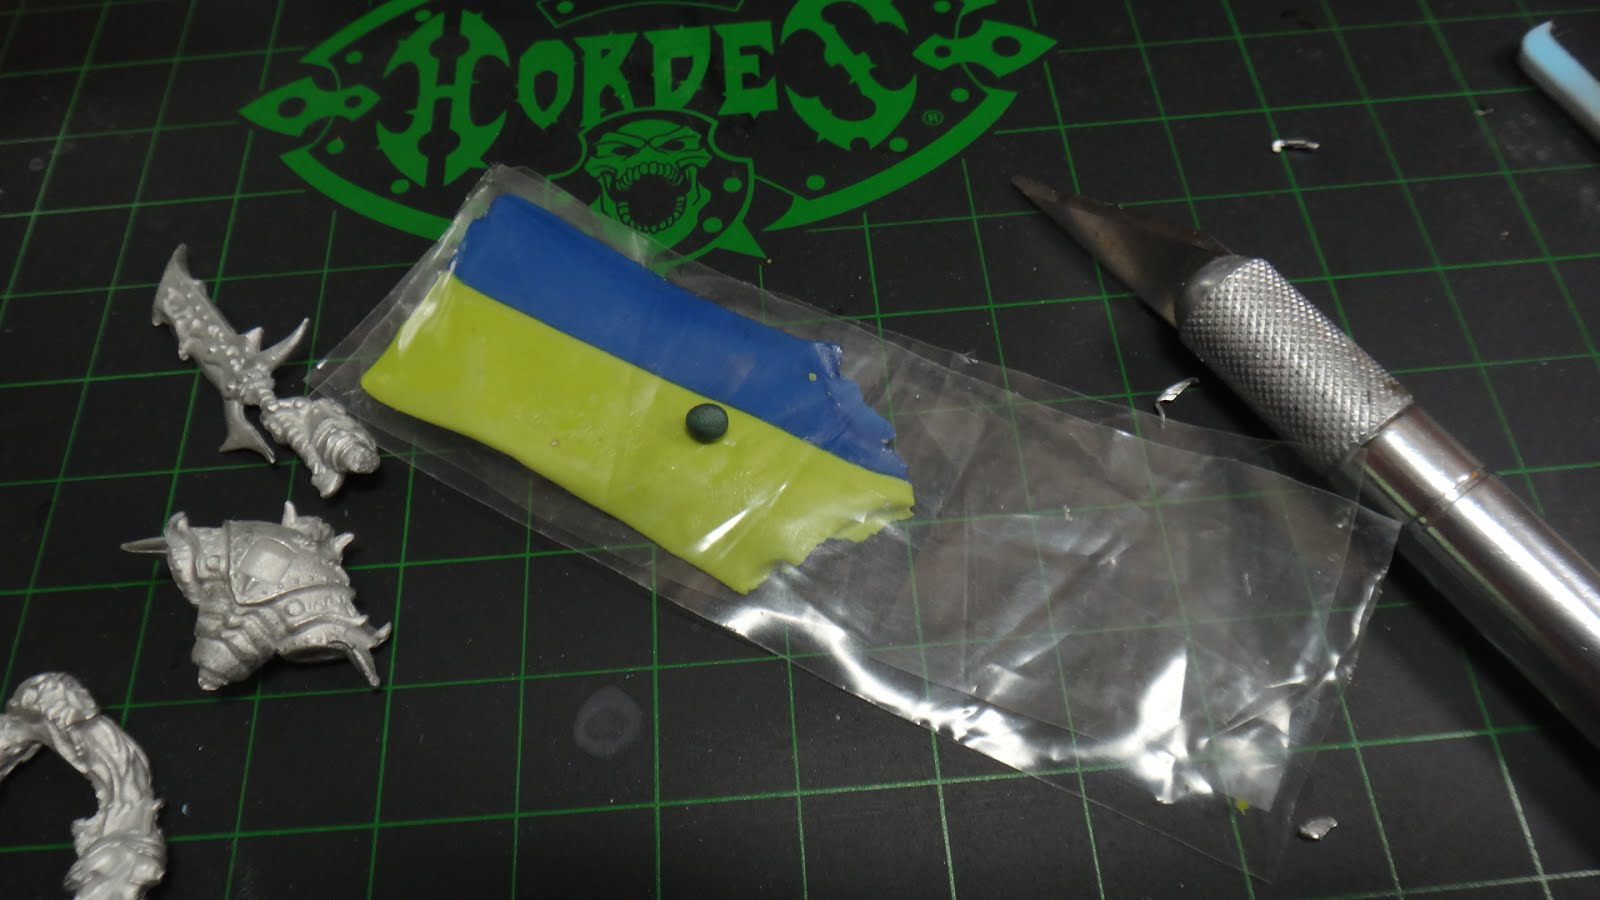
  Now, let's do the girl first because it's one joint.  There's little to no weight going to be held at this joint, so we're not pinning it.  On all metal models though, I usually greenstuff the joints.  So, you'll need your favorite glue and your favorite sculpting material.  In my case, it's the loctite professional liquid super glue in a long necked blue bottle.


  And greenstuff, just your typical GW or Galeforce 9 tubes of blue/green material.  The PP grey/brown stuff is also extremely good, but it doesn't come in the large tube quantities like the green/blue stuff does.  So, roll a little ball of the grey green stuff, and have your favorite sculpting tool nearby to use it to set it in there and let's get this started.


  Here's the joint.  Most of PP's miniatures have that nice little square knob to line things up the way they envisioned.  I've definitely cut them off before so I could do what I want, but this time we'll stick with what they want.


Here, I cut just a tiny bit of green stuff off and I'm going to put it in that slot.


  Put a very fine drop of glue in there and set the arm.  Resin models set extremely quickly.  Couple of seconds.  Metal models do not.  I've held metal to metal for over a minute before.  Abby2 will have you looking at quitting the hobby entirely.  The greenstuff helps a lot to hold the part together and give it a lot more stick while it sets.  Scoring the joints with the knife helps too but most of the time this is unnecessary.


  And there she is.  I'll set her aside and move onto the main show.  Goreshade himself.  His arms specifically are much more weight at a small connection point, unlike the girl's arm.  These, I will pin.  Especially the arm that has the skull with the giant trail behind it.

  So for this, I have the GW drilling kit with the PP pinning kit.  A dremel is nice for bigger pinning jobs, but at this diameter, it's too much.  I'm going to drill dead center in the joint squares.  Put the knob against your palm and twist the drill.  This particular model likes to unscrew the drill from the palm setter, instead of spinning like it's supposed to, so pay attention to that.  Don't give yourself too much bit out of the tip because you'll break it pretty quickly with the amount of pressure you have to apply as you drill.


  I drilled about an 1/16'' to 1/8'' inch into both joints, and then cut a probably 3/16'' bar and made a small ball of green stuff.  I'll stick the pin into the socket with the green stuff, add some glue and stick the other end in.


For the leg/torso connection, I'm just going to greenstuff.  It's not holding weight at a bad angle or anything.  Same with the backpack and the second half of the trail coming off of the skull.


  The cloak, I thought, stuck up under the backpack and would have lots of surface area to glue to.  I was wrong.  It actually comes off the lower edge of the backpack and doesn't touch the torso at all.  So I did a noodle of greenstuff along the top of the cape and glued it in.  I had to hold it for awhile, but it wasn't bad.


  Then I had to go back in and cut the excess greenstuff out.  It's easier to do while it's still pliable, but you also don't want to break the cape loose.  So do the large chunks while pliable, and fine tuning after it's dried and solidified.
  
  Then I did some final greenstuff on the trail joint since the joint didn't flow well at all and left a visible seam.


  And here they're assembled.


  One day, when MKIV comes out, I'll do the second part of this series, which will be basing.  We're not basing these guys to their plastic bases because I want to do a far more comprehensive basing tutorial than what two bases would provide.  As I said before, we'll have a chance to look at lots of different basing material, techniques and we'll probably do a little bit of painting on just the terrain too so it's ready to go before we attach the painted miniatures in the third article.

  That's it for now, hopefully this has given you some insight on the finer details of assembly for the hobby.  Any comments or questions can be sent to me here, or on my twitter feed.  Thanks for reading!

Friday, April 8, 2016

The Hunters Grim and playing them w/ Trolls today

EDIT:  THIS IS MARK II INFORMATION.

  It's entirely possible that you already know that, given the dates, but even if this popped up on your google search while you looked for Grim2, again, be well aware that this is an edition change away.  While Grim2 did not change much into MK3, the rest of trolls did, so take that into account when you read this article.

  Do I plan to update this article?  Not whatsoever.  As far as I'm concerned, PrivateerPress has thrown their game out the window and has no interest in a competitively tight ruleset, and has repeatedly demonstrated that attitude.  There will be no more PP related batreps or strategy articles on this blog until that changes.

  I'll be playing something else.


  Hunters Grim, or Grim2.  The second incarnation of Troll's favorite Anti-Cryx caster.  There's really no in-between with him.  Either you love him and his playstyle, or you wish you had Grim1.  I'm in the first camp.  Every time I play Grim1, I wish I had Grim2.  Grim1 does some things much better, and probably has the best control feat in trolls that's an actual control feat, not "You can't actually hurt me, so don't come here.".  

  Some of Grim2's problem when he first came out though was that Trolls really didn't have a lot of things he wanted.  Burrowers and the Bomber was an auto include, but Scattergunners were really the only other major ranged unit that got any benefit from his feat, and even then, the snipe really only was for Grim and his cohorts.  He didn't make Bushwhackers or Sluggers much more competitive, and he really slid off to the side again til probably the last year and a half.

  When I began picking him up, I was getting drug all over the place by Cryx and needed a solution.  My problem with Grim1 is that he's very very good at two things, and has a control feat, and he can deal with stealth things very easily, and he can lower DEF like nobody's business.  The problem I had is that A) He had to get up the board to do it, and thus risk himself though the feat helped, and B) Any ARM skew whatsoever and Grim1 is in trouble.  I have seen lots of Grim1 builds that had Mulg in it, which makes sense, but since most of the time I'm running my pairing with one of the Doomshapers, Mulg is usually taken with one of them.  So, in developing this Grim2 list, let's talk about what we're covering in the list pairing.

  Until last December, I had Runes.  Runes is pretty well known, does a lot of things well.  If it wasn't Runes, it was a form of Meat Mountain, but usually Runes.  Runes murders most Hordes armies, is very good against shooty Warmachine armies, and has a great tankiness to it that makes it very difficult to root out of the zone.  What it does not like, however, is better control presence, lots and lots of infantry, and weaponmasters specifically.  

  So, Cryx basically, though Runes has enough AOEs to try and make it work, but I still found myself getting swarmed and losing key pieces easily to three or four small based models.  Menoth is hit or miss.  Cygnar is hit or miss.   Also, the mirror matchup was an issue unless it was just Runes on Runes which is horrible.  Menoth's biggest deal for me was weaponmaster spam.  None of that, then we were fine, but otherwise it was a Cryx problem kinda thing.  Haley2 also concerned me a lot because of how trivially she controls Mulg.  Time Bomb, Dead-eyed ATGM and feat.  My favorite things are simply going to get pushed around the table and frustrate me.

  In December, Doomshaper3 dropped, and my tastes have changed a bit.  Time Bomb from Haley still hurts, weaponmaster still hurts, but Mulg doesn't get knocked down anymore, or pushed around.  Druids can't pull my stuff around anymore.  I run the Mountain King and I can remove support all day.  All sorts of things.  Doomshaper3 is my guy.  The Harby matchup is now an issue though because in our meta, Paladins are a thing, and Harby Tier takes like 5 of them.  So Mulg and D3 are the only models that can deal with it.  It's a playable game, but I don't feel like I have the volume of attacks to kill Paladins under Martyrdom.

Enter the Hunters Grim.  Grim2 solves a lot of these issues.  Whereas Grim1's game gets flipped if there's armor involved, Grim2 can debuff it just fine.  Grim1 has to get way up the zone to do things, but Grim2 can hang back, make sure his stuff is in control, and then reform on top of that to a safer spot.  Secondly, the little trapper thing is pretty legit too.  As long as it's not a super high-ARM beast, or a warjack in general, Grim should be ok.  As far as warjacks go, there's not many that can get through Grim's DEF16 on 3 focus without some serious help.  Grim2 definitely stays within the Trollblood bounds of "Difficult to assassinate."

Secondly, Grim2 gets snipe out faction wide and turns the ranged game up quite a bit.  +4RAT is very common in Grim2 lists, and +6 RAT is entirely possible.  RAT10 POW16 burrowers are crazy, man.

What makes him even more playable now though, you ask.  Well, let's look at them.

Highwaymen.  Highwaymen are hit or miss for a lot of players.  Strictly playstyle preferences.  Without any help whatsoever, they are 20 RAT5 POW10 shots.  However, I think that's the wrong way to look at them.  They're actually 10 RAT7 POW12 shots, and that's extremely legit.  They threaten 14, but any caster with movement buffs or range extension helps them with that.  Grim2, I feel, is the best caster for them.  Gunnbjorn likes them too with Snipe, but that's it.  They're good with him, but Grim2 I find only needs snipe on them once and after that it's not an issue.  Between Mirage and Snipe, they can threaten 20''.  That's not bad at all.  Stack Mortality on them and now we have 20 RAT9 POW12 shots under feat.  CRA?  Ok.  10 RAT11 POW14 shots.  There's not many casters that survive that.  

Grim2's feat turn is usually turn two, maybe top of three.  At that point, I have a decision.  If they've made any mistake, I kill their caster.  If they've made no mistake, I might still kill their caster.  If the caster is straight up unkillable (Read: Hordes and lots of transfers.  I've killed Butcher3 and Denny3 both), then I kill everything else.  If Denny1 has hid way outside of my range, I kill all of her infantry.  I leave her with nothing.  Highwaymen adapt to that very easily with CRA.  I could choose to do 4 POW17s even with them, but if there's a lot of infantry on the table, 20 POW12s do a lot to remove it.  Grim2 loves these guys and they love him.

Braylen Wanderheart.

There's only a handful of casters that run her with the HWM, IMO.  Grim2 can be one of them.  Grissel2 and Calandra are the others because of how they can enable the backstrike bonus.  In Grim2's case, it's Mirage.  The Highwaymen can be placed behind things they're engaged with, or outside of melee and walk around.  However, she doesn't play into my gameplan with Grim2 very well because I usually feat going in, and that makes or breaks the game most times.  She's also 3pts of support in an already support intensive build.

One day, I want an Ocean's 11 list with Grim2 or Calandra, and she'd make that.

Dhunia Knot.

These guys are my current favorite addition.  Most of my Grim2 list has models from the last year and a half, and the Knot is no exception.  Grim2's major lynchpin in my opinion is Mortality.  Mortality is Cost 3 and boosted.  It's essentially Cost 4, and if you miss, you're done.  You've done nothing for your army ARM wise, they're down 2 RAT, and you're on 1 transfer because you upkept Mirage.  I've missed so many boosted 8s with Grim2 it's not even funny.  The Knot fixes a lot of that.  And for two more puppet masters, I can get one onto the Bomber and help him out, feel better about not boosting to hit on one of those attack rolls, and the other puppet master goes to the HWM or Rok, maybe get that crit freeze on the assault.  In fact, the odds of that crit freeze landing go up quite a bit.  
A lot of players look at the odds of an assassination and move on.  They only consider it if the chips are down.  Even then, the odds are long and they might be able to pull an attrition swing.  The Dhunia Knot does a lot to skew those odds in your favor.  My specific Grim2 list has a lot of the tools in place (I can't wait for him to be back on ADR) that enable so many assassinations, but those tools can easily make or break the rube goldberg machine that has to go down perfectly in order for it all to happen.  The Dhunia Knot makes those far more reliable with Puppet Master on 3 different models.  I faced down a double Judicator Durst list with Grim2, and won.  When I needed to remove any piece in the list, I can get a a rerollable boosted Mortality from Grim2, followed by a rerollable boosted (L&E) quake shot from Hutchuck or Krump, stacked with 3 POW16 shots off of a Glacier King who can either A) Reroll those snakeeyes to hit, or B) grab that die that rolled a 1 in a boosted damage roll that actually got a total of 11, and maybe get a four or a five now.  The odds of your army pulling through on assassination runs that rely on key components are incredible now, thanks to this unit.

Lynus and Edrea.

  The runebearer was in this list for a long time, trying to get Mortality down to a Cost 2.  Lynus and Edrea are a better answer to that I believe.  Something Grim2 lost when he upgraded incarnations was that he handed the knockdown gun off to a pyg that couldn't boost it.  Lynus helps with that quite a bit.  He can put it on the Pyg, he can put it on Grim2 and make Mortality cost 3 w/ boost, he can put it on Hutchuck for that boosted Rust, you name it.  Very adaptable model.  Again, helps the non-warcaster parts of the puzzle put their weight in reliably.  I remember playing Cygnar, and how many times the game came down to whether or not Eiryss2 landed that focus stripping shot or not.  No more.  She'll be boosted from hereon out guys.

Hutchuck.

  Also brand new, Hutchuck brings Rust to the game.  Speaking of the same game, with Hutchuck against double Judicator on Durst.  Between Mortality and Rust, I removed the Colossal from the game trivially.  Grim2 is basically my Warmachine drop against non-super shooty lists, and Hutchuck is great for that.  Quake is also a nice addition, and I like having more than one in the list.  Sometimes Grim2's pyg doesn't get there.

Glacier King.

  I'm not a super Glacier King user yet.  I think he's good, I think he does a lot for trolls, but I still prefer other things.  On Grim2 though, he's very good if you can manage his fury (Swamp Gobber Chef).  He brings a degree of Board Control that Grim2 didn't have before, and he tries to anchor the game for you a bit too in the end game.  He buffs Grim's DEF great as well, and does the same for the HWM.  He'd seem like a shoe-in, but when he came out, Denny3 was super popular in my meta and the Glacier King straight up couldn't hit her, KD her, or anything.  I went back to Bomber/Rok, and have continued to be very happy with that battlegroup.

Speaking of Rok

  I know he's not a new option but I rarely see him, much less on Grim2 and he deserves an honorable mention.  I don't play Rok through most of the game, but it's fairly common that he's able to help clear jam units out of the way on feat turn with the spray, or sometimes land the crit stationary on the caster (thanks Dhunia's Knot), but if the assassination goes downhill or we turn to the attrition game, Rok is an amazing endgame piece.  Mirage to disengage or get him further up the board, a free charge, Mortality + Primal?  He's easily the biggest bully on the board in the endgame.  Especially if everything went well on the feat turn.  

  Sure, Mulg maaaaay be better, or maybe a second Bomber.  Generally though, I hit a game where there's a crazy hard target that I really struggle to shoot off the board (A colossal usually), and Rok threatens it enough that it has to stay back.  It can't come wreak havoc or apply scenario pressure because Rok will end it.  And if things really get pear shaped, my Bomber gets primal and now he's a very capable heavy too.  

  Rok goes in all of my pairings, and usually on Grim2.  It's hard to pass up.  

  Fire Eaters

  These guys are in everyone's lists right now.  They're amazing, and under Grim2 they're no different.  They are great for Mark Target, they're fantastic for attrition games, they love mortality, they're just good all around.  They're currently not in my Grim2 list, oddly enough, but I find they don't contribute too much to the overall assassination plan.  They're almost strictly an attrition tool.  A really good one, but attrition.  It's not often a 6'' spray will reach back and touch the caster.  Still very good, still worth considering in your list.

Building Grim2 lists

There's a few playstyles for Grim2, and the plethora of new solos and units help to really define what you can do.  I think Grim2 can play a very strong attrition list, or a very strong assassination list.  My particular variant currently is a very strong assassination with a decent attrition game.  Last week it got put to the test against a full-camp Butcher2 with Gorman's cloud on him.  He was DEF16, ARM25.  Even with Mortality, the Burrowers were dice -9.  In that particular situation, I would have preferred to go attrition, and wait til Butcher rolls lower Fury or spends some of it but my opponent had successfully placed me in some strong scenario pressure so I went for it and pushed the Dhunia Knot to the limits.  Killed Butcher with 3 Dygmy rolls to go.

  I've seen Grim2 lists with Blitzer spam anchored by Dozer's Veteran leader.  I've seen lists with tons of melee infantry that just want Mortality, and the feat just kind of works for him, maybe the scats.  I've seen some minon heavy lists, and I've see some other goofy stuff too.  It really comes to your playstyle.  Right now, I want Grim2 to be fast games, turn 2 or 3, shoot the caster and pack the tray.  I'm not even counting on mistakes.  You can play your caster very safe, and I'm ok with that, I'll kill everything else.  Eventually though, unless you just feed me your whole army, the caster has to come out and play and at SPD6, RNG17 w/ Snipe, there's not many places where I can't start pinging you.

  I've had a couple of lists for Grim2 that I've really stuck with, but I've had Highwaymen in there since they came out.  The current incarnation is:

Grim2
*Rok
*Bomber
Fell Caller
Witch Doc Croc
Max Fenns w/ UA
Max Highwaymen
Max Burrowers
Dhunia Knot

  It's really simple.  Fenns usually get mirage unless I feel like the caster is going to play it safe and hide.  Then the HWM get mirage.  If the Fenns get it, they run way up and stagger so that hopefully only the front two or three get nailed.  Between Vengeance and Mirage, it's a 5'' non-linear movement that can clear some chaff.  

  Burrowers usually burrow turn 1.  Definitely if I'm going second.  Turn 2 is when I like to feat.  If there isn't much blocking LOS to the caster (a Warjack is actually best case scenario), if he's not camping a huge ton of Focus and is high ARM to begin with, and if he's not got any tricks that backfire on me, I'll go for it.  Warlocks are a bit scarier.  I do have the volume of attacks to do it though.  If a list could assassinate the Legion Twins, I think it'd be this list.  

  So, if he's hiding behind a jack, Mirage gets upkept, Burrowers come up, Vengeance triggers, Fenns do some stuff and then we negotiate Order of Activation.  Ideally, the Fenns/Fell Caller can remove what's in the way, be it a screening unit, a shieldguard, whatever.  The goal is for the Burrowers to activate after Grim and get the feat bonus.  Sometimes they can't, and they just have to go up and try to clear it themselves.  Dhunia's Knot will go on all the important pieces at the beginning of all this, and then we'll go from there.  Ideally, Grim2 goes before the burrowers and feats, lands Mortality and shoots the guy once.  Krump KDs the jack in the way if he needs to before Grim goes, but otherwise, KDs the caster hopefully.  Then everything else goes.  Bomber, Rok, Burrowers, HWM.  It's very rare that a caster survives all of that. 

  The HWM are actually some of the more key pieces in the last.  With mortality, they land a pair of POW22s on the caster and finish off a lot of things.  Fenns don't seem like they do a lot in the list, but if all they do is keep people from shooting my Highwaymen, I'm a happy camper.

  If I can't touch the caster, then I may or may not feat.  Either way, Grim2 goes early, gets Mortality on the best thing and reforms.  Fenns tangle up in the lines, and HWM/Burrowers remove infantry from the board as much as possible.  The list seems to attrition very well, and I really think a lot of it is the high volume of reliable attacks that HWM can land on mortalitied targets.

  The other thing is the Witch Doc Croc.  Haven't talked about him a lot.  He's legit.  He's there for Awe, and fearless Burrowers.  He's been very key in a lot of matchups, and since we have a Harby issue in our meta, I don't see him going anywhere.

  Possible things I may change in the list.  The Fell Caller might go away.  The only thing that reeeaaaally needs Pathfinder are the Fenns and they get it on the turn it matters anyways.  I also really like the +2 to hit, but the Fenns hitting things isn't crucial to the list.  It's very nice, mind you, but it's not make or break and if it is I have the Knot for that.  3pts to something else would be nicer, I think, and in this case, probably Lynus and Edrea.  Hutchuck is a fantastic consideration, and I'm very tempted because Rust + Mortality is crazy.  But having a free Mortality boost, or a boosted KD shot, or so many other things is really tempting.  Also, Edrea gives me another magic attack which can be nice as well. 

  Everything else in the list performs very well, and has time and again done well.  I'm pretty confident into most Warmachine matchups that I can at least make a game of it with Grim2.  I tried him with the GK for a bit, but I had a really difficult time anchoring the late game with him at MAT5 and Denny3 was very big in the meta at that point.  I could probably get away with it now, but the biggest thing that helps is the gobber chef.  Before, the GK wanted to run full, and Grim2 wanted to camp a few, and the GK can't pass frenzy checks pretty much ever.  So that was out.  With the chef, I might could make it work now, and it'd give me a few more points to play with.  I'd still have to camp 2 all the time or cut for fury but it'd be doable at that point.  Idk.  It's an option.

  Anyways, I hope that this has been an insightful view to the new Grim2 lists available and if he's a caster that you're looking at getting into, I hope this helps broach your options.  The Hunter's Grim is a very adaptable, capable caster unit that can play nearly any style of game.  The tools are all there, and Grim2 himself can contribute every turn.  It's a fun game and keeps things interesting.  Hopefully find out for yourself.  

  Enjoy the weekend!

Sunday, February 7, 2016

Vayl2 (Legion) vs. Doomshaper3 (Trolls) x2.

  It's been a weird month guys, but I've got some batreps at least.  This is the first non-beta scenario I've played in a month and a half, so I can use the batreps.  The Objectives, however, are in beta, but because they held no significant factor on the game, whatsoever, I can share the game with you.  For all intents and purposes, the objectives are SR2014 objectives that do nothing.

  Still playing Doomshaper3.  I've played this legion player several times, and his current pairing is Thags1 w/Blightbringer and 2x units of Warspears w/UA, and his other list is Vayl2.  He's tried the Thags1 list into my twice now and I've beaten it both times, though they've had the opportunity to go either way.  So he's trying Vayl2 into Doomy3 again.  We burn through the first game, and reset and go again, so I've got two batreps here, same lists, same scenario.

 Vayl2
*Angelius
*Angelius
*Scythean
*Seraph
*Ravagore
*Ravagore
Succubus
Shepherd
Shepherd
Spawning Vessel

  My Doomshaper3 list is unchanged, though I forgot my Mountain King so the large black base is the proxy.  It's been a busy month.

Doomshaper3
*Mountain King
*Mulg
*Axer
Max KSB w/UA
Max Burrowers
Whelps
Whelps

  This is a Tier 3 list.  Vayl2 is playing tier as well.  My opponent wants to play Recon so we throw the terrain together, roll off and I win the roll with a Seven thanks to tier.

  Deployment is pretty simple.  I only have a few models.  Mountain King is deployed left of the objective because there's a house on the right and more room to move on the left and that's the only important thing there.  This picture is after the Axer has rushed MtK and charged, and the Burrowers have run.


     Mountain King runs.  Doomshaper puts down Implacability, rushes Mulg, dumps the rest to the stone and charges the Mountain King.  KSB pops aura and runs.  The one whelp I deployed runs up too.


  My opponent decides that he thinks he can get an Angelius into the King this turn.  So a Ravagore shoots a Burrower and kills.  The Seraph animuses and Slipstreams the Angelius up a bit and moves to my left.  The Scythean pushes the Angel up.  The other Ravagore runs.  Vayl2 activates, puts Refuge on the Angel that's been pushed, puts Admonition on the other and that's all I remember that's pertinent.  The Angelius charges the Mountain King, armor pierces at dice even (19 rounded to 20, divided in half to 10 for armor piercing, +2 ARM from tier, +2 ARM from stone), and does seven or eight damage.  Buys an attack, hits him again.  It does about 15 damage to the King, leaving four whelps on the ground.  It refuges off to my left.  The pot dudes attack themselves and spawn a stinger which runs up to my Mountain King and is just a pest in general.


    It's feat turn for sure, so the Burrowers burrow.  This is probably the most thinking for this game, is running the Burrowers first turn or burrowing.  I like them to be underground for the feat so that there's really nothing for the opponent to do.  They help to either stall an alpha, or be a pain on the post-feat turn.  In this case, that's what I want, the post-feat turn speedblock.  So they burrow.  Doomshaper moves up a little, feats, does Admonition on Mulg, casts Implacability and puts 1 on the stone.  

  Mulg walks up, murders the Stinger and goads away.  The Axer moves up, rushes the Mountain King.  The Mountain King activates, rolls 5d3 to heal (Four whelps, 1 hyper regen from Doomy3) and rolls five fives, healing 15 damage, bringing him to full.  He then assaults into the Seraph.  The admonitioned Angel wanders past me into my back arc.  It takes four fury but I remove the seraph (Missed an attack and rolled terrible damage on another, leaving him on two boxes) and have a fury left.  I killshot the pot, hit, boost damage and remove it from the board, along with the unit.  The Mountain King has consistently removed that pot from the game.  It's pretty funny.  To me.

  The stone pops aura and runs to support the King and get +2 ARM out there.


    So it's go time.  The back right Ravagore aims, puts a shot into the stone unit and kills three models, including the stone bearer who self sacs to the one survivor in the group.  The angel that admonitioned walks up and kills the bearer himself, putting the Mountain King down to ARM19.  

  Don't remember how, and refuges the other Angel I think.  It moves in, hits the Mountain King some but not a lot and backs of.  The Scythean goes all in but really does very little.  Vayl activates and manages to get Admonition back on the angel in the zone, oblits some whelps off and the Ravagore gets some too.  That's turn.  Shepherds do some fury things but yeah.


  Burrowers come up around the Angel in the zone.  Mountain King eats a whelp to get rid of fury and Doomshaper takes everything back in and upkeeps Admonition.  The stone moves first to get stuff set up and open lanes, and in my idiocy, I run the KSB UA within 6 of the Angelius, which admos out of the burrowers, so four of them lose the back arc bonus.  Very dumb move on my part.

  Doomshaper goes ahead and moves into the zone, casts Implacability, and puts Rush on Mulg I think.  Maybe.  He camps three fury though.  The scroll does the "Signs and Portents" thing for warrior models and the Burrowers shuffle over unfortunately.  Of the six of them, three hit with their POW8s and do nearly nothing, and only 1 POW14 hits, doing three or four damage.  The other burrowers shoot at the objective and leave it on seven.  The Axer charges in, boosts to hit and does seven or eight damage.  Buy an attack, hits (rolling hard 8s) and then boosts damage, leaving the Angel still kicking.  Originally Mulg was going to go into the Ravagore in the upper right, but the Angel is more important.  He moves up to the objective, hits it, finishes it, goads back to the Angel and kills it.  The Mountain King removes the Scythean with ease.   With the Objective gone and Doomshaper in the zone, I go to three CP.


  Not a lot anyone can do.  Vayl2 moves in, feat, oblits Mulg twice, does some damage, and kills whelps that spawn with her occulus. She's also just out of range of the KSB dude, so she can't get the +2 ARM gone.  She does refuge the Ravagore though.  The Ravagore charges, but is just out, failing it.  The Angel goes in on Mulg, but only does about half damage, removing his spirit.  The second Ravagore goes in on the Mountain King but at dice -5, does very little.


  Pretty simple after that.  Doomshaper pulls fury off of Mulg and the Axer while the Mountain King eats a whelp.  Mulg heals 3 with the Hyper Regen and trivially kills the Ravagore, scoring the last two CP needed to win the game.

  Thoughts on the game.

  1.  Vayl2 is a concern for me, but she straight up has no damage buff so she really struggles to kill any ARM whatsoever, so I'm pretty comfortable tanking even when the feats not up.  She does out threat me with the Seraph's animi though, and I think once he figures out how to leverage that and force me to feat on his terms, 
 2.  I've played against Vayl2 tiers before, and had a lot more trouble against them.  I think normally they have the Blackfrost Shard though, and this guy doesn't have that.  Until then, a PS17 scythean doesn't scare me too much.  
 3.  I can't believe I forgot about Admonition.  I even have that spell.

Next game.  Same lists, same Scenario.  I even win the rolloff again.  We deploy exactly the same.  First turn goes exactly the same.


    His turn is vastly different however.  Everything essentially runs to the left with an Angel, Seraph and Ravagore putting shots into the Burrowers, killing three, and one bad drift way out to left field.   When it's all said and done, everything is way back and way left trying to flank hard and the Seraph has Admonition, really the only thing in Charge range.  There's one Ravagore tucked into the building on the right, but that's it.  The Pot tries to kill enough of it's own models to spawn something, but no luck.


  I decide that I can stay out of charge range of most of the things, so the Burrowers don't burrow, but run up the left flank and tarpit .  The KSB pushes right and up into the tall grass, pops Aura.  The Axer moves left and back a little, trying to protect the extreme left flank, Rushes the Mountain King.  The Mountain king walks forward seven inches with Rush, boosts to hit the Ravagore on the right, hits and boosts damage doing seven or so.  Mulg walks up.  Nothing crazy.  Doomshaper moves to the right, puts admonition on Mulg, loads the stone a bit and camps three.


So.  Vayl2 upkeeps admonition.  Seraph aims and shoots two burrowers, one toughs, shoots it again and kills it.  Ravagore on the right charges in and does some damage.  Mountain King whelps mostly to the back because I want to heal, and I expect Vayl2 to oblit and clear them if I place them in front.  
  Vayl2 activates, shoots another burrower in the way, puts refuge on an Angel and camps.  Burrowers fail CMD.  The Angel charges in, armor pierces decently, then overtakes around and kills more whelps.  Then it refuges away behind the objective.  Mountain King is about half health.  The other Angel runs up a bit, nothing crazy, the Scythean shuffles in somewhat, trying to force Mulg to get Rush if he's going to come.  The last Ravagore puts a shot into a whelp near the King on the back side, but misses and drifts onto 3 KSB dudes and kills them.  The pot manages to kill one more guy and pops a shredder when puts spiny growth on Vayl.


    So, definitely Feat turn this time.  D3 upeeks admonition and pulls in fury.  Stones shuffle into the tall grass and pop aura.  Doomshaper moves into the zone, casts Implacability, loads another onto the stone and puts Rush on Mulg.  Then he feats.

  Mulg walks into the objective, hits with his fist, then the club and kills it.  Then he buys into the Ravagore.  He kills it in four attacks and goads back out of the way.

  The Mountain King assaults the Angel hiding behind the objective.  The assault shot misses both the Angel and Vayl.  The charge attack hits though and cranks damage.  The second initial misses.  Third attack hits, fourth attack hits and I boost damage to finish the angel.  With Killshot, I target the pot, hit needing a 5 and boost damage, killing it and removing it from the table.  Axer runs to my left and tries to block some more of the zone.  I go to 3 CP.


    There's not much he can do.  Vayl2 upkeeps admo, because why not. The Angelius gets spiny growth from the shredder.  Vayl activates, put refuge on the Angel, moves back and tries to shoot the KSB but since he's trying to camp, he can't roll the 7 he needs because of concealment.  The KSB stays.  He does Icy grip the Mountain King though.

  Seraph shoots the whelp behind the wall and tries to slipstream the Scythean but is just out.  The Angel charges in, does a little to the King but not much.  Enough to whelp once.  It then refuges into the zone behind most of the stuff.  Ravagore charges in, does next to nothing.  Scythean charges mulg, Mulg admonitions because Vayl2 didn't Purify.  Scythean instead kills Burrowers.  Shepherd runs into the zone.


  Doomshaper pulls in fury, leaves one on the Axer which frenzies and does some damage to Mulg.  Not much.  Mountain King eats a whelp to get rid of his. Stone pops aura for +1 STR.  Doomshaper charges the Angel, and the scroll bearer does the Signs and Portents thing.  Doomshaper boosts a Repudiate, hits and removes Spiny Growth.  Then he hits, crits (pointless against the Angelius) and does eight or nine damage on his own.  Casts Implacability because why not.

  Mountain king can't sweep because of Icy grip, but he only needs sixes to hit the Scythean, so he goes for it.  He kills it with 2 fury to spare, buys and boosts a hit into the Shepherd and kills it.  Mulg walks into the Angel, needing sevens to hit.  Four or five attacks later, it's done, dead, and I score the last 2 CP needed.

Thoughts on the game:

1.  This game was more one-sided than the last one.  Being able to start scoring on my feat turn means I go to 3CP, he can't clear me out, remove any key models, and I get to finish off what's in the zone next turn.  It's pretty bad for him.  Flanking hard had some benefits, but allowing me to position back and dictate when I feat was really bad.  He needs to be able to keep enough of his army alive past the feat turn to remove either Mulg or the Mountain King.  If I go first, I can't score on turn 2, but I probably have to feat because of my position on the board.  So I'll score 3 on turn 3, but the feat is down.  If he's managed not to lose his heavy hitter(s), he counterpunches bottom of 3 and removes Mulg or the Mountain King and fills the zone, which he can do very easily with Refuge.  Now I have to clear the zone with just whatever's left.  With the number of beasts Vayl2 brings with her and the ability to Refuge them back trivially, she can really manage to only feed me one a turn.  That means she feeds the Seraph and Ravagores into the machine, saving the Angels and Scythean for the counterpunch on turn 3.  None of that happened in this game.

2.  No damage buff really hurts.  I think I might see the Blackfrost in the future.  

3.  Recon is Doomshaper territory anyways.  Unlike some of the other scenarios, Recon encourages a brick, and really rewards the good brick troll lists.  Vayl2 can afford to spread out and play things like Incursion and Outflank, and Doomshaper3 really doesn't want to.  Recon though, man, I love that Scenario with Doomshaper.

So, that's the batreps.  Hopefully they're some good information with the Doomshaper3/Mountain King combo.  Feel free to comment and critique.

Saturday, January 9, 2016

Kromacs finished and then some.

  I've had a long log of painting accumulate over the last few months. Some personal, some commission.  Secret Santas came and went, etc.  The top of the list was a set of Kromacs, both models for Kromac1 and then the new Kromac2.


  Kromac1a for starters.  There's so much detail on these guys.  It's ridiculous.  I was really excited to get a chance at painting these models, and then I started and realized how much detail is actually on the Kromac1 sculpts.  A lot.  Too much probably.  

  When the client gave me the models, he told me that his scheme was standard, except for anywhere I'd do green, he wanted red.  The neck piece would have been green, but to make it red would basically blend into the hair so I ended up going grey/white with it.  It turned out somewhat monochromatic but I'm happy with it.


  The Kromac1b model has all the same details, just larger.  Fun model, difficult to get balanced but is still pretty sweet.  I don't like how all the details are larger though.  It's not like Bruce Banner's clothes all change size with him when he Hulks out.


  Kromac2, the new guy.  My wife got him, but she plans to paint him so I probably wasn't going to get to except that the client wanted him done.  So I got a chance at him.  He keeps all of the really cool details from the original Kromac, but tones it waaaay down.  I appreciated it.

  Keeping with the very tribal feel of the original Kromac, I wanted to convey it with his cape.  The lines cut into the cape really don't do much except break it up, and I wanted to paint in there like warpaint.  I liked how it came out.


  Then there's a Nicia I painted for Secret Santa.  Super fun model to paint.  Really dynamic.  Hirst Arts supplies form the base.


  And then these ones I received over the holidays.  The Steelsoul protector was in response to just convergence solos painted up as the artist's favorite Ironman scheme.  The other was from a guy at the LGS, and is particularly awesome.  I actually have to build a list with Gudrun now lol.


  So, I'll have some batreps out before too long.  Hopefully with holidays behind us I'll be able to get back into the swing of things and get some hobby articles out that I've been working on. Enjoy what's left of your weekend.