Wednesday, August 17, 2016

Step 2 into Guildball: What do I need to play the game?


  This originally started out as "Choosing your First Guild" but I got into what you needed to play the game first, and after a million pages, decided to break them up.  So, let's look at a lot of text that talks about all the money you're going to spend on things that aren't models just to play this game.

  That's kind of a rough impression, but the basics for this game is measuring tape and a handful of dice.  Anyone you're playing with will probably help with the rest.  The ideal starting kit is a 5$ measuring tape, a 7$ box of dice (you want at least a dozen die), the 14$ widget kit for Guildball with the Kick scatter, and something to mark character plays with.  The best recommendation I have is a Privateer Press token kit for your favorite color (base on faction. Cygnar has blue, Khador red, etc).  That's another 12$.  Chances are, someone you're playing has spares, so don't worry about it too much, but pretty soon, you'll want your own things.  The list I just gave you is 38$, give or take a few bucks.  After your first couple of games, they're things that you'll want to accumulate, and in many cases, already have around the house.  If you've played Warmachine already, you have tokens, dice, and measuring tape.  You just need the Kick Scatter.  This is the TL:DR part.  Get into the meat of the article and I have things like pictures to cheer you up.

  So.  A lot of people grab the models, show up to the game store and get a bit daunted when your ten year tabletop wargaming veteran dumps out a bag full of tokens, rings, measuring widgets, coins, marbles and anything else you can imagine cut into shapes made of quarter inch acrylic plexiglass.  My favorite is the Mark I metal Centurion model that thumps onto the table but you don't know what it is because it's in the toe-end of a knee sock.  No worries.  You won't even know what hits you.

  The Token/Widget collecting has gotten even more prevalent in the last couple of years as measuring widgets have picked up popularity.  For the longest time, 40k was the king of the board, and any question was answered with a cursory check on a measuring tape.  Melee was determined by being base to base and that's really all there was to it.

  Then a couple of games introduced melee ranges, and in my case specifically, Warmachine.  Warmachine brought in a lot of half inch melee, 2'' melee, 3'' movements after an activation, and all sorts of other in-game effects that involved half inch, 1'', 2'', 3'', 4'' and 5'' measurements on a regular basis.  It became very clear very quickly that glancing over the top of a model while holding a tape four inches off the table was not very accurate and players were more competitive than the devices used to measure things.  So widgets picked up.  Warmachine had a little half inch one with a 2'' side.  Then several other companies got into it and based on player feedback, began building ones with 5'' sides, 3'' sides, 2'', 4'', you name it.  Now there's a dozen companies that do nothing but widgets.  And if you're a podcast with more than a name and less than an episode, you have your own brand of widgets.

  Similarly, Warmachine had a lot of in-game effects and statuses that needed to be marked, and introduced token kits for them.  Other games have this too, like Infinity, and now Guildball.  So when you see this veteran player dump his kit, know that he's accumulated this assortment over several years, and that most of it is stuff you don't need right this second.  Let's talk about the stuff that is necessary, and then we can talk about some of the extras.

1. Measuring tape

  At this point it's moderately archaic but still needed.  It's still the best way to measure out 17'' and etc and nobody minds too much if all you're doing is sprinting and seeing if you can kick a goal next turn.  Get a cheap 5$ one from walmart or whatever.  It's not the sort of thing I would get at a game store since it'll have some miniature company's name on it and they'll want quadruple the price.  Get the cheapo and buy another Guildball mini with the rest.  Quick tip:  Anything that says "Games Workshop" on the side costs triple what it's worth and takes a little piece of your soul that you'll never get back.

2. Measuring widget(s)

  Maybe you come from warmachine already.  If you do, your regular stuff is probably fine.  Until MK3, Privateer Press didn't produce really good 1'' widgets except for the little key one for a long time.  The new MK3 kits do really well though if you have one.  I actually probably prefer it to the standard Guildball set, but there's pros and cons.  The AOE template is pretty useless in Guildball, and the Spray Template is nothing more than a 10'' straight edge.  However, the widget on the upper right has a half inch, 2'', 1'' and 5''.  The only thing it doesn't have that you'll want often is a 3'', and sometimes a 4'', but mostly 3''.  I do really like this one though because at 5'' long, it's easy to use the 1'' end for melee measurements without getting too much in the way of other models.  However, 2/3rds of this kit is largely useless so I would wait til one comes up used, or your money is burning a hole in your pocket.  Get the following Steamforged one instead.


  So, the Steamforged set is probably the best one to get simply because you'll need the Kick Scatter token.  It's the only widget like it in the industry and very basic to the game.  It simply points what direction the ball goes after a kick, and it's never straight on.


  The little widget in the bottom has a 2'' side, a 3'' side and two 1'' sides.  That's enough for many situations and is most melee ranges in the game, and most movements.  It's not a bad one.  The only dumb token in the entire set is the drop scatter token.  It has the same problem as a measuring tape and requires you to hold it over the top of the ball and look down.  It's probably fine, and once you roll the direction, you measure the distance off the ball, so the drop scatter widget at best is a rough estimate.  Really though, want you want is the Kick scatter.  If someone has an extra, buy it from them.  Otherwise, old Warmachine ones are great for everything except that Kick Scatter.

3. Tokens

  This is one of the few areas I think Steamforged dropped the ball on.  A token kit is anywhere from 26$ to 32$.  I can get a starter kit for the cost of a token kit that's already outdated since they're from Season 1 and we have models from Season 2 that are already in tournaments.  None of the new captains have tokens in the Season 1 kits, so for teams like Brewers and the Butchers where the Season 2 captains are wildly popular, the Token kit is a waste.  I'm actually going to direct you to Privateer Press's kits.


  You can easily write the statuses and character plays down on the blank sets, and since there's a dozen factions in Warmachine, you even have a selection of colors to choose from.  Instead of 30$, you're looking at 10-15$ for a far more adaptable kit.  And the focus tokens are made to stack, and there's 20 of them.  I highly prefer them to influence tokens and even after I buy the new Muse on Minis token sets in the next month, I'll possibly continue to use focus tokens from Warmachine.

  On top of that, many Guilds have AOE character plays, and only a couple of AOEs to go with them.  The Engineers are a perfect example, easily placing two AOEs a turn and their kit only comes with one.  Grab some of these.


  A pack comes with 5 and they've got a spot to write on.  On top of that, they work great for a drop scatter token since you can actually place this one around the ball.  These are 7$ to 10$ for 5 rings, depending on the local markdown.  Your local hobby or leather store will have simple 3'', 4'' and 5'' metal rings that work too, but they don't have the arrows on them for ball scatter.  For AOEs though, they're great.

  Lastly, status tokens.  Steamforged has this little bundle.


  However, as of Season 2, there's a new condition called "Snared", which is not a token in this kit.  It's, again, already outdated.  So again, I use my old PrivateerPress ones that used to come with individual faction token kits.  Now, however, PP wised up (in one, single area) and created universal packs.  There's two.  Effects and statuses.  The Effects come with Fire, Corrosion (poison) and Disruption (whatever you want).  The other one comes with Knockdown, Shadowbind, Stationary, and Blind.  Stationary could double as Icy Sponge tokens, but you'd be the only player in the world to ever actually use Icy Sponge tokens.  Bleed is really the only one that doesn't translate directly since Shadowbind works for snared just fine, but between Blind, Stationary or Disrupted, take your pick.  Or, wait for Muse on Minis to release theirs.  However, so far, this list has had things you can pick up semi-locally.  In the next section, we'll talk about some of the products out there you can order.


  The caveat to all of this is that I've seen anything from marbles, to the little glass aquarium things, to colored balls of fluff used for statuses.  I like to have a bit more visual than that for both me and my opponent, but as long as it's clear on the table, that's what matters.

4. Dice

  Get what you want.  They have Guild dice with the logo on them, but often you'll find you don't have enough.  That's not really their fault, there's only 10 dice and it's not often that you need more than that though it happens probably at least once a game.  I wish the kit had 12, but at 10, it's usually adequate.  I would definitely have another set handy though.

  It's also worth considering having some D10s or D20s to keep score and momentum.

5. Card Sleeves and a marker

  Couple of bucks.  Get some cheap sleeves and a small dry-erase marker so you can mark health on your guys.  I've gotten all fancy and laminated mine, but that's because I have easy access to one.  Otherwise cardsleeves are perfect.  But you'll need some.

  THE OTHER OPTION

  Instead of Cards, get an app.  If you've got a smart phone, there's no reason for you not to have a Guildball one anyways since it's great toilet reading.  There's two options.  Tooled Up is one.  It's free.  You download the app, download the card pack and it's ready to go.  You can build lists, play games, record damage, have a timer, everything.  Get it.

  The other app is Guild Ball manager.  Both of these apps are in the Google Play store.  Idk about Apple users. No one likes those guys anyways.  Buy sleeves, you hipsters.  But for all the smart guys on Android, there's all kinds of options.  Guild Ball Manager downloads and is ready to go.  It's an easy to use app, also has a damage tracker, list builder, all that great stuff.  The only issues I've seen is that it doesn't just straight up use the Guildball resources PDF cards, and sometimes the app is wrong, whereas I've never had an issue with Tooled Up.

EDIT:  The other side has spoken and there's an app for IOS called GBKeeper.  I'm told it's pretty decent, but that's straight from the mouths of Apple users so who knows if that's the truth or not.

Extras

  None of the below is required, and honestly, it'll be a few weeks before you can appreciate the handiness of most of it.  The above should have you set up for your first game without needing a whole lot, but the below is what you're going to see that everyone else has and once you know what you need, you'll see that it's a lot handier.

1. Measuring Widget(s) and tokens

  The movement from measuring tapes is more involved than just 5'' and less measurements.  As tabletop wargaming establishes that it can be a competitively tight game, the small things that can be wrong easily are slowly taken out of the equation.  Within a year, I think it'll be rare that you see a measuring tape used regularly at any Guildball table, and the same goes for Warmachine.  There's already assortments of 1/4'' plexiglass acrylic measuring sticks, anywhere from 4'' to 10'' long that can be stowed in a bag and combined for any length of measurement.  The most useable ones will be the ones at 5'' and below, but even for 9'' sprints, you'll see a four and a five used together more often on the competitive scene as time goes one.  Especially if it's for anything like a kick or a charge that really matters and it's possible that they may be out.

  This link here takes you to a collected Guildball Resources thread on the forums.  The top section includes various companies that sell tokens designed for Guildball.

  My second favorite is the Art of War studio.

  https://art-of-war-studios-ltd.myshopify.com/collections/guildballcompatible

  They have the new measuring sticks, Guild specific, all of the status tokens you could want and updated core sets to cover all of the new spells.  Most companies have the same thing, but I like AoW's quality quite a bit and I like their designs.  If it wasn't for the next company, and that AoW is in the UK, I'd already have a set from AoW.  If you're in Europe, I'd pick these guys.

  Muse on Minis is my favorite, but they have yet to release the full Guildball line. The Muse guys live an hour and a half from me, I've been to their convention, and met and talked to most of of them.  They're great guys, and we've had good times in Omaha and Des Moines both, so it's personal preference when I try to throw money in their general direction, and try and support a semi-local company.  John DeMaris runs the Muse Token line, and is extremely easy to work with on custom orders and I have nothing bad to say about him.  I've never seen a guy take so many pirate jokes without breaking into tears.  If you're in the states, these guys are my recommendation.

  http://museonstore.com/

  I'd also like to point out that in their last podcast, they announced that the GB tokens would be releasing within the month.  I'll be purchasing those immediately  Currently, I use their multiwound magnetic trackers for my Momentum counter, and that's been pretty decent.  The best one is the objective health counter.  It's large base sized, and has up to 18 pts, so it's perfect for tracking momentum, and acting as a goal.

  Counter Attack is another that I have seen used personally.  The best is their goal sized token that has multiple layers and can track both momentum and score.

  http://www.counterattackbases.co.uk/mob-ball


2. Season plots

  Similar in concept to scenarios for Warmachine, Guildball uses Season specific plot cards.  There are twelve of them.  You deal out 2 piles of five, select three, discard two.  They have things like +1 DEF against the next attack, or +2 TAC during a counter attack, things like that.  Not particularly game-changing, but slightly different and adds some flavor and mild unpredictability.  Season 1 had one called "Don't touch the hair" which was basically Unpredictable Movement, but after the first attack.  It created a pretty negative play experience though and as such, none of Season 2's are quite as drastic.  There are a few tokens that are needed, but they come with the deck.  The plots are not required to play, but any player past the basics will probably be playing them.

  They are also available for free online as well in the Guild Ball resources section, so you're also welcome to print them off and sleeve them.  Saves you 11$.

3. Goal/Momentum counter

  I touched on this in section 1, but I want to hit it again.  You can use dice for this, or an actual purpose built token.  I encourage it.  It's important to both you and your opponent in this open information game to know what eachother's momentum total is currently at.  Any die greater than D6 is probably fine, but there's some nicer setups out there.

  My overall goal is to build/paint a pretty Brewer goal with a momentum counter built in but that's still in conceptual phase.

4. Laser

  Not a first purchase, certainly, but definitely one that is the best tool for specific situations.  There are several variants, but my favorite is the Army Painter one.

  http://museonstore.com/collections/frontpage/products/army-painter-target-lock-laser

  It's a small pen laser that lays down a long straight line when held directly overhead.  It's best use is for charge lanes or ball paths.  Some of the measuring sticks will work for this as well, but when looking at LOS issues and etc, the laser is one of the best 10$ purchases you'll ever make.

5. Pitch Mat

  I used to really not care for mats.  It was in warmachine, and a 4x4 mat was expensive, and didn't bring enough flavor to the board to interest me.  Since Warmachine always used scenarios, I had to set up and measure things out regardless, before even placing terrain.  Prior to MK3, a mat that had all the markings for scenarios and deployment lines was a lot of open information in a game that didn't allow premeasuring.  Now, even in MK3, it's still a cluttered mess to have a mat that has all that information, and what's worse, Steamroller scenarios change from year to year.

  Guildball doesn't have any of those problems.  There is no proper scenario.  Premeasuring exists.  There's no reason not to have a mat that lets you convert any 3x3 surface into a playing field just like that.  I'll talk about terrain in a moment, but for the most part, a pitch mat has all you need.  For 57$ you have a ready made setup.  To many people, that's not worth it, but I play enough that it's extremely nice to have and makes for a very pleasant looking game.

  Steamforged has produced 2 specific mats.  There are probably others out there, and I think there are people photoshopping their own designs and having them printed out, but I'm just focusing on the official ones.  There's the Classic Pitch, and the Proving Grounds.


  The proving grounds, to me, have a lot more character.  But more importantly, it has two uses.  The Demo format for a 3v3 game of Guildball uses the smaller, green board in the middle, and uses the goal spots that are six inches further in from the normal spots.  As a prior PG from Warmachine, I'm fairly used to introducing other players to any game I'm playing, so the Proving Grounds immediately stood out to me as the preferred option.

  Again, these mats are not required, you can easily make the needed measurements.  I do prefer just rolling the mat out though, and I enjoy the asthetic quite a bit.  When my fully painted army is on the move through fully painted terrain on a full color print mat, it's a beautiful site.

6. Terrain

  There's two main options.  Ideally, your local game store will already have terrain, but Guildball tournament grade has specific measurements.  Obstacles need to be within 2x2, Barriers need to be within 3x3, and forests, rough ground and fast ground all need to be within 6x4.  Many of the standard terrain sets from Warmachine don't really meet these needs, so there's a few other options.

  One of them is to build your own.  I have another article here, building your own terrain using Hirst Arts, and at some point in the future, I'll do one about not cheating and casting your terrain, and making it out of stuff around the house.  For now, the best suggestion I have is normal sticks, branches, basing material.  Mine looks like this.


  The second option is buying some.  If you're going to buy some, the only really Guildball Specific terrain is the beautiful 2D stuff from Broken Egg Games.

  http://www.brokenegggames.com/enhancements/guild-ball/guild-ball-2d-terrain-set.html

  My problem with Broken Egg Games is their pricepoint sucks.  They're super proud of their stuff.  They've got good quality stuff, but they charge you pretty heavily for it. Art of War and Muse on Minis both have considerably more reasonable prices.

EDIT 7. Carrying Tray

  I happened to do some horse swapping and landed this super sweet carrying tray for Guildball from Tectonic Crafts.  For Warmachine, where you could have thirty to sixty models, carrying trays are pretty mandatory.  Instead of unpacking your army bag for every single table switch in every round of a tournament, you just loaded everything you wanted in the tray and left your bag somewhere safe.

  Guildball isn't quite as bad.  It's 8 models and a pocket of tokens.  It really doesn't take too much to carry it around, but after a bit, a tray is pretty nice.  I was planning on building one eventually, but now I've got a pretty sweet little one.  They're worth looking at.

 In Closing this became a fairly long article, but I hope it's given you an idea of what you need going in, and what's out there for options.  Don't feel pressured to have all of this immediately.  Most people out there want you to play the game and get involved and have more than enough for you both to use.  Get out there, play.  This is just a resource for you to know what you'll need at some point and what else exists.  This is aimed at players new to tabletop wargaming, and Guildball, unlike any other, seems like it has the highest percentage of players new to the genre.  Warmachine had a lot of ex 40k, Fantasy and stuff, but Guildball seems like it's half tabletop noobs completely.  It's cool to see.

  Anyways, hopefully this has been some help to you.  Part 3 will be the basics of choosing a guild with some hard numbers and averages in the differences. Thanks again!

Sunday, August 14, 2016

Guildball Intro, in case you've missed it somehow.


Think Rugby, but in a Gladiator stadium. A Captain, four players and a mascot. Your team, your fight.

You know Dark Souls? Did you know it has a board game? You may have heard of Steamforged. They recently held a wildly successful kickstarter for the Dark Souls boardgame. However, the boardgame is neither their first game, nor their first miniatures game. It started a few years ago with Guildball. Some of you may have heard of “Warhammer” or it’s American competitor, “Warmachine/Hordes”. Both fall under the tabletop wargaming umbrella, along with many other miniatures games. The newest contender to this genre is Steamforge’s “Guildball”. Guildball is a ballgame set in a fictional world full of crime, poverty and heinous organizations full of greed and intrigue. It’s almost a steampunk Victorian setting for the most part. Many guilds have become increasingly powerful in the wake of the Century Wars, and instead of settling their disputes through politics or money, they settle it on the field with their team. Thus: Guildball.


At the beginning of each round, players allocate “influence” to each character depending on what your plan is that turn, and each character is able to do an action per influence or use it towards “character plays.” There’s a second resource in the game, called momentum. Momentum is created by the players based on successful attacks, passes and scores, and can be spent to heal or perform extraordinary acts, or “heroic plays”. Some teams are better than others at building momentum, others at using it, and others still at taking it from you.


Playstyles are extremely varied. The Fishermen Guild and the Alchemist Guild both want to play ball, and bring the best “Strikers” to the game for that purpose. The Brewers’s Guild and Butcher’s Guild, on the other hand, would rather take out your players, and maybe score at the end when your team is down and broken, laying on the field in pieces. Then there’s Guilds like the Hunters and Morticians who don’t particularly excel at either, but are dominant at controling, and limiting. There’s currently nine Guilds, and almost any playstyle can be found among them. If you want to hit hard and survive, but maybe score a goal too, there’s Masons. If you want to hit from range and focus on scoring with the ball, there’s Engineers. If you want to be good at any and all of it and have the widest selection of players, there’s the Union. Any and every option is available and more on the way with each season.


Unlike Warmachine or Warhammer, a list is not built up of points spent on models. A tournament list is 8 models including a mascot and a captain, and two of them sit on the sidelines to be subbed out between games. Because a tournament list is just 8 models, most guilds only have 10-12 players available currently, though this number will go up slightly as the game ages. Compared to Warhammer or Warmachine where a tournament requires two lists, each one being anywhere from 20 to 50 models, and a pricepoint of 400-1000$ per list, Guildball hands you a starter kit for 32$, and individual models sell for 10-20$ per model depending on the size of the model. I own three complete Guilds currently, and most of another, and all of that for less than one Warmachine list, and waaaaaaay less than one Warhammer list.

Here's a few models. This is a Fisherman team. All about kicking the ball, pushing models around and being hard to get ahold of.


A few of the Butchers. They're out for blood.


My particular favorite, the Brewers, or the drunks. They can brawl and ball both, but they'd prefer to brawl.


The Morticians. They're dicks. All control, denial, and taking things from you.


A little bit of everything. There's some union, some morticians. It's all painted beautifully. Well, it looks confusing. Sure it does. I thought that too, and I’ve played seven years of tabletop games. It took five minutes to figure this out. 


Let’s look at a card real quick.


This is Corsair. He’s a badass from Season 2 for the Fishermen’s Guild. In Season 1, the Butcher Captain chopped his damn leg off in the storyline, and now he’s back. Unlike the Season 1 Fisherman Captain who plays ball all day long and exceptionally so, Corsair brings the fight back into the game. What’s the difference between Season 1 and 2, you ask? Is the Season 1 guy gone? Nope. You can play them both. Seasons just introduce new players and rules modifications to the game, much like large patches to any online game. 

This card is still confusing though, I digress. Let’s look. He’s got a name. Corsair. There’s a base size on the upper right. We don’t care because he comes with a base. Under that though it says his Melee zone is 2’’. That means he can hit people from 2’’ away which is great, and probably the best character rule in the game. Most Fisherman Players have it. They’re annoying like that. Now all the numbers. From left to right, let’s talk about this.

  MOV 4/6. He can walk 4’’ for free, sprint 6. Sprinting costs an influence, one of those resources we talked about.

  TAC 6: He rolls 6 six when he attacks things in melee. This is pretty high, and only a handful of models have higher. TAC 6 and 2’’ melee means this guy is a boss in a fight. Most captains can handle themselves, but this guy is in the top half for sure. 

 KICK 3/6: Believe it or not, this is what the game is supposedly about. The 6’’ is how far he kicks, and the first number, 3, is how many dice he rolls to do it. 3/6’’ is pretty decent, a little above average. Most players in the Fish have at minimum that, and usually more. There’s ways to modify it but 3/6’’ is a great place to start.

  DEF 3: So, let’s say Corsair attacks another player’s Corsair. TAC 6, we talked about that, right? So he rolls six dice. On a three or higher, it counts as a hit. 3+ is pretty average for a big guy like this. Not amazing, but with 2’’ melee, he has other options. Also, the back of his card says that he doesn’t give a shit about some things. We’ll get there. 

 ARM 1: So, everything on a 3 or higher hit, right? Well, take one away for his ARM stat. If four dice hit (average), then take one away, now he only has 3 hits. File this number away for a minute. 

 INF 4/6: The main resource here. 4 is how much he generates, 6 is how much he can be allocated. At the beginning of the turn, all of your dudes put their influence in a pool. Corsair contributes 4. Then you allocate it to people you want to do work. If Corsair’s in a good spot to kill a guy, then give him six. Someone going to take a ball and kick it? Great, give him some. Etc. It’s a resource.


At the bottom, we’ve got his health. This guy’s a pretty difficult guy to one or even two round in some cases. Pretty decent for a captain. See the numbers in squares? Those are what he can come back into the game with after being taken out, depending on the number of “Icy Sponge” tokens you spend on him. Most of the time, you spend just the one he gets, and he’ll come back in with 6 boxes and you can heal up from there.


The back of the card is similarly cluttered with abilities. Cosair’s got a lot of good ones, including Sturdy so he ignores the first Knock Down. A great ability. He also has a “Legendary Play” which he can do for free once per game. Most captains have something like that. Those are the basics of a card, which comes with the model. Getting into the game is easy. There are 3 man starter kits.


Then after that you buy individual models. You’re 3 away from being able to play a full game, 5 away from a full tournament list. The Guildball buy-in cost is very low for a miniatures game. Even better, it can be free. Steamforged has posted their entire ruleset, including the model’s cards and the complete rulebooks with tokens and scale sized printouts of the players themselves, all on line. You can literally print everything you would need except the dice and maybe a tape measure, for free, cut it out and play it. Even better, there’s an online option, ALSO FREE, called Vassal. Vassal is free to download, and Steamforged has developed an also free module for it allowing you to play the game online with friends, people from other countries, states, or just online because it’s easier than putting pants on. The game is widely accessible at 0 cost if you want it to be. You wouldn’t download a car, but you can download Guildball. It’s encouraged!


Try a game! Print it out, give it a shot. The rules are all there, youtube is full of videos, there’s a complete set of forums for assistance, news and strategy. Try the game! Want to get started?


For all of the rules and paper proxies, check out:
http://steamforged.com/resources/

For trying out vassal, try:
http://diceotfirstdegree.blogspot.com/2016/07/vassal-for-guildball-getting-started.html


For regular support and online community, go to:

http://forums.steamforged.com/


Want a professional introduction to playing the game? Steamforged has one, at:

https://www.youtube.com/watch?v=SyoajPumow0


Hopefully this has piqued your interest enough to take a look, maybe even give it a shot. If you have a local game store, contact them and see if they have anyone there willing to do a demo. You can even use the Pundit locator on the steamforged website to locate a nearby rep to demo for you.

TL:DR A small miniature game that's fantastically addicting and either free or cheap to get into. If you have any questions, feel free to contact me through here on imgur, or email me at diceotfirstdegree@gmail.com. I’m a long time miniature wargamer and have two years of hobby support on my blog so hopefully I can answer a lot of your questions. Thanks for reading!

Sunday, July 31, 2016

Esters, Rage, vRage and Gutter finished, plus running a Low-Inf Brewers team with Rage


  Let's lead off with the pictures of decent looking models.  I like to start my articles with stuff that I know more things about, and then it devolves into random nonsense based on 0 experience from there.

  Any less experience, and I could playtest for PrivateerPress.


  Anyways.  The Season 2 Brewers Captain, Esters.  I was slow in picking her up.  I spent a lot of time trying to play the Dark Horse on Tapper and even into the Hunters I was doing ok.  However, he really does very little for the team, and after a particularly brutal matchup where he was easily tied down and the team just died without him, I went to Esters.  Esters can literally support the team with 0 influence.  She's a dangerous lady with 4 influence, but once the scrum is engaged in the middle, she mostly sings.  Occasionally knocks down.  She likes to be the first one into Corsair who can be difficult to get momentum off early, but with momentous 2 damage and KD, she can get past both his tough hide and initial KD, and then her second hit puts him on the ground.  I'm enjoying her playstyle, but her model is definitely far from my favorite in the lineup.


  Gutter is my control piece at the moment, though I'm warming up to Stave.  Gutter goes into Tapper lists, being far better at threat extension than Tapper's Marked Target play.  I'm playing her less currently, but again, I've gotten better at keeping Stave alive.  However, Brewers love that scrum in the middle, and Gutter slots into that kind of thing perfectly.


  Rage is my surprise favorite.  I really loved both Rage sculpts, and ended up getting them both and painting simultaneously because of it, even though I haven't played vRage yet, or even Union, and it's not really that high on my list.  However, the list I want to talk about a little has Rage in it, so he's painted up and rolling.  We're in the middle of a Big League, so I haven't been able to field him as much as I would like to, but when he gets on the table, he's hella fun.


  vRage is straight up because I like his sculpt, and one of these days, I'm going to play him just to abuse Red Fury.  May not be the best reason, but I love that character play.  It ignores so many things.  He can cast it on himself even.  It's hilarious.


  The whole party of painted models.  Not everything I own, just the painted stuff.


  About that list.  I have no idea what I'm doing.

  However, this idea started with someone pointing out that Rage cannot be affected by friendly character plays.  So I began wondering if I dumped most of my ball players, leaving one or two that don't need a lot of support, and everything else was bashers, how well I could do.  The biggest thing to try was Rage, and his number one problem is getting tied up by engaging models.  Guess who loves blowing away engaging models?

  Stave.  Stave can toss that bomb in there and blow off the entire crowd, leaving Rage alone in the middle, free to charge whoever.  This is especially fantastic if it's early enough in the turn that the opponent doesn't have the momentum to stand a model up and charge.

  Who else?  Hooper brings 2'' melee, which is extremely important in many matchups.  For awhile, I really bounced back and forth between Hooper's 3 inf max and Stoker's 4, or 5 if Stave is around, but Hooper just hops up to TAC7 so easy and requires less setup for more damage.  Stoker wants things on fire, he wants stuff unable to escape his 1'' melee.  Hooper doesn't care.  So Hooper comes along in most matches.

  Before we go on, let's talk Captains.  Esters is obviously the best choice.  She's capable of giving away all of her influence and still contributing, but she's also just better against so many more matchups.  The 2/2 movement has been the biggest thing though. Being able to just toss that out there so easy has been make or break.  So that ups Stave's sprint, Hooper's charge, all sorts of things.  The only issue is that it doesn't affect Rage in this lineup.

  Mascot.  Scum doesn't bringing anything to table for a bashy list, I don't feel.  Quaff is obviously better at that with Bag of Quaffers. More importantly, with Second Wind, he does a lot to remove Stave's ability to farm momentum for the other team.  That, by far, is my biggest complaint with the big 2/0 defense guy, and Quaff protects him for the most part.

  Rage, again, was the big model I wanted to play.  This team so far has 3 1inf models between Rage, Stave and Quaff, but Rage can't even have more than one so it works out.  He goes and wrecks models, and between him and Hooper, causes a ton of damage.  People like to engage him too, knowing that's what shuts him down, and Stave loves it when you walk into his range, letting him throw and then walk away.  Also, Rage has Tooled Up.  But so does Spigot, so why bring Rage?  Well, don't bring Spigot.

  Bring Vet Spigot.  I hated this guy's card when I first looked at him, but the more I thought about this low influence team, and the desire to have just one kicker on the board, vSpigot fit the ticket.  He doesn't need influence to score, he just wants momentum.  He has close control, sits on the edge of the board, counter attacks for free, and scores from 18'' away for FREE if he starts with the ball.  That's ridiculous.  So, he contributes 2 inf, and doesn't actually want any of it after the first turn.  He can use it, but doesn't need it.  He even has Goad if you need it for some reason.  It's like Pinned, except a third of your team's influence doesn't go down the drain when you miss.

  That's 6.  That's the list.  It brings 11 influence.  Esters wants 4 at the beginning, maybe second turn.  Stave wants 2.  Rage gets 1.  Hooper gets 3.  Throw 1 at Spigot so he can run if you want, or Esters if you want her to sprint.  Or Stave for the sprint.  Hopefully Stave can blow somebody towards your lines.  Esters can go early and buff whomever for whatever, maybe Hooper for Speed or Damage, and then she throws AOEs in the way of the scariest models, slowing them down.  Stave blows in the nearest guy and Hooper builds momentum off of them for next turn.  At that point, he could be +3 Damage with KD from Stave, Tooled Up from Rage and +1 damage from Esters.  That's a Momentous 6 Damage at the end of the playbook.  Once Rage gets involved, it gets pretty ballistic.

  The two I have on sideboard have varied a bit.  One is almost always Mash.  If I really feel like I'm going to lose the melee fight (Butchers) or if I'm bringing more than enough melee and need to protect the ball more (Shark Fishermen), then I bring Mash for 2'' unpredictable movement.  Between Him and 2'' UM, Spigot with CC and Poised on the edge of the map and Esters with Gluttonous Mass, the ball can be extremely difficult to get away from the team.  Hooper and Stave still smash face and even Esters can get involved.

  The other one on the Sideboard...  I had Stoker for a bit, but I always preferred Hooper.  Avarisse and Greed are an option instead of Rage, and it's possible, but I haven't decided the matchups I would sub them in for.  The biggest reason I would keep Stoker is to sub in for Rage if I'd rather have Guild, and 12 influence.  Again, I haven't decided why I should do that, but it's an option.  Gutter is another possibility, to replace Stave if I feel like I can't protect him.  The list is going to take some figuring out, and more playtesting before I decide it's trash.

  The game I got in with it was against Corsair Fishermen, and I trashed that list without using any of my sideboard.  Corsair brought Kracken, Jac, Avarisse and Greed, Sakana, and Salt (for now).  My opponent tried to play a bashy game, but Esters easily controlled Corsair, Kracken and Avarisse all game long with AOEs and conditions and they only ever got involved when Stave brought them.  Every turn, Hooper was +2 or +3 damage.  Corsair went after Spigot early turn 1 and got him, but had to come up the board quite a ways to make it, after which Stave blew him in close.  Hooper took him down to one or two points, and then with the momentum, won the next turn and Esters killed him I think.  Next was Kracken, pulled in by Stave.  Hooper and Rage killed him too with room to spare.  It took until round 3 for him to finally score and kill Vet Spigot simply because Stave was blowing models away and Corsair simply couldn't get enough momentum to stand up and do things.  Spigot came back on in the back of the pitch and picked up the goal kick then mosied around.  Hooper and Rage killed Salt and Jac in round 4, Rage being cleared off by Stave, and Spigot meandered up the board with an influence to sprint and scored the goal, no sweat.

  I think if my opponent had played a considerably more scoring team (subbed out Avarisse for one of the strikers, maybe Kracken too), I would have had to focus considerably more on protecting the ball or losing against goals.  As it was, I was happy to trade Spigot for Corsair, and then farm enough momentum off of Corsair and Kracken to heal Spigot and stand him up throughout the game until he finally died.  And when he finally died, it was fine because Icy Sponge was faster at getting him back to pick up the ball than him trying to run back there was.

  Overall, Rage and Hooper converted their combined 4 influence into 12-14 Momentum every turn.  Rage was getting 2 per attack, and so was Hooper.  My opponent really struggled to get into the fight at a pace faster than I was allowing, but with everything MOV 4/6", Esters was easily reducing the scary guys to 2/0".  Even with their harpoons, I just had to stay outside of 8'', and even Stave can do that.

  So yeah, I'm excited to play some more Rage, and I'm excited to do it with a completely painted team, with the exception of Quaff.  But Gencon is next week and Quaff should be on shelves shortly after that.  I'm excited.

  Hopefully you enjoyed seeing some more painted Brewer's models, and don't think I'm completely crazy for trying Rage.  We'll see you around.

Sunday, July 24, 2016

First Guildball Tournament and rude awakenings

  I have no idea what I'm talking about.  We can lead off with that.

  We had 12 signed up for a tournament, with four or five people coming on top of that who didn't have their names in the hat.  Unfortunately at the last day, we lost most of those due to a number of reasons.  We ended up with only 7, but one dropped to keep the numbers even.  He came back in on round 3 to cover the bye, but that's about it.

  I took an Esters team with Scum, since I didn't have any choice on the mascot.  I really like Tapper, but he really struggles against any control it seems like, and if I'm not able to gain any momentum, it's hard for Spigot to use his Heroic to get some speed into the team.  I've found I have a lot better grasp of the game when Esters is able to affect the team from turn 1.

  For the full lineup, I took:

-Esters
-Scum
-Spigot
-Friday
-Mash
-Hooper
-Stoker
-Gutter

  Spigot is always good with tooled up and football legend.

  Friday is there if I really want to play the ball.  If I go into a strong beating team, then I'll just go all in on footballers.

  Mash, I actually like to put in my teams when I'm up against scoring teams.  He retains the ball very well with the dodge against everyone but the kickers with 2'' melee.  Even them, he's 3/1, but can become 4/3 extremely easy.  Between him and Esters with Gluttonous Mass, I can usually retain the ball pretty well.  On top of that, once they start getting me surrounded, Mash just Long Bombs the ball into the backfield.

  Hooper is Hooper.  In this particular lineup, I didn't know if I prefered him over Stoker since Stoker has the extra influence, and with Stave (who wasn't in this line up), can go to 5 influence.  However, I'm finding that for 2 reasons, Hooper is more reliable.  2'' Melee, for starters, lets me dodge of a lot of problems and solve many others.  Secondly, his Heroic nearly counters Stoker's influence.  At TAC5, Stoker really wants some crowdouts so he can wrap, even at 4 or 5 influence.  He also wants things on fire to do damage.  Hooper just wants them knocked down.  Stoker, with 1'' melee, struggles into packed centers where he can be crowded out easily.  Hooper just stands outside of the circle and plays whack a mole, and if you've got any momentum at all, he does it at TAC7.  Any crowdouts or help at all and he's wrapping pretty easily.  I can consistently get 6 momentum a turn off of Hooper where Stoker, even with a shorter playbook, needs more setup for that.  I don't think Stoker is as bad as people give him credit for, but when Hooper can bump up to TAC7 and gain his +1 Damage without getting into b2b contact with the opposing model and do it all from 2'' away, it's hard to let him go.

  Gutter lets me play the game at my pace.  Instead of having to go to enemy and scrum, I can easily sit back, let Esters slow down the pieces I don't want to deal with, and have Gutter pull in a specific target for Hooper/Stoker to beat down.  If it comes to a scrum in the middle, Gutter is a solid choice for putting all that damage out there on multiple models.  The other option is Stave, but Gutter is able to survive considerably easier at DEF4 ARM1 instead of Stave's DEF2 ARM0.  I really want to play Stave, but I don't think he's an option until I'm able to take Quaff and pull Stave back with Second wind.

GAME ONE: Brewers vs. Masons

  My wife plays a lot of Masons, but never Hammer, and she hasn't figured out Brick yet.  So while I felt comfortable into the Masons, I was wary of Brick and Hammer both.  Hammer, I know what he does.  Brick, I hadn't seen played effectively before.

  Spoilers: He got played effectively.

  I left Hooper and Friday out.  He took Hammer, Mallet, Tower, Brick, Flint and Marbles.  I won the rolloff, Brick kicked, and I bounced the ball around a bit, trying to stall Gutter and Stoker's activations till someone came close enough.  Esters activated early, moved up and targeted Brick with Fire and Rough Ground both, hitting him both times and lighting both Brick and I believe Mallet as well, on fire.  This, as long as my opponent couldn't gain momentum, would prevent a mostly loaded Hammer from getting to me on turn one, allowing me to win the momentum war on turn one at least.

  I ended up pulling Mallet in I think.  Brick sprinted up his 2'' while on fire and in rough terrain, and when Stoker went in on Mallet, Brick countercharged.  This didn't bother me too much since I didn't expect him to do much of anything and I didn't think you could generate momentum on out-of-activation attacks like Counterattacks.

  That's not correct.

  Brick didn't do anything to stop Stoker from doing much, but gained one momentum.  This allowed Hammer to come flying in next activation and easily win the momentum war.

  So now on my back foot after a noob mistake, I tried to regain momentum and slowly pushed stuff around, did minor damage and kept the ball on Mash and away from Flint.  Esters did a legendary and gave Stoker another damage, and he got tooled up as well and had a max of 4 influence on him.  At this point, Hammer was knocked down and a little hurt but not bad.  Stoker moved into Hammer, staying out of the scrum in the middle, and Brick countercharged from behind other models.  I didn't think he'd have reach, but he did, and it was tight, but he got a momentous push and pushed my fully loaded Stoker out of melee with Hammer, and coincidentally, everyone else.

  The game continued, but I certainly did not play it much after that.  Models moved, but I was done.  We played it out for the sake of playing but I was pretty pissed at myself for screwing it up on turn 1 with giving my opponent momentum to glide Hammer, and then not premeasuring Brick's countercharge on turn two.  I wasted 4 inf and a legendary on that, and I was done.  I lost 12-0.  My opponent played it very well with Brick, and I should have known better by then.  It was an easy mistake I could have rectified if I had checked Brick's range first, but because he was behind other models, I didn't expect him to be able to get there with the melee, but he did.

  GAME TWO: Brewers vs. Fishermen

  I took the same list into my Round 2 opponent who was playing a Corsair Fisherman list.  He had Jac, Sakana, Kraken, Avarisse and Greede, and Salt, all under Corsair.

  I again won the rolloff, and Corsair moved up to kick it.  There was rough terrain in the middle, and he kicked it to my left where only Scum could really reach it.  Scum went out and grabbed it and made a lucky kick back to Spigot.

  Esters really dominated this matchup.  Again, I wanted to save Stoker and Gutter for the last activations and pull in either Kraken or Corsair himself but my opponent wouldn't particularly cooperate, especially since he was trying to do the exact same thing with Corsair.  However, as soon as the cat was done and his next activation was over, Esters moved up and landed both a rough terrain and fire AOE on Corsair, removing 4/4 movement from him and severely hampering his threat range.  The rest of the turn was my stuff staying out of Corsair's drag range.  Gutter moved up and pulled Kraken in at the end for some extra momentum, and Sakana ran in to try and crowd her out.  I won the next turn rolloff.

  Similar things happened.  Esters hammered Corsair with AOEs again and then Legendaried Stoker for damage, maybe movement, and I think DEF on herself.  Corsair did have range on Gutter though, and drug her in.  He failed to do much damage, or build significant Momentum.  Spigot tooled up Stoker and went in on Kraken for a little bit of damage.  The rest of the Fishermen were out of range for much so they just shifted around and Avarisse tried to run to my side of the board to be relevant.  Gutter activated and did damage to Corsair, Sakana and Kraken, but not a great, great deal.  Got me plenty of momentum though, swinging onto a KD Kraken with Spigot engaging.  Stoker was the last activation and I think he killed either Corsair or Kraken. This gave me enough momentum to win the next round where a fully loaded Gutter killed whoever I didn't kill the turn before, and Sakana died shortly thereafter as well.

  Midway through the third round, a mostly ignored Mash walked up and scored for kicks and giggles.  However, I timed out, and things got very tight.  I won the game 12-2 when a fully loaded Stoker finished a knocked down, crowded out Jac.  The 2 points my opponent scored were because I had timed out.

  This game, I felt like I paid better attention to the gotchas in my opponent's list, and with pretty stoic threat ranges, I was able to really neuter the other team by simply lighting their hard hitters on fire and in rough terrain, and denying momentum.  It was a best case scenario for my list, and Gutter being able to pull out the one I wanted to kill every turn just made it even better.  It was a pretty rough game for my opponent, probably every bit as rough as mine had been in the last round.  The only thing I really botched was the clock.

  Stoker was pretty hilarious in this game.  He easily did the most killing, but in the last round, my opponent kept trying to take him down and keep him out of 1'' of his models so he couldn't just stand up and walk around.  However, Esters stood him up with her heroic once, Gutter got him 2 momentum to stand him up once, and then on his turn, he just stood up with Magical Brew.  It was pretty funny how often he went down, and how often he simply stood back up again.

GAME THREE: Brewers vs. Brewers

  There were only so many players left, and my fight was actually for third or second at this point.  My opponent from round one was absolutely thrashed by a Obulus list in the second round that managed to get up to 23 momentum in one turn without using the legendary.  He told me later he was in pretty much the same boat I had been.  Just pushing models around with no hope and wanting the game to be over.  So that left me and another guy pushing for second or third given the turnout we'd had.  We stayed on the table I had just played on so the rough terrain in the middle was still a factor.

  The remaining opponent was another Brewers player.  He was also playing Esters.  His full list was her, Scum (for now), Stave, Stoker, Friday, Spigot.  I took Mash out of mine and put in Hooper, leaving me with him, Esters, Scum, Stoker, Spigot and Gutter.  The running joke was that since the main difference was Stave, I was definitely loosing this game since Stave would control my list so easily.

  I again won the rolloff and received the ball.  Gutter was the best to retrieve it, so I settled for not pulling anyone in this turn and kicked it to Spigot.  Esters moved up and bombed his Esters and Stave both, but stayed out of range of Stave being able to push her in.  Hooper moved up and repositioned, Stoker wandered around kicking the ball.  I won the rolloff just barely and Gutter pulled in Stave and began cutting him up for momentum.

  Stave, engaged, was unable to do anything, so Esters moved in and knocked Gutter down to free him up.  My Esters moved in, stood everyone up and Knocked down Stave, then legendaried herself for a defense, Hooper for damage and maybe Stoker for damage too.  Settling for not getting a Barrel off, Stave swung at Esters and she counterattacked, knocking him down.  This was basically how most of my game went.  I was always ahead in momentum, by several, and could easily defensive stance and counterattack to KD unless they were able to knock me down.  With Esters at DEF4, and Gutter standing up, it didn't happen much.

  His Spigot and Friday slowly began hunting my Spigot, trying to get the ball from him.  I wasn't too worried about it, and simply kept tooling up Hooper.  My cat wandered aimlessly.  His Stoker took three rounds to get into the fight simply because he was on the wrong side of the central rough terrain.  However, he was loaded up constantly, and ended up just burning my Scum to death over two turns.

  At the end of Round 2, Hooper was at +3 damage and went in on Stave, killing him handily and generating 6 momentum.

  Round 3 led off with a fully loaded Gutter moving up, dragging Stave in and getting him pretty low.  Stoker finished him in the next activation.  That left Esters and another fully loaded Hooper counterattacking into Esters and putting her in a bad spot as well.  Spigot got a "Ball's Gone!" off on my Spigot and gave it to Friday, whom I continued to ignore.  That round ended, again, with a fully loaded Hooper beating the living daylights out of Esters for VP 5 and 6.  Friday went and scored, getting my opponent to 6 as well.  Esters would get the ball on the goal kick.

  My opponent won the rolloff, but even though the score was tied, the end was in sight.  His spigot was tied up pretty well by Hooper, and Esters ended up walking up, throwing the ball to Spigot and putting some hurt in bad Spigot.  Bad Stoker tried to hurt Gutter, but did very little.  My Spigot walked up and scored with no issues, and a fully loaded, tooled up Hooper killed bad Spigot for the win.

 In conclusion, I missed 2nd place by 2 score difference, and/or a ball score.  However, after being absolutely trashed by the Masons, I was ok with it.

  I really think the Masons game was the lynchpin, obviously.  There's two easy mistakes I can look at and know that's where the problem was.  I expected to have a difficult time into that opponent, and was prepared for a grindy game, but not knowing that momentum can be scored on the countercharge really hurt, and then having Stoker pushed out when fully loaded with the end of it for me.  There wasn't much I could do to score after that anyways, and it wasn't of much concern to me.  However, Mash had the ball most of the game, and if I had been inclined, could have probably scored it if I wanted to, and that's what cost me 2nd place.

  I need to premeasure.  If it's a possibility, premeasure it.  Check it.  Find out.  I can in this game and I don't every time, and it costs me.

  My future line-up is pretty exciting.  I will probably not play Scum for a long time, especially with a Gencon release of Quaff and no tournaments before then.  There's a couple of lists I want to play with a try, and hopefully batrep properly but we'll see.  I also have Hunters that I'll switch to playing some more here in the future.

  So, for my first n00b tournament, I'm ok with it.  Hopefully there's some basic mistakes in here that you can read and say "Oh yeah, don't be stupid like that guy."

Saturday, July 9, 2016

Vassal for Guildball - Getting Started


  Vassal comes up a lot when people talk about a Tabletop simulator, which boils down to what Vassal is essentially; A tabletop simulator with an internet connection.  Modules exist for Vassal for most games, and if you've played any of the other games, you understand the frustration that comes with trying to navigate Vassal.  But you really want to get that game in without driving an hour, or buying a plane ticket to the UK to play that one guy.

  So you're googling Vassal for Guildball.

  Here's the really nice thing though.  The Guildball Vassal module is produced by Steamforged and updated/maintained by them and they even have a place for it in their forums.  This is very different than any Vassal module you've seen before, and if you come from Warmachine specifically, Vassal is a hodgepodge rumination updated by a rotating group of people that do it as long as they can with out being so frustrated with it that they drop it entirely.  That's gone with the Guildball Module.

  The GBVM (Guildball Vassal Module; I'm tired of typing it out) is a streamlined program with all the shortcuts, widgets, art, plot cards, tokens and terrain created already by Steamforged.  It's amazing.  It takes a minute to get into, but not anything like the learning curve that the Warmachine module takes.

  My major complaint about the WMH Vassal module was how swingy the dice were, and that may or may not be true with GBVM too.  I haven't decided yet.  My first game definitely had me miss a 5D6 Supershot pass from Mash to Hemlock, but then when we rolled out the theoretical un-bonus timed snapshot kick through an intervening model, she got a 5,6,6 screamer.  So the computer generated dice are still interesting, at best. On the plus side, he never ever hit Slippery DEF6 Hemlock, even at TAC11.

 Anyways, I can't preach how great this program is enough.  I hope that if nothing else, you'll give it a shot.  The Guildball community is taking off like nuts, but most of the warmachine players coming off the presses will not have great memories of the WMH Vassal module.  I'm here to change that and tell you it's not the same.  Right now, we might see two or three guys on vassal a night.  It'd be nice to really raise that number up.

  So, let's look at it.  What are the major things that you need, or should have?

  Before we look at the actual Vassal program, the things you should consider having are:

1.  Skype/Mic.  Trying to communicate with the other player about what you're doing without using Skype is very much hamstringing yourself and doubling the time involved in the game.  If you're going to play Vassal, get Skype, get a Mic.  It's pretty imperative with Guildball.  You could get away with it a little bit in Warmachine because of simpler activations, but in Guildball, you absolutely need it.  

2.  Your cards, obviously, but the best thing I think is the App, Guildball Manager.  It's a free app with all of the guilds, their cards, a fight feature, you name it.  It's everything War Room 1 should have been with none of the downsides.  Get it.  It's free.  There's no downsides to this program.  Even if you have your cards sitting in front of you for playing Vassal, the app is great for checking your opponent's cards, and etc.  Even better, it doesn't require you to have your cards with you wherever you have your laptop.  Work trip?  Good to go.  Downtime on vacation somewhere? Good to go.

3.  Time.  A vassal game is still longer than a tabletop game, simply because you can't pick up a model and set it down.  It's a bit more finite in Vassal than that.  Everything else I think is actually streamlined and possibly faster, but physically moving models saves sooo much time.  Don't go into a Vassal game with an hour of free time.

4.  Vassal Ball Facebook group.  Want to coordinate with some people for a game?  Join the Facebook group.  The forum's a good place too but the Vassal Ball FB group provides some instant updates on people's availability.

Actual Vassal links needed:

1.  The Vassal program.  The base program is at the root of all of this, and you'll need it.  It's at: http://www.vassalengine.org/ and is currently version 3.2.16.  Download it.  Install it.

2.  The Guildball module, located in the resources section of the website.  http://guildball.com/#downloads

Install the program, then the module.  Start it up and double click the Guild Ball module.  This will take a minute to start up, so when you start browsing the forums, or this great blog, keep in mind that the wizard pops up on the desktop, and you can't see it, and it doesn't create selectable on the windows bar.  You'll have to minimize your window periodically (not show desktop) to check if the wizard is up.

  Once it's up, if you just want to play around, or for some reason your opponent is sitting next to you, do offline game.  Otherwise, look online.  This is what it will look like.


  The main window is the chat screen.  The middle right window is the rooms in existence (Main, Scrub vs. Byron, and the one I created for this, Test).  The far right is the players in the room.  If you right click a room it gives you the option to join it, or if it's your own room, you can lock it because you hate people and socialization but you play a social game.  If you right click a player, you can PM them.  Above those two right windows are a series of statuses to indicate what you're doing.  The X is afk, the exclamation point means you're looking for a game.

  In order to create a room, in the middle window where it says "New Game", just type a name and hit enter and it will generate the room.  Your other player will join, whatever.  Someone creates the game.  Ideally, get someone else to do it for the first time, but since this is a walkthrough, we're going to do it.  Go to File, and hit "New game".  It will ask you if you want to be a visitor, or home team, or visiting team.  Generally the host picks home team, but either way, make you both know who is who.  This will generate a normal green pitch, but if you hit the "Maps" button in the upper left, you can change your pitch.

  If you click Roster, up left next to Maps, it'll pull up a few more windows.


  There's several tabs that we'll talk about in a moment, but the Terrain one is the important one here.  In the dropdown menu, there's your types of terrain, and then the selection menu to the right has the different sprites available.  Drag them onto the pitch in a legal way.

-OR-

  Start over.  This is the simplest way.  If you've followed my instructions to this point, go to File, and close game.  Now hit file, and choose one of the setups available.  This will ask you all of the same questions, but will generate a pitch with terrain already placed.  If you're just getting going in Vassal and Guildball, this is the way to do it.


   The other player, when he joins the room, will select Visiting, probably, (whatever option is left).  Then you guys can drag your stuff out. So, back to our Rosters button.


    There's a lot of options here.  All of which, you click and drag to the pitch.  From top left to right:

  Templates: Your AOEs are here.  They're all 3'' AOEs, but with various art for various spells.  It should be noted that the AOEs are selectable at their centerpoint, not the whole circle.  This reduces some mouse confusion on the pitch.

  New Ball: There's a ball in the center of the pitch by default, but if you delete it by accident, or it goes buggy (which happens), there's a new one here you can drag out.

  Tokens: These are just little colored indicators for things if they aren't built into the engine.  Haven't needed them yet, but like, when Tater comes out, you might use them since he may not be in the system yet.

  Token Sets: These are faction specific.  Select it, select your faction from the dropdown box and drag what you want out.  Some of them will be missing, like Tapper's Commanding Aura, but that's because the aura effects are selectable options on the model itself.  It's pretty sweet.  These are indicators for spells and such, so Tooled up, Dirty Knives, etc.  Football Legend, Commanding Aura, all that will be attached to the model.

  Individual Dice: Haven't used them yet.  Let me know if you do.

  Plots: This is the wrong way to select plots for the game, but we'll talk about that shortly.  These are specifically for league play since they have every faction, season one, season two and the campaign plots.  How cool is it for a company to build their leagues into the module for you?

  Home/Visiting Team: These tabs are identical except that the base colors are different so that all the various Avarisse and Greedes are identifiable from eachother.  Same thing as the plots.  Dropdown box select your team, drag them to the pitch.

  Terrain: We talked about this already.

  So, now that your stuff is on the pitch, let's talk about the right side of the board.


  This is a great feature guys, I can't praise these dudes enough.  This is the scoreboard and what amounts to your trays.  The pretty artwork sections are where you can sit your tokens, templates, plot cards and dead players and keep the pitch clean.

  Then there's the Scoreboard.  If you look at the top and bottom of the board, it says "VP".  Right click this to select if you got a TO, scored a goal, extra point, or if you need to reset them all.  The three little divots to the right are for goals specifically. Selecting "Goal Scored" from the menu will automatically fill in one of those, and serves as a reminder for your extra influence.


  Then there's your MP with the arrows on either side.  Self explanatory for the most part.  Click left or right to adjust MP.  Keep it up to date because when you both are done, you'll hit "New Turn" and the game will factor in your MP for who wins initiative.

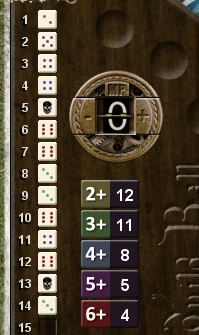
  Then there's the dice.  That long column from 1-22 is your dice.  After you've added up your dice pool number, select the box next to that number and it will roll that many dice.  


  Now, instead of browsing those dice and trying to figure out how many times you hit that sweet 5+, instead of counting them out, that colored chart in the middle summarizes it all up for you.  You got 5 hits at 5+ not counting any armor.  If you're whacking on Stave, you did considerably, and unsurprisingly, better, at 12 hits needing 2+.  Very intuitive, very simple.  I really like it.

  Brief note.  Do you remember the tape measures from WMH vassal?  Well, they're still here, in the upper right corner.  And they still suck.  They can be accomplished by many other things but if for some reason you need one, they're here.

  One more thing before we play ball.  The Plot Cards.  Select "Plots" from the bar at the top.  Not home plots or visitor plots.  That's where you drag your league cards from your roster.  Just select Plots, which is a deck you and your opponent will both use.  Drag 5 cards from the deck to the table, select which ones you want, right click "Claim", where they turn blue, and then return the other two to the deck.  The cards remain hidden from your opponent until you right click "Flip" to play them.


  Now we're going to drag a player onto the pitch.
  

  On top of the player, you see his name, Tapper.

  Below that is his Health.  Health is adjusted by Ctrl - or +, depending on how his day is going.

  The arrow means I have him selected and if I hit the arrow keys, which direction he will move.  I rarely use the arrow keys in this game though.  

  The little yellow dots on the bottom left is his current allocated influence.  These are adjusted with the - and + keys as well, but without the Ctrl.  

  Then there's statuses.  


  From left to right, there's Poison (Ctrl P), Burning (Ctrl B), Lacerate or Bleed (Ctrl L), Snared (Ctrl S), Knocked Down (Ctrl K) and then Taken Out, which would remove all statuses and give you a skull but most of us just drag the player off the pitch.

  Most of what you're going to do is holding down that Ctrl key.  Ctrl X deletes the model, for example, while Ctrl C clones it (important here in a minute).  It also creates our auras, the easiest part of playing this game.  Ctrl 1 - 0 are auras from 1'' to 10''.  Ctrl + Alt gives us the next ten inches, 11 - 20 by using Ctrl Alt 1 - 0.  You can have as many auras as you want out there, and they can all be cleared with Ctrl period (.).  

  So, let's say that Tapper is sprinting to the ball, then over to the forest to engage Avarisse, but I want cover too, and I want to stay out of Avarisse's melee.  I also want to be in Spigot's Football Aura so when I kick the ball at some point in Tapper's activation, I have 1/1 kick bonus.

  I'll start by selecting the ball and pressing Ctrl 1.  All of this can be done with the right click menu, but the keyboard is far easier.  

  So now, Tapper can move an inch, snap the ball, and use the remaining movement to get to the woods.  I'm going to create a 1'' aura on Tapper, and Ctrl C to clone him.  I'll drag the clone to where I want him to be in that Aura for that 1'' move, and then use Ctrl 6 to show how much movement he has left.  I'll use the original sprite now, clear his auras with Ctrl . and then turn on the 2'' aura with Ctrl 2 for my melee range.  I'm also going to turn on Spigot's Aura, which I can do with a Ctrl 4 since that's the range of it, or I can right click, scroll to "Special Auras" and select "Football Legend".


  This picture looks pretty complicated, but the TL:DR is Tapper moved south an inch, snapped the ball, sprinted with most of his remaining movement to engage Avarisse without being engaged by him, while toeing into the forest, and is still within 4'' of Spigot for his Football Legend.

  This took maybe 5 seconds to do.  It's very intuitive very quickly. I'm going to drag an invisible box over the whole group, hit Ctrl . and clear the auras and Ctrl X to delete the clones I don't need.  This is way better than using the arrow keys to nudge players around and back and turn and etc.  This is almost faster than a regular game of Guildball.


  Fantastic.  let's look at Kicking.  Tapper makes this kick to Spigot, and even at 4d6 kick, I miss.  If you select Spigot, hit Ctrl A to generate the Kick Scatter.  Or again, the right click menu.  If you ever have any doubts on the shortcut, use the Right Click menu.

  Now, with the Kick Scatter created, and the ball selected (it snapped to spigot when you created the Kick Scatter), tap End on your keyboard and grab the half circle piece (not the path) and drag it to align your kick.  Now hit Ctrl S for Single Scatter, or right click menu.  If this is scatter kick you hit with and you can reroll direction, use the undo button in the upper left corner to step back and single scatter again.


  Now resolve the scatter.  It didn't go far enough to run into cover.  I may have passed Spigot's path though, allowing him to snap the ball.  Press End again and align the path.  


  It just caught him, so I will snap the ball to him.  The path can be removed or created with Ctrl E, which is travel paths in general.  Use Ctrl E for charge lanes and kick lanes, etc.  Great tool.  Again, if you're having issues rotating the path with End, make sure what is traveling is selected, in this case, the ball.

  At the end of the turn, select "New Turn" at the top where your MP and your opponent's MP is calculated, rolled against and reset.  It will tell you in the chat bar whether Home or Visiting won initiative and you'll go from there.

  That's pretty much it.  There's really not a lot more to show with it outside of you getting in there and trying it.  Steamforged has a complete list of Keyboard Shortcuts available, but the ones you're going to use the most are the ones I've mentioned above, and summarized below.  Everything that can be turn on can be turned off with the same set of hotkeys.

Health: Ctrl - / +
Influence : - / +
Poison : Ctrl P
Burning : Ctrl B
Bleed : Ctrl L
Snared : Ctrl S
Knocked Down : Ctrl K
Auras 1'' - 10'' : Ctrl 1 - 0
Auras 11'' - 20'' : Ctrl 11 - 20
Clear Auras : Ctrl .
Travel Path : Ctrl E
Kick Scatter : Ctrl A
Standard Scatter : Ctrl B
Path/Scatter Rotate : End
Single Scatter : Ctrl S
Delete model : Ctrl X

 And that's pretty much it.  Hopefully this has given you a decent insight to playing Guildball on Vassal.  The Steamforged Forum for it specifically is located here: 

http://forums.steamforged.com/index.php?/forum/23-vassal-module/

And the Vassal Guildball group is here:

https://www.facebook.com/groups/901202099948458/

  If you have any corrections, suggestions, ideas for further improving this guide, shoot me a message on twitter @diceotfirstdegree or comment here.  Thanks for checking this out and I hope to see you on the pitch.