Showing posts with label Grim2. Show all posts

Friday, April 8, 2016

The Hunters Grim and playing them w/ Trolls today

EDIT:  THIS IS MARK II INFORMATION.

  It's entirely possible that you already know that, given the dates, but even if this popped up on your google search while you looked for Grim2, again, be well aware that this is an edition change away.  While Grim2 did not change much into MK3, the rest of trolls did, so take that into account when you read this article.

  Do I plan to update this article?  Not whatsoever.  As far as I'm concerned, PrivateerPress has thrown their game out the window and has no interest in a competitively tight ruleset, and has repeatedly demonstrated that attitude.  There will be no more PP related batreps or strategy articles on this blog until that changes.

  I'll be playing something else.


  Hunters Grim, or Grim2.  The second incarnation of Troll's favorite Anti-Cryx caster.  There's really no in-between with him.  Either you love him and his playstyle, or you wish you had Grim1.  I'm in the first camp.  Every time I play Grim1, I wish I had Grim2.  Grim1 does some things much better, and probably has the best control feat in trolls that's an actual control feat, not "You can't actually hurt me, so don't come here.".  

  Some of Grim2's problem when he first came out though was that Trolls really didn't have a lot of things he wanted.  Burrowers and the Bomber was an auto include, but Scattergunners were really the only other major ranged unit that got any benefit from his feat, and even then, the snipe really only was for Grim and his cohorts.  He didn't make Bushwhackers or Sluggers much more competitive, and he really slid off to the side again til probably the last year and a half.

  When I began picking him up, I was getting drug all over the place by Cryx and needed a solution.  My problem with Grim1 is that he's very very good at two things, and has a control feat, and he can deal with stealth things very easily, and he can lower DEF like nobody's business.  The problem I had is that A) He had to get up the board to do it, and thus risk himself though the feat helped, and B) Any ARM skew whatsoever and Grim1 is in trouble.  I have seen lots of Grim1 builds that had Mulg in it, which makes sense, but since most of the time I'm running my pairing with one of the Doomshapers, Mulg is usually taken with one of them.  So, in developing this Grim2 list, let's talk about what we're covering in the list pairing.

  Until last December, I had Runes.  Runes is pretty well known, does a lot of things well.  If it wasn't Runes, it was a form of Meat Mountain, but usually Runes.  Runes murders most Hordes armies, is very good against shooty Warmachine armies, and has a great tankiness to it that makes it very difficult to root out of the zone.  What it does not like, however, is better control presence, lots and lots of infantry, and weaponmasters specifically.  

  So, Cryx basically, though Runes has enough AOEs to try and make it work, but I still found myself getting swarmed and losing key pieces easily to three or four small based models.  Menoth is hit or miss.  Cygnar is hit or miss.   Also, the mirror matchup was an issue unless it was just Runes on Runes which is horrible.  Menoth's biggest deal for me was weaponmaster spam.  None of that, then we were fine, but otherwise it was a Cryx problem kinda thing.  Haley2 also concerned me a lot because of how trivially she controls Mulg.  Time Bomb, Dead-eyed ATGM and feat.  My favorite things are simply going to get pushed around the table and frustrate me.

  In December, Doomshaper3 dropped, and my tastes have changed a bit.  Time Bomb from Haley still hurts, weaponmaster still hurts, but Mulg doesn't get knocked down anymore, or pushed around.  Druids can't pull my stuff around anymore.  I run the Mountain King and I can remove support all day.  All sorts of things.  Doomshaper3 is my guy.  The Harby matchup is now an issue though because in our meta, Paladins are a thing, and Harby Tier takes like 5 of them.  So Mulg and D3 are the only models that can deal with it.  It's a playable game, but I don't feel like I have the volume of attacks to kill Paladins under Martyrdom.

Enter the Hunters Grim.  Grim2 solves a lot of these issues.  Whereas Grim1's game gets flipped if there's armor involved, Grim2 can debuff it just fine.  Grim1 has to get way up the zone to do things, but Grim2 can hang back, make sure his stuff is in control, and then reform on top of that to a safer spot.  Secondly, the little trapper thing is pretty legit too.  As long as it's not a super high-ARM beast, or a warjack in general, Grim should be ok.  As far as warjacks go, there's not many that can get through Grim's DEF16 on 3 focus without some serious help.  Grim2 definitely stays within the Trollblood bounds of "Difficult to assassinate."

Secondly, Grim2 gets snipe out faction wide and turns the ranged game up quite a bit.  +4RAT is very common in Grim2 lists, and +6 RAT is entirely possible.  RAT10 POW16 burrowers are crazy, man.

What makes him even more playable now though, you ask.  Well, let's look at them.

Highwaymen.  Highwaymen are hit or miss for a lot of players.  Strictly playstyle preferences.  Without any help whatsoever, they are 20 RAT5 POW10 shots.  However, I think that's the wrong way to look at them.  They're actually 10 RAT7 POW12 shots, and that's extremely legit.  They threaten 14, but any caster with movement buffs or range extension helps them with that.  Grim2, I feel, is the best caster for them.  Gunnbjorn likes them too with Snipe, but that's it.  They're good with him, but Grim2 I find only needs snipe on them once and after that it's not an issue.  Between Mirage and Snipe, they can threaten 20''.  That's not bad at all.  Stack Mortality on them and now we have 20 RAT9 POW12 shots under feat.  CRA?  Ok.  10 RAT11 POW14 shots.  There's not many casters that survive that.  

Grim2's feat turn is usually turn two, maybe top of three.  At that point, I have a decision.  If they've made any mistake, I kill their caster.  If they've made no mistake, I might still kill their caster.  If the caster is straight up unkillable (Read: Hordes and lots of transfers.  I've killed Butcher3 and Denny3 both), then I kill everything else.  If Denny1 has hid way outside of my range, I kill all of her infantry.  I leave her with nothing.  Highwaymen adapt to that very easily with CRA.  I could choose to do 4 POW17s even with them, but if there's a lot of infantry on the table, 20 POW12s do a lot to remove it.  Grim2 loves these guys and they love him.

Braylen Wanderheart.

There's only a handful of casters that run her with the HWM, IMO.  Grim2 can be one of them.  Grissel2 and Calandra are the others because of how they can enable the backstrike bonus.  In Grim2's case, it's Mirage.  The Highwaymen can be placed behind things they're engaged with, or outside of melee and walk around.  However, she doesn't play into my gameplan with Grim2 very well because I usually feat going in, and that makes or breaks the game most times.  She's also 3pts of support in an already support intensive build.

One day, I want an Ocean's 11 list with Grim2 or Calandra, and she'd make that.

Dhunia Knot.

These guys are my current favorite addition.  Most of my Grim2 list has models from the last year and a half, and the Knot is no exception.  Grim2's major lynchpin in my opinion is Mortality.  Mortality is Cost 3 and boosted.  It's essentially Cost 4, and if you miss, you're done.  You've done nothing for your army ARM wise, they're down 2 RAT, and you're on 1 transfer because you upkept Mirage.  I've missed so many boosted 8s with Grim2 it's not even funny.  The Knot fixes a lot of that.  And for two more puppet masters, I can get one onto the Bomber and help him out, feel better about not boosting to hit on one of those attack rolls, and the other puppet master goes to the HWM or Rok, maybe get that crit freeze on the assault.  In fact, the odds of that crit freeze landing go up quite a bit.  
A lot of players look at the odds of an assassination and move on.  They only consider it if the chips are down.  Even then, the odds are long and they might be able to pull an attrition swing.  The Dhunia Knot does a lot to skew those odds in your favor.  My specific Grim2 list has a lot of the tools in place (I can't wait for him to be back on ADR) that enable so many assassinations, but those tools can easily make or break the rube goldberg machine that has to go down perfectly in order for it all to happen.  The Dhunia Knot makes those far more reliable with Puppet Master on 3 different models.  I faced down a double Judicator Durst list with Grim2, and won.  When I needed to remove any piece in the list, I can get a a rerollable boosted Mortality from Grim2, followed by a rerollable boosted (L&E) quake shot from Hutchuck or Krump, stacked with 3 POW16 shots off of a Glacier King who can either A) Reroll those snakeeyes to hit, or B) grab that die that rolled a 1 in a boosted damage roll that actually got a total of 11, and maybe get a four or a five now.  The odds of your army pulling through on assassination runs that rely on key components are incredible now, thanks to this unit.

Lynus and Edrea.

  The runebearer was in this list for a long time, trying to get Mortality down to a Cost 2.  Lynus and Edrea are a better answer to that I believe.  Something Grim2 lost when he upgraded incarnations was that he handed the knockdown gun off to a pyg that couldn't boost it.  Lynus helps with that quite a bit.  He can put it on the Pyg, he can put it on Grim2 and make Mortality cost 3 w/ boost, he can put it on Hutchuck for that boosted Rust, you name it.  Very adaptable model.  Again, helps the non-warcaster parts of the puzzle put their weight in reliably.  I remember playing Cygnar, and how many times the game came down to whether or not Eiryss2 landed that focus stripping shot or not.  No more.  She'll be boosted from hereon out guys.

Hutchuck.

  Also brand new, Hutchuck brings Rust to the game.  Speaking of the same game, with Hutchuck against double Judicator on Durst.  Between Mortality and Rust, I removed the Colossal from the game trivially.  Grim2 is basically my Warmachine drop against non-super shooty lists, and Hutchuck is great for that.  Quake is also a nice addition, and I like having more than one in the list.  Sometimes Grim2's pyg doesn't get there.

Glacier King.

  I'm not a super Glacier King user yet.  I think he's good, I think he does a lot for trolls, but I still prefer other things.  On Grim2 though, he's very good if you can manage his fury (Swamp Gobber Chef).  He brings a degree of Board Control that Grim2 didn't have before, and he tries to anchor the game for you a bit too in the end game.  He buffs Grim's DEF great as well, and does the same for the HWM.  He'd seem like a shoe-in, but when he came out, Denny3 was super popular in my meta and the Glacier King straight up couldn't hit her, KD her, or anything.  I went back to Bomber/Rok, and have continued to be very happy with that battlegroup.

Speaking of Rok

  I know he's not a new option but I rarely see him, much less on Grim2 and he deserves an honorable mention.  I don't play Rok through most of the game, but it's fairly common that he's able to help clear jam units out of the way on feat turn with the spray, or sometimes land the crit stationary on the caster (thanks Dhunia's Knot), but if the assassination goes downhill or we turn to the attrition game, Rok is an amazing endgame piece.  Mirage to disengage or get him further up the board, a free charge, Mortality + Primal?  He's easily the biggest bully on the board in the endgame.  Especially if everything went well on the feat turn.  

  Sure, Mulg maaaaay be better, or maybe a second Bomber.  Generally though, I hit a game where there's a crazy hard target that I really struggle to shoot off the board (A colossal usually), and Rok threatens it enough that it has to stay back.  It can't come wreak havoc or apply scenario pressure because Rok will end it.  And if things really get pear shaped, my Bomber gets primal and now he's a very capable heavy too.  

  Rok goes in all of my pairings, and usually on Grim2.  It's hard to pass up.  

  Fire Eaters

  These guys are in everyone's lists right now.  They're amazing, and under Grim2 they're no different.  They are great for Mark Target, they're fantastic for attrition games, they love mortality, they're just good all around.  They're currently not in my Grim2 list, oddly enough, but I find they don't contribute too much to the overall assassination plan.  They're almost strictly an attrition tool.  A really good one, but attrition.  It's not often a 6'' spray will reach back and touch the caster.  Still very good, still worth considering in your list.

Building Grim2 lists

There's a few playstyles for Grim2, and the plethora of new solos and units help to really define what you can do.  I think Grim2 can play a very strong attrition list, or a very strong assassination list.  My particular variant currently is a very strong assassination with a decent attrition game.  Last week it got put to the test against a full-camp Butcher2 with Gorman's cloud on him.  He was DEF16, ARM25.  Even with Mortality, the Burrowers were dice -9.  In that particular situation, I would have preferred to go attrition, and wait til Butcher rolls lower Fury or spends some of it but my opponent had successfully placed me in some strong scenario pressure so I went for it and pushed the Dhunia Knot to the limits.  Killed Butcher with 3 Dygmy rolls to go.

  I've seen Grim2 lists with Blitzer spam anchored by Dozer's Veteran leader.  I've seen lists with tons of melee infantry that just want Mortality, and the feat just kind of works for him, maybe the scats.  I've seen some minon heavy lists, and I've see some other goofy stuff too.  It really comes to your playstyle.  Right now, I want Grim2 to be fast games, turn 2 or 3, shoot the caster and pack the tray.  I'm not even counting on mistakes.  You can play your caster very safe, and I'm ok with that, I'll kill everything else.  Eventually though, unless you just feed me your whole army, the caster has to come out and play and at SPD6, RNG17 w/ Snipe, there's not many places where I can't start pinging you.

  I've had a couple of lists for Grim2 that I've really stuck with, but I've had Highwaymen in there since they came out.  The current incarnation is:

Grim2
*Rok
*Bomber
Fell Caller
Witch Doc Croc
Max Fenns w/ UA
Max Highwaymen
Max Burrowers
Dhunia Knot

  It's really simple.  Fenns usually get mirage unless I feel like the caster is going to play it safe and hide.  Then the HWM get mirage.  If the Fenns get it, they run way up and stagger so that hopefully only the front two or three get nailed.  Between Vengeance and Mirage, it's a 5'' non-linear movement that can clear some chaff.  

  Burrowers usually burrow turn 1.  Definitely if I'm going second.  Turn 2 is when I like to feat.  If there isn't much blocking LOS to the caster (a Warjack is actually best case scenario), if he's not camping a huge ton of Focus and is high ARM to begin with, and if he's not got any tricks that backfire on me, I'll go for it.  Warlocks are a bit scarier.  I do have the volume of attacks to do it though.  If a list could assassinate the Legion Twins, I think it'd be this list.  

  So, if he's hiding behind a jack, Mirage gets upkept, Burrowers come up, Vengeance triggers, Fenns do some stuff and then we negotiate Order of Activation.  Ideally, the Fenns/Fell Caller can remove what's in the way, be it a screening unit, a shieldguard, whatever.  The goal is for the Burrowers to activate after Grim and get the feat bonus.  Sometimes they can't, and they just have to go up and try to clear it themselves.  Dhunia's Knot will go on all the important pieces at the beginning of all this, and then we'll go from there.  Ideally, Grim2 goes before the burrowers and feats, lands Mortality and shoots the guy once.  Krump KDs the jack in the way if he needs to before Grim goes, but otherwise, KDs the caster hopefully.  Then everything else goes.  Bomber, Rok, Burrowers, HWM.  It's very rare that a caster survives all of that. 

  The HWM are actually some of the more key pieces in the last.  With mortality, they land a pair of POW22s on the caster and finish off a lot of things.  Fenns don't seem like they do a lot in the list, but if all they do is keep people from shooting my Highwaymen, I'm a happy camper.

  If I can't touch the caster, then I may or may not feat.  Either way, Grim2 goes early, gets Mortality on the best thing and reforms.  Fenns tangle up in the lines, and HWM/Burrowers remove infantry from the board as much as possible.  The list seems to attrition very well, and I really think a lot of it is the high volume of reliable attacks that HWM can land on mortalitied targets.

  The other thing is the Witch Doc Croc.  Haven't talked about him a lot.  He's legit.  He's there for Awe, and fearless Burrowers.  He's been very key in a lot of matchups, and since we have a Harby issue in our meta, I don't see him going anywhere.

  Possible things I may change in the list.  The Fell Caller might go away.  The only thing that reeeaaaally needs Pathfinder are the Fenns and they get it on the turn it matters anyways.  I also really like the +2 to hit, but the Fenns hitting things isn't crucial to the list.  It's very nice, mind you, but it's not make or break and if it is I have the Knot for that.  3pts to something else would be nicer, I think, and in this case, probably Lynus and Edrea.  Hutchuck is a fantastic consideration, and I'm very tempted because Rust + Mortality is crazy.  But having a free Mortality boost, or a boosted KD shot, or so many other things is really tempting.  Also, Edrea gives me another magic attack which can be nice as well. 

  Everything else in the list performs very well, and has time and again done well.  I'm pretty confident into most Warmachine matchups that I can at least make a game of it with Grim2.  I tried him with the GK for a bit, but I had a really difficult time anchoring the late game with him at MAT5 and Denny3 was very big in the meta at that point.  I could probably get away with it now, but the biggest thing that helps is the gobber chef.  Before, the GK wanted to run full, and Grim2 wanted to camp a few, and the GK can't pass frenzy checks pretty much ever.  So that was out.  With the chef, I might could make it work now, and it'd give me a few more points to play with.  I'd still have to camp 2 all the time or cut for fury but it'd be doable at that point.  Idk.  It's an option.

  Anyways, I hope that this has been an insightful view to the new Grim2 lists available and if he's a caster that you're looking at getting into, I hope this helps broach your options.  The Hunter's Grim is a very adaptable, capable caster unit that can play nearly any style of game.  The tools are all there, and Grim2 himself can contribute every turn.  It's a fun game and keeps things interesting.  Hopefully find out for yourself.  

  Enjoy the weekend!

Sunday, October 18, 2015

Harby (Menoth) vs. Doomy3 (Trollbloods) + bonus Grim2 w/ GK into Kreoss1

  Swung into the Shoppe today for a couple of games.  I landed a Kreoss1 game with Grim2, but we'll cover that at the end.  My second game was vs. an opponent that has Harby or Sevvy1.  He built Harby as his Trolls drop.  I expected Harby, and Grim2 should have been my drop, but I really wanted to play Doomy3, so yeah.  The Harby list is identical to the one I played against in a tournament not that long ago.

  Harbinger Tier III
*Devout
*Reckoner
*Reckoner
*Avatar
Min Choir
Heirophant
Max Flameguard w/ UA
Paladin
Paladin
Paladin
Paladin
Vilmon

  The kicker here is that Harby doesn't really worry about martyring the Flameguard, she really only protects the Paladins who do nothing but impervious wall all game long so they can't be targeted by non-magical attacks.  My only magical attacks in the list are Mulg and D3.  Also, she gets walls.  My opponent took 2 walls.

  I, again, really wanted to play D3.  I almost beat this list awhile back with Madrak2, and he's in the same boat, only magic attack in the list.  The Paladins are issue, but I wanted to try it.  The list is the same as the last time I played.

  Doomshaper3 Tier III
*Mulg
*Mountain King
*Axer
Max KSB w/UA
Max Burrowers
Whelps
Whelps

  Tier III gets +1 to the roll, +2SPD on turn 1 and +2ARM on Round 1.

  I won the rolloff.  Scenario had 2 rectangular zones, perpendicular to deployment and with objectives in both zones.  I deployed pretty centrally.  He deployed with really everything to my left, just the Avatar and a few paladins to threaten me in his own zone.  The walls went way out, one in his own zone and one just outside of mine.


  Burrowers run forward.  He has little to no shooting.  I bunch them to the left to make room for the Mountain King.  The Axer rushes the King, walks up.  The King is SPD5, SPD7 because of tier, and runs 16'' forward.  D3 puts Admonition on Mulg, dumps the rest to the stone and charges the Mountain King.  Mulg runs forward 12'' and riles to four.  KSB pops aura and runs forward.  I have 2 whelps deployed, they run up with the King.


  My opponent now has a serious issue.  He wants to get up the field, but if he does, everything dies.  Doomy will feat and put some serious hurt on the battlegroup.  He has the walls to get behind, but I still have the additional dice attacks for the feat.  So he plays defensively.  The red Reckoner gets 2 focus.  The Avatar generates 2.

  Flameguard run up the left flank a bit.  On Paladin sprints up that side.  The other three move up and impervious wall, as well as Vilmon.  A Reckoner walks up.  The other walks up and shoots the Mountain king, boosting attack, boosting damage.  Only does a few points.  I whelp.  

  Avatar moves out to the right to threaten me in his zone.  Devout moves up with Harby, who decides not to feat, and camps pretty much everything.  Not a lot to do at the moment.  


  I really want my cake, and I want to eat it too.  I want the boosted attack rolls, AND the defensive bonuses.  Ideally, I would charge the Mountain King into the Avatar right now and kill him, or at least cripple him, then remain unkillable and finish the job next turn.  However, there's not enough room to get there and get past the walls too.  I can get pathfinder, but I can't land my huge base on the other side.  However, I can position a little better and force him to come closer, but he has zero pathfinder in the army, and two walls to cross.   Neither the Avatar or the Reckoners can charge across the walls.

  So the King moves up next to the objective, sprays two flameguard, kills one, Harby martyrs it for kicks and giggles. 

  Burrowers burrow.  Mulg moves up near the king, but out of charge range of the Avatar.  Axer steps into the left zone, ready to contest.  Doomy casts Implacable, fills the stone a little.  Nothing crazy.  


    Harby allocates a few focus to one reckoner.  Avatar generates 2 again.  The far right paladin moves to the corner of the zone and does Impervious wall.  Harby casts crusaders call, I think, and purifies Admonition off of Mulg, and feats.  The Flameguard run/charge.  One goes after the axer, six or seven after Mulg, the rest run.  The one on the axer does a few points.  Three CMA into Mulg and do two points.  The other four CMA and do seven I think.  He whelps once.  

  The reckoner with focus comes off the hill, shoots the King, boosts damage for a few points, and I whelp.  Avatar shuffles forward.  The other reckoner moves up, shoots the king and doesn't do much either.  Paladins overall shuffle up, one specifically standing between Mulg (who's damaged) and the Avatar.  Choir shuffle around, sing Passage


 Doomshaper pulls in his fury.  No upkeep since Admonition got purified.  Burrowers pop up.  The King moves up, takes a few points of damage.  I use the first initial on the objective, boosting damage and kill it.  My second initial goes into the back arc of the nearest flameguard, well out of Martyr range.  He squashes it, and killshot triggers.  I boost into the the nearest two, and then roll for the rest and kill... three or four.  I forgot to make them roll CMD checks for being in melee with a mountain with teeth, but meh.  I do two points of damage to my own objective with the spray.  The KSB activates, hangs out, pops aura.  Doomshaper activates.  The scroll does the Signs and Portents one, and D3 charges the King while the scroll runs away to be farther from Harby.    Doomy takes 2 damage from feat.  He doesn't even scratch the King. He boosts a Stranglehold into the Paladin in the corner and boosts damage, killing him.  Then he puts Implacable out.  

  Burrowers activate.  The one near the axer kills the Flameguard engaging the axer.  I forgot about passage, so I had this great line to target the reckoners with, but I couldn't shoot.  However, the TFG fail their CMD check, so there's that.  The Axer walks up and threshers.  I do five more points of damage to the objective, but kill all the TFG I'm engaged with, freeing Mulg up.  At this point, I had been fully planning to charge into the Avatar, but the Paladin was definitely in my way, and Harby wasn't going to let me through.  So Mulg walks into the Paladin, and hits him what amounts to six times (Doomshaper's affinity).  I really wanted to kill him so I could get goad and back up a bit since I was out of stone aura, but he martyred it every time, leaving Harby on four or five boxes, and Mulg well within charge range of the Avatar, and no admonition to protect him.

  However, with the objective gone, and Doomy in the zone, I scored 3 CP.


  Harby allocates 3 to the red Reckoner, and the Avatar generates 2 again.  The paladin near Mulg charges his left side, does ok damage under the feat, but I heal, and whelp.  Vilmon moves up behind the tier wall and does impervious wall.  The left paladins both move into my zone and impervious wall.  Harby moves up and cataclysms the five burrowers in front of her, and rolls snakeeyes for damage on two of them, but kills the three that she needed to.   Choir activates and does Battle.

  The Reckoner walks over the wall and into melee with Mulg.  He hits every time, but at dice even, only does two or three damage between feat, and my healing.  Every time though, I whelp.  The second reckoner aims, shoots Mulg and boosts damage.  Only a few points, but I whelp again.  Between the Paladin and the reckoners, Mulg spawns 6 whelps, and only has 14 boxes left out of 34.  However, he no longer has a charge lane into Mulg with Avatar because of the whelps.  Devout shuffles around, and Avatar gazes.


    Mountain king eats a whelp for fury and Doomshaper pulls everything else in.  Stone moves to pop aura and plus 1 STR.  Axer moves up, kills the Paladin engaging Mulg, which is when I took the picture above, or there'd be a Paladin under Mulg's left arm.  The burrowers move, do some light damage to the red Reckoner, but that's it.  The whelps behind Doomshaper run up to the wall near Vilmon.  Mulg activates, and I roll 7 dice.  1  For Hyper-regen, and 6 for eating six whelps.  I heal Mulg 14 boxes.  He charges Vilmon, takes a some damage from a freestrike from the Reckoner.

  Harby has... seven boxes now?  My charge attack hits, kills Vilmon.  She martyrs, takes 2 damage.  Buy.  Hit.  Martyrs for 2 damage again.  Buy, hit.  She martyrs, dies.  


Thoughts on the Game:

1.  This list is difficult for trolls in general because of the need for magic weapons.  On the plus side, I'm capable of killing everything else in the list, and POW16 SP10 is always a concern for Harby as well.  However, Mulg and Doomshaper can get after paladins ok.  However, as we talked about it and I wrote this report, I think the best thing he could have done is buried the Avatar and a Reckoner into the wall in his zone, with the Avatar to the outside, then get Harby up to within 8'' of the back edge of the wall.  This means whatever is attacking the Reckoner is -4 MAT, and whatever goes against the Avatar has to be careful with placement or he'll be facing the same issue.  Best case is -2 MAT from awe.  On top of that is the +2 DEF from the wall.  Mulg is basically MAT1 and the Mt. King is -1 MAT.  On my feat, I'll probably have to boost everything, even with additional dice.  That gives him a bit more time to deal with things, and lets his jacks be relevant to the game.  Here, the Avatar never killed a model, and the Reckoners both struggled to do anything.
2.  The walls were better for me than they were him.  He could have used them in the above example, but otherwise, he had no way to charge me, at all, so all game long I would be one step ahead of him in the positioning game.  Worse case scenario, I just powerattack his models out of the zone if I can.  
3.  The Paladins.  I probably would have started running them into which ever zone I was going for, try and keep Harby within 10.  I don't have the volume of attacks to kill them very well, so the whole game I am fighting them to control the zone.

Overall, good game, I learned some things, and so did he.  I still don't know that I think trolls are favored in this matchup, in this scenario.  A central scenario is much better for Doomshaper since Mulg can threaten anywhere in the square he wants to, and it's away from Harby's walls.

Game 2 or 1, chronologically

  This is a quick batrep here.  Just a bonus.  Enough that I won't even run the full Kreoss1 list by.  Errants, double reckoners, the book, some other stuff.  Zealots.  Etc.  However, my Grim2 list is janky as they come, and I really wanted to try it.

Grim2
*Glacier King
Max Highwaymen
Max Burrowers
Min KSB w/UA
Thrullg
War Wagon
Lynus and Edrea (Ayaina and Holt)
Dhunia's Knot (Runeshapers)

This list is designed to just kill the caster.  That's it.  Nothing more, nothing less.  Burrowers tarpit until the other guy makes a mistake and then Grim2 feats and unleashes the world.  I won the rolloff, deployed stuff.  All my stuff ran up, and the HWM got Mirage.  His stuff moves up, zealots get in front and mini feat.  Book does no knockdown.


  At first I'm just figuring to kill the stuff that makes my job hard.  Put shots into the Book, and kill Rhoven.  Get rid of the no Knockdown and such.  Probably kill most of the Errants.  There's one chance for kicks and giggles though.  Burrowers pop up, HWM mirage up.  So Dhunia's knot activates, puts markers on the Wagon, Grim2 and the King.  The Wagon shoots an errant central to a clump on the left flank, actually hits, kills and affects all of the reckoners and everything else around.  However, one reckoner and a couple of dudes on the right are close enough to the book to not care, but I pretty much kill everything else.  

  I ask what Kreoss's base DEF is so I can do math for my next turn, and he tells me he's DEF16 on the hill, that he's toed in on, though the picture shows him on the table.  Him being on the hill changes things.  Grim2 feats.  I boost the hit, hit, and boost damage, rolling 11 at dice -3.  I reroll the lowest dice in the group, and roll the same number lol.  I do 8 damage.  Burrowers run into the Zealots and one runs to the left to get Mark Target on Kreoss.  The HWM move up, six are in range.  They CRA for a RAT13 (RAT5 + 6 + 2 from mark target), hit and do several damage.  Second attack hits and kills.

  I didn't even get to use my Glacier King...  

  The list is teched for Denny3.  I figure if it can kill Denny3, it can kill most Warmachine casters.  I just have to hang in there until I have a way to get LOS to the caster.  E.G., Quake on the War Wagon, and then go from there.  Pretty janky, idk if I'll keep it.  But it's fun, and if the caster is left out at all, stuff goes nuts.  I may drop Lynus, they don't do a lot in this setup.  They're there for Grim2 or the Thrullg, and that's about it.  

  So, hopefully you enjoyed the batrep, learned a couple of things.  I'm loving this book for trolls, and can't wait to get some more D3 games in.


Monday, August 10, 2015

Guest Batrep from Arizona_Troll. 75pts Grim2 (Trolls) vs. Siege (Cygnar)

  Good news for you guys tired of me modding warjacks, building boxes and writing crappy batreps.  Arizona_Troll, who I think has been featured in both of my "Painters I like right now" articles, went after a friend of his at 75pts, and asked if I'd like to post it on Diceotfirstdegree.  Of course I would.  Arizona_Troll is well known on the PP forums for his painting talent and has one of the most unique styles of painting that I've ever seen, so to get a huge batrep featuring all of these models is a fantastic opportunity and I've been excitedly waiting for the email with it since he asked.  Without further ado, the batrep:

(It's really long, but well worth the read.  On google docs, it's 32 pages, but only because of the incredibly well-documented battlereport that's told like History Channel's documentary of D-Day.  You'll enjoy it.)


75 Points: Cygnar (Siege) vs. Trollbloods (Grim2)

Hello fellow wargamers! Alan O’Bryan here (Arizona_Troll), and I’m honored and excited to be posting this guest Battle Report on Dice of the First Degree. You can find me on Twitter at @Irish_Al or check out more pictures of my model at www.whpictures.blogspot.com. I hope you enjoy this report!

My good friend Travis wanted to duke it out at 75 points, and we thought it was a perfect opportunity to bring the big boys! So the rules of this engagement were:
1) 75 point lists, 1 caster
2) You must bring exactly one colossal or gargantuan.
3) Each round we would crack open a beer, split it between glasses, and enjoy the experience of playing a great game with a good friend.


As the sun sets in the distance, Grim Angus looks on from his hiding place in the woods at the columns of Cygnaran troops marching down the road. From their activity, he knows that advance scouts have already spotted his own forces camped in the hills nearby. Surely they will not leave his forces at the rear and march on. In the morning he best have his troops ready for battle. Before turning to leave, Grim notices a familiar sight. Trollkin march with the humans wearing Greygore Boomhowler’s Quitari. Grim smiles as a plan forms in his mind.

##########

Greygore Boomhowler and his mercenary Trollkin camp at the edge of the forest, set apart from the main Cygnar tents and fires. No matter how much they pay, they Cygnarans still don’t quite accept he and his troops as friends. He can’t blame them, for he’s had his share of battles against the Swans in his days as a mercenary. He takes another bite of the dry, tasteless rations. Dhunia knows that Cygnaran coin spends well, but eating from their larder is almost a punishment.

A twig snaps behind him from the edge of the forest. Greygore freezes.

Grey. It’s been a long time,” says a familiar voice. Without turning around, Greygore responds. “Angus. Are you the one got these humans all riled up?”

Grim Angus steps from trees, careful to watch for signs that he was spotted by the Swans.

I have something for you, Grey.” Grim tosses a bag in front of Greygore, the sound of coin clearly ringing out. “Walk away from this fight. I’d hate for you to end up in the belly of my Mountain King.”

Greygore laughs. “That’s hardly more than what the Swans are paying. Surely I can’t risk my reputation for the price of a few measly treats.” This was a lie. By the looks of the bag, it was easily twice what Siege was paying him. He finally turns around to look at Grim, who is holding a large sack over one shoulder. A barrel of Borka’s finest brew sits at his feet.

Is that...”

Salt pork. Fresh roasted boar. And a keg of a real Troll drink. Not this ... water... the humans serve.”

The two Trollkin smile at one another.

##########

At first light, the Cygnaran trumpets blare, calling the army to formations. Leaving their tents pitched and the morning fires still smoldering in the pits, they march towards the Trollkin lines hoping to catch them unprepared. It is not to be. Lining the ridges across a shallow valley is a massive Troll army, at least as large as Siege’s own.

A deafening roar echoes through the valley, and a creature as tall as the hills comes into view. The Cygnar lines waver slightly at the sight of such a humongous beast.

Siege begins to shout out orders to get his troops moving and get their minds off of their fear.

Lt. Marks. Get those Trollkin mercenaries up in front of the Stormwall. I don’t want anything to break through our lines there.”

Um, sir. They’re gone.”

What?”

They left sometime during the night. All they left behind was this.” Marks holds an empty ale cask with Troll glyphs branded onto its surface. The top has been removed, and rattling around inside is a pile of Cygnaran coin.

Cursed mercenaries. Well, forget them. We can’t leave this army on our flank. Prepare for battle!”

*******


SCENARIO AND DEPLOYMENT [Beer Choice: Firestone Woodsy Jack]

Travis had first choice of beer, and he chose a dark, flavorful IPA, suitable for contemplating dark deeds and mourning the inevitable loss of comrades in the upcoming battle.

Scenario: Recon!
Dominate either flag for 1 CP.
Destroy/RFP opponent’s objective for 1 CP.
Control the zone for 1 CP, Dominate it for 2 CP.
Kill Box: NO


Alan (Trollbloods) wins the roll. He choose to go second while taking the side of the board with the hill. This proved to be very important in the game. Travis (Cygnar) goes first, Huge bases are deployed, and we go from there.

*******Travis somehow forgets to unpack Greygore Boomhowler and Company. Thus, he plays down 9 points, although neither of us realized it until the next day. *******


TURN 1: GETTING IN TO POSITION [Beer Choice: New Belgium Trippel]

My choice of beers for the first round. I chose a nice, sweet Belgian beer with a hint of Coriander. Lighter than the last brew, this one is suitable for giving you liquid courage without making you feel weighted down as you run up the field towards the enemy.

Top of Turn 1: Cygnar (Travis)

I want Rangers and Blazers on the flanks!” Siege orders. “Harry their advance, and force them towards the center! Move! Now!”


Allocation: 1 Focus to the Stormwall.

1. Tempest Blazers: Run into the forest.
2. Rangers: Run up behind the building.
3. Gun Mages: Run up to be between the forest and the zone.
4. Forgeguard: Run forward and create small pockets of models base to base with each other.
5. Stormwall: Spends a Focus to run forward.
6. Stormlances: Run forward into the forest.
7. Siege: Moves behind the Stormwall, casts Foxhole over the Gun Mages.
8. Reinholdt: Moves up next to Siege.
9. Piper: Gives fearless and tough to the Forgeguard and moves up.
10. Squire: Moves up.
11. Stormblade Captain: Runs up to toe into the Foxhole template.
12. Journeyman Warcaster: Moves up, casts Arcane Shield on the Stormlances.


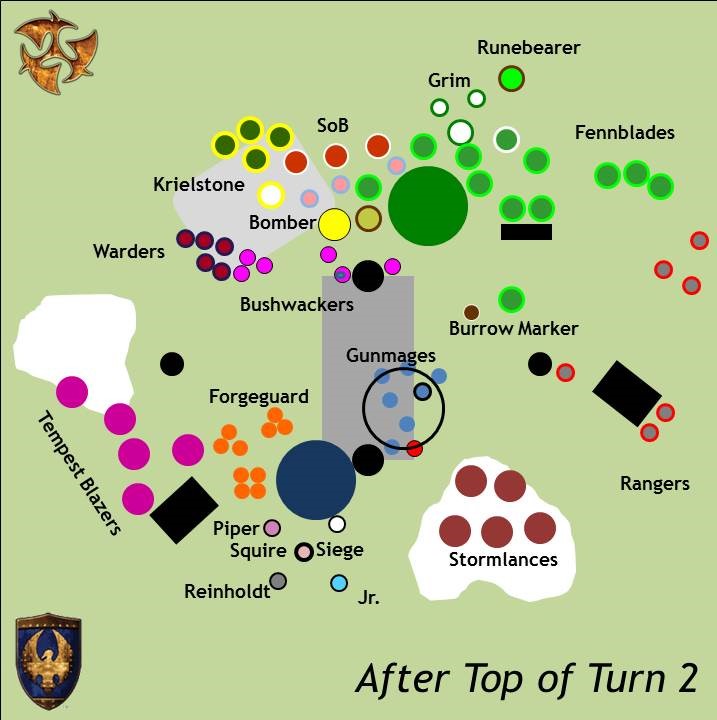
Travis spends his turn running most of his stuff forward. The key aspects of this turn were casting Foxhole to protect his Gunmages from getting shot at by the Bushwackers. Also, he wasn’t happy about it, but he placed his cavalry in the forest to protect them (Concealment with Arcane Shield) and to get them in position for the next turn knowing that if they declared a charge later that they would have Pathfinder thanks to the close proximity of the Stormblade Captain.


Bottom of Turn 1: Trollbloods (Alan)

Grim sends orders ahead for the Burrowers to enact his battle plan, and gives his Fell Caller a nod. The pieces are put in motion.

Watch our flanks, my brethren,” Grim says to his unit commanders. “Don’t let them box us in. We can’t afford to give that colossal an easy shooting gallery. Stay spread out!”

Sir! Stormlances assembling in the woods!”

Dang!” Grim looks across the valley. Sure enough, a unit of Stormlances are lining up for a charge. Fennblades are great against most cavalry, but those electrical bastards are a different story.

Hold back, lads. Don’t move up too far. Give our plan time to develop. Don’t make yourselves a target!”


1. Bushwackers: Move up, 10-man CRA targeting the Stormwall. At Dice+1 damage, they roll an 8 and inflict 9 damage to the Stormwall. Damage goes onto the left side, column 3.
2. Warders: Run up to protect my flank.
3. Bomber: Riles and moves up behind the Bushwackers, toeing the hill.
4. Burrowers: Burrow, move the Burrow Marker up 5 inches.
5. Runebearer: Shuffles back a bit.
6. Mountain King: Riles for 1 Fury, runs a little to the side and then forward.
7. (Whelps (3 of 5 started in play): I don’t recall exactly when I activated each one, but they just ran to their final positions when necessary to get out of the way).
8. Fell Caller: Runs forward next to the Mountain King.
9. Fennblades: Run into position.
10. Hunters Grim: Moves behind the Mountain King, transfers 5 Fury to the Stone, reforms a bit to get into final position.
11. Stone: Activates, uses 1 Fury to create the Aura (with Immunity to Continuous Effects), then moves to be between the Mountain King, Bomber, and Warders to try to cover them all.
12. Sons of Bragg: Run behind the lines to be near the Stone.

I had intended to shoot some Gunmages with a couple of CRAs from the Bushwackers, maybe even using my feat if I thought I could really decimate the Pistoleers. However, Foxhole put a damper on those plans. So, since he didn’t put Arcane Shield on the Stormwall, and without any other great targets, I decided to put a big shot into his Stormwall, hopefully scaring him enough to switch Arcane Shield to it. In games like this I tend to ignore the Stormwall and try to pick apart the rest of the army, so having Arcane Shield on him is preferable to me than having on it a powerful cavalry unit. The tactic worked (see Turn 2). I was also very afraid of his Stormlances charging my Fennblades. I’ve seen that play out before...assault shots, electro leap, plus melee attacks and more electroleap if he can get there. That’s not a fun scenario for my low defense, low armor troops. So I played very cautiously on that side of the table to limit his options. I also shifted Grim and my support towards the center of the table. I had intended to use the Runebearer to put Mirage on the Fennblades, but completely forgot when the time came. Alas.


TURN 2: BLOOD IS SPILLED [Beer Choice: Sharkinator White IPA]

A fitting beer name for the beginning of the killing, Travis chose this wheat IPA to celebrate the pain and bloodshed he wanted to inflict on my Trollbloods.

Top of Turn 2: Cygnar (Travis)

Clever Trolls!” Siege growls. “They sit there on their hill and refuse to give us an opening. Do we know who their commander is yet?”

No sir.”

Well find out! I feel like I’m fighting blind! I need to know what we’re up against.”


Allocation: 2 Focus to the Stormwall.
Gains 1 Focus from the Squire

1. Tempest Blazers: Move up and choose electro leap for their shots, firing at the Bushwackers. His dice failed him. Needing 6s or 8s (depending if the Bushwackers were on the hill), he missed 2 of his 4 shots (the 5th was out of range). Thanks to some tough checks and one hit failing to break armor thanks to the Stone, the Blazers had to retreat after killing only 2 Pygs.
2. Gunmages: Move up, and those that can do so took shots at the Bushwackers. More poor dice rolling, and they end their activation having felled only 1 Bushwacker.
3. Forgeguard: Run up, keeping in small base to base groupings.
4. Stormwall: Moves up, shoots his small machine guns at the Bushwackers. Gets one shot from one arc, kills 1 Bushwacker. Rolls two shots with the other arc, misses the first shot, hits with the second shot, but the Bushwacker makes his tough check. The Stormwall then fires his big guns into the Bomber. The first shot hits, and with boosted damage puts 4 damage into the Bomber, column 3. He misses his second shot, having saved the last Focus to boost damage if he hit.
5. Rangers: Run into position to draw the attention of the Fennblades (hopefully).
6. Siege: Moves up, casts Foxhole over the Gunmages again.
7. Stormblade Captain: Runs up into the Foxhole template.
8. Journeyman Warcaster: Moves up and casts Arcane Shield on the Stormwall.
9. Piper: Move and gives fearless and tough to the Forgeguard.
10. Reinholdt: Moves a bit.
11. Squire: Moves a bit.
12. Stormlances: Activate and stay where they are.

It should be noted that Travis spent a long, long time thinking before starting his turn. His comment: “You have left me with no good targets this turn.” I guess I did my job then. :-) He really wanted to shoot my Warders with Brutal shots from the Blazers, but was afraid of giving them Pathfinder on the next turn so that they could perhaps engage his Blazers through the forest. He was very worried about losing his entire unit of Stormlances on the following turn if he moved them up, but knew that if he left them where they were that he would lose the front rank to Burrowers next turn. He decided to take that route, although he admitted later that he didn’t count on me getting to his Stormblade Captain (see Bottom of Turn 2). Note that he chose not to shoot with his Rangers because he did not want to trigger Vengeance for only killing a couple of models.


Bottom of Turn 2: Trollbloods (Alan)

Grim Angus can feel the unrelenting hunger of the Mountain King, pulling constantly at their fragile bond. Its hunger is so deep and raw that Grim himself begins to salivate, his stomach growling. He quickly quiets the urges, but the beast is hard to contain.

So far the two sides have been positioning for battle, only exchanging probing blows. Grim is waiting for the sign...

There it is! A pygmy troll leaps out of the ground near the Cygnaran cavalry. The army’s Fell Caller, prepared with the order, bellows out a rousing shout, and the Burrowers charge, emboldened by the powerful call.

Grim smiles. He turns to look at the Fennblades on his flank, awaiting their orders. He gives them the signal for a cautious advance.


During the Maintenance Phase I placed the Burrowers between the building and the Gun Mages with one trooper model back within 4” of the Effigy of Valor (so the Burrowers would be Fearless this round and so that the Fell Caller could use War Cry on them.)

1. Fell Caller: Moves up behind the objective, gives War Cry to the Burrowers for +2 MAT.
2. Mountain King: Sacrifices movement to Aim (targeting the Objective to line up his shot), his spray catches two Gunmages (including the Officer) and, after boosting to hit on both and succeeding, the Gunmages’ heads explode with the force of the cry.
3. Burrowers: Receive a Charge! order. They slam into the front line of Stormlances, killing the two closest. I also get one Burrower into the Stormblade Captain and, after hitting with both attacks, slay him. A couple of Burrowers charge the Gunmages as well, killing one.
4. Bushwackers: Receive a Run! order and move up to engage the Forgeguard. They began their activation next to the Effigy of Valor, so they were fearless for the next round.
5. Warders: Run towards the center of the table to protect my beasts and hold the line.
6. Bomber: Riles and moves up behind the Warders.
7. Runebearer: Moves a bit, uses Harmonious Exultation.
8. (Whelps: I don’t recall exactly when I activated each one, but they just ran to their final positions when necessary to get out of the way).
9. Stone: Activates, uses 1 Fury to create the Aura (with Immunity to Continuous Effects), then moves to be behind the Bomber.
10. Sons of Bragg: Run to the edge of the hill.
11. Hunters Grim: Casts Mirage on the Fennblades, moves towards the hill, places 2 Fury on the Krielstone unit, Reform to their final position.
12. Fennblades: Receive a Charge! order. Three Fennblades charge the Rangers and, with good rolls to hit, kill two of them. The rest run into position.

I knew this would be an important turn. I had to kill as much as possible before Siege used his feat. With the Forgeguard bearing down on me, I sacrificed what was left of the Bushwackers as a possible screen in front of the Dwarfs, and getting them engaged was the best protection from the Tempest Blazers removing them trivially. I moved my Sons of Bragg to the opposite side of the field to threaten his Blazers with the assault spray and so I could use my Warders to hold the center instead of just chasing the Blazers around the board all day. At this point Travis was starting to get nervous. [He even made the comment that he felt like he just didn’t have enough models on the table. I asked him “Are you sure you built a 75 point list?” He said, “Yeah, and quickly tallied up most of his army, showing that without even counting everything he was already above 60 points. If only he’d actually added up ALL of his points, he would have realized at this point that the Boomhowlers were missing. But neither of us noticed.]


TURN 3: WHEN WIDOWS ARE MADE [Beer Choice: Firestone Easy Jack IPA]

Turn 2 wasn’t kind to Travis, so I picked an easy-drinking IPA for our fourth beer, something really drinkable to help him drown his sorrows.

Top of Turn 3: Cygnar (Travis)

Siege can hear the screams of his men as the lines clash. These damned Trollkin are one tough lot, he’ll grant them that. Siege still isn’t completely sure who is leading them. He steps around the Stormwall to get a better look, and catches sight of a Troll with a large rifle and cap pulled low to shield his eyes.

Grim Angus,” Siege grumbles, taking cover behind the glowing stone effigy. Taking stock of the battlefield, it’s clear that Grim is out of range. Choosing his shot carefully to free up his mercenary Dwarf company, he shouts the order.

Charge! Hit their lines and collapse their middle. Go! Go! Go!”


Allocation: 2 Focus to the Stormwall.
Gains 1 Focus from the Squire
Journeyman Warcaster upkeeps Arcane Shield on the Stormwall.

1. Tempest Blazers: Move up and shoot at the Stone unit. They kill one scribe (forcing me to remove 1 Fury from the unit), and another scribe makes his Tough check. The other shots either miss or are out of range.
2. Siege: Moves up next to the objective and uses Ground Pounder to kill some of the Bushwackers engaging the Forgeguard.
3. Stormwall: Rolls poorly with his secondary weapons, only killing one Bushwacker (his other attacks he made at the Sons of Bragg I think and missed). He hits the Bomber with his big guns, and the bomber takes a total of 8 damage from two hits. The two remaining purchased whelps are placed into play from the damage. The Bomber’s Body is “out” and he has some damage to his Spirit. The Stormwall places a Storm Pod that kills a Bushwacker and puts two damage into a Warder.
4. Forgeguard: They receive a Charge! order. They crash into the front lines of the Warders and kill two of the mighty heroes. They also kill all but two of the remaining Bushwackers. [The Bushwackers were Fearless this turn and automatically passed their morale check.]
5. Journeyman Warcaster: Stands still and uses his Handcannon to shoot at the closest Burrower. His shot misses.
6. Rangers: Run back towards the Forest. One takes a free strike from a Fennblade and dies.
7. Stormlances: Receive a Charge! order. Between free strikes, assault shots, and charge attacks, they murder most of the Burrowers. [The Burrowers were Fearless this round, and so automatically passed their morale check.]
8. Gun Mages: Charge into combat and kill one Bushwacker and one Burrower.
9. Piper: Tough and Fearless on the Forgeguard.
10. Reinholdt: Moves a bit, does nothing.
11. Squire: Does nothing.

What sums up this turn, in Travis’s words: “I just didn’t kill enough stuff at all. Okay, go ahead and murder me now.” He wasn’t really mad. That’s just Travis. :-) [Somewhere along the way a whelp was killed from electro leap I think, but I can’t remember where, and forgot to remove him from the following diagram. There should only be three next to the Bomber.]


Bottom of Turn 3: Trollbloods (Alan)

The Cygnaran Warcaster had stepped up into the middle of the fray, coming out from behind his massive warjack. Knowing that this signaled an important turning point in the battle, Grim extends his focus and skill, lending accuracy to his army.

Fire at Will!” he shouts. “Collapse the left flank, and drive off that blasted cavalry!”

Grim upkeeps Mirage, and the Fennblades each are placed within two inches of their current locations (heading towards the Cygnar lines).

1. Stone Unit: Spend 1 Fury (3 remaining) to create the Aura (with +1 STR), moved up to the side of the Bomber and behind the Warders.
2. Burrowers: Burrowed beneath the ground and moved the Burrow Marker within a couple inches of Siege.
3. Runebearer: Used Harmonious Exultation.
4. Hunters Grim: Moved up to the middle of the hill and made Cygnar “Smell His Troll Feat!” He then shot the closest Tempest Blazer not in the forest, Boosting the hit but not the damage. The Blazer died. Grim then cast Mortality on the Forgeguard, choosing not to boost. The spell landed. The unit reformed back a bit and ended their activation. Grim had 2 Fury remaining.
5. Bomber: Ate three whelps to heal 6 damage from his body. Threw his first bomb into the Dwarf behind the Lightning Pod. His hit landed. He purchased a second shot and threw into the group of four Forgeguard in front of the Stormwall. I can’t recall what rolls I boosted, but he ended with 3 Fury on him and the result was that two nearby Dwarfs and the Pod were destroyed, as well as the entire group of four Dwarfs next to the Stormwall. My rolls were pretty good, but Mortality removing tough and dropping their armor really hurt them.
6. Fell Caller: Moved around the objective and gives War Cry to the Fennblades for +2 MAT. He then tried to spray the Gunmages, but he missed his attacks.
7. Sons of Bragg: They Fell Call: Fervor for +2 to attack and damage rolls. Tor charges the Tempest Blazer on the edge of the forest, and his assault spray kills the poor chap. He catches another Blazer in the spray template, hits, and does 4 damage to him (leaving him with 1 remaining wound). Rhudd charges the Blazer in the forest, but fails his charge because of needing to move through the forest. Wrathar runs to engage the same Blazer.
8. Fennblades: Receive a Charge! order along with the No Quarter “mini-feat”. They kill the remaining Stormlances and one Ranger. The Rangers failed their command check against Terror. The Fennblade Officer also killed one of the remaining Gun Mages, who automatically passed their command check because of their proximity to the Effigy of Valor.
9. Bushwacker: The remaining Bushwacker turn around and shot a Dwarf, killing him.
10. Warders: Receive a Charge! order. One Warder hits the Stormwall for 2 damage, another Warder kills a Forgeguard Dwarf, and the last Warder misses his attack against a Gun Mage.
11. Mountain King: Moved up, sprayed towards the objective. The spray was short, but that target was just being used to line up the spray to catch a Gun Mage (and miss my troops). Boosting to hit, the Mountain King murdered the Gun Mage.
12. Whelps: The remaining whelp ran up into the zone.

Again, I knew it was important to kill as much as possible since Siege hadn’t used his feat yet (and so it was obviously coming next turn). Thus, I decided to make Travis “SMELL MY TROLL FEAT!” this turn. The turn was a good one. When I asked Travis to comment on this turn, he said “What happened is that you pretty much collapsed one side of the table and probably won the game.” I felt pretty comfortable leaving Grim on the hill with two transfers considering he would be DEF18 vs. shooting. Travis didn’t know it yet, but I was setting him up for a Mountain King-assisted assassination attempt next turn...


TURN 4: FINISH HIM! [Beer Choice: Lagunitas Little Sumpin’ Sumpin’ Ale]

It was Travis’s turn to pick the beer, and he knew he needed some help to pull out a win. And what better fuel than that little extra Sumpin’ Sumpin’ that comes with a truly excellent brew?

Top of Turn 4: Cygnar (Travis)

Sir, we must retreat!”

Siege glares at the journeyman warcaster. No, retreat is not an option on this day. They still have a Stormwall, and whatever that giant Troll is, they cannot leave it alive to ravage the countryside. The innocent people of Cygnar will NOT be left to fill this creature’s belly.

No! We fight! Take aim, and give them everything you’ve got boys!” Siege focuses and extends his energy to infuse the troops around them, helping to guide their attacks and maximize their damage. With a cry, he fires his cannon and lays waste to a squad of Trollkin with huge swords running in his direction.

Keep it up men! We aren’t beaten yet!”


Allocation: 2 Focus to the Stormwall.
Gains 1 Focus from the Squire
Journeyman Warcaster upkeeps Arcane Shield on the Stormwall.

1. Gun Mages: Move back out of combat. Both die to free strikes.
2. Reinholdt: Moves up and gives Siege Reload.
3. Siege: Activates his feat, then puts Ground Pounder down into the large group of Fennblades nearby, killing a bunch of them (one makes his tough check). He then takes his extra shot and kills the Fell Caller.
4. Stormwall: With his left machine gun he killed one member of the Stone Unit, and with his right machine gun he killed the Fennblade Officer. He then proceeded to two-shot the Bomber into oblivion. The first attack (under the feat) did 18 damage, and the second shot finished him off. Grim reaved the Fury.
5. Forgeguard: Received a Charge! order. One Dwarf killed a Warder, the other missed his attack.
6. Tempest Blazers: Received a Charge! order. One damaged Rhudd for a few points, and another did 6 points of damage to a Warder.
7. Rangers: Stayed where they were, rallied with a successful command check.
8. Journeyman Warcaster: Shot the knocked down Fennblade who Siege failed to kill and finished him off.
9. Piper: I think he just left him back and didn’t do anything with him.

Travis killed a lot of stuff, but he also opened up some clear lanes to Siege. Siege was camping 5 Focus, and so was ARM 22. I think he should have moved Arcane Shield onto Siege, but the beer might have been getting to him by this point. Or perhaps he thought the game was lost and wasn’t fully engaged. Or maybe it just didn’t occur to him. Who knows?


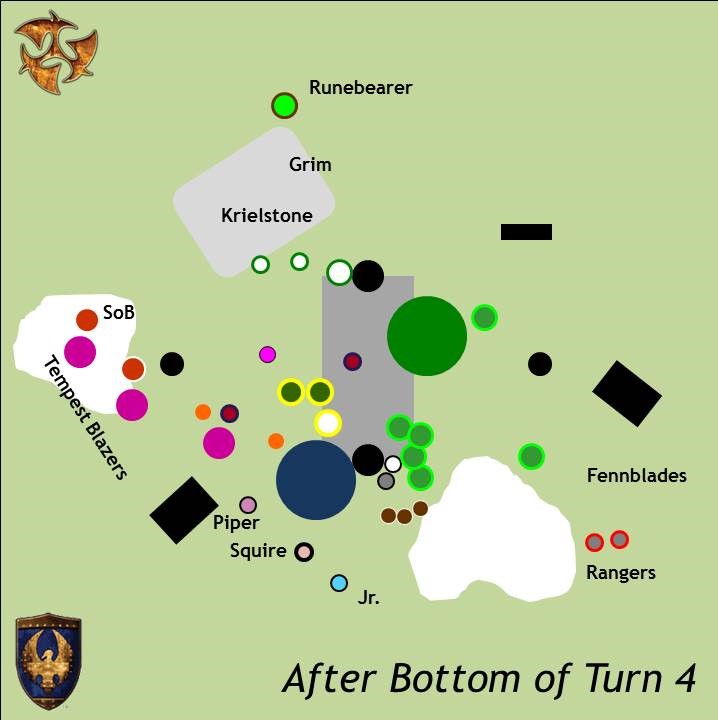
Bottom of Turn 4: Trollbloods (Alan)

Grim moves up and kneels next to the Effigy of Valor, feeling its magical energy coursing through him. Trying to put it out of his mind, and ignoring the distance cries of battle and barely restrained fury of the Mountain King pulling at the bond, he exhales slowly and takes aim at Siege, who is struggling to stand as Fennblade warriors scream towards him. He squeezes the trigger, the bullet piercing Siege’s shoulder. The warcaster falls again, and the Fennblades finish him off. At his death, a trumpet blares, and the remaining Cygnaran troops flee the battlefield.


Grim upkeeps Mirage, and the Fennblades each are placed within two inches of their current locations (lining up several for a charge against Siege and making sure to get the ). The Burrowers popped out behind Siege.

1. Whelps: The one remaining whelp runs to within a few inches of Siege.
2. Mountain King: Moves up and Power Strikes the whelp in the back. Boosting the hit, the whelp sails through the air and crashes into Siege. Siege takes no damage, but is knocked down.
3. Bushwackers: The remaining Bushwacker just moves out of the way.
4. Stone Unit: They spend 1 Fury to activate the Aura (+1 STR), and run to get as close as possible to Siege.
5. Hunters Grim: Grim moves up and puts a boosted damage shot into Siege, causing 6 damage to Siege.
6. Burrowers: Shoot their Slug Guns at Siege. All of them hit, but none do any damage at dice minus 8.
7. Fennblades: Receive a Charge! order. Four Fennblades get to Siege, and the fourth attack fells the Cygnaran Warcaster.

Grim looks around the battlefield. His forces have won the day, but at great cost. While the Mountain King scavenges the field eating the dead, Grim removes his hat and wipes sweat from his brow. He knows that Cygnar will not take this loss lightly, and that the United Kriels must prepare for their eventual counterattack.


END OF GAME: A TOAST TO VICTORY, TO FRIENDS, AND TO GOOD TIMES! [Beer Choice: Ballast Point Sculpin IPA]

My choice for the victory toast. Good friends and good times call for one of my favorites.


VICTORY: TROLLBLOODS!!!

No friendships were harmed during this game, but we did slay the following beers. Borka would be proud. :-)


My thoughts on the game:
1. Some players have a hard time with the idea that every model in the game except your 
warlock/warcaster is expendable. It’s a lot like chess. It sucks to lose your knight, but if you lose 
him to protect your rook, and to eventually allow you to be able to take a bishop then it’s worth 
it. On Turn 2 I ran my Bushwackers at his Forgeguard instead of taking the opportunity to move 
up and shoot a CRA at the Blazers or fire at another target of opportunity. They mostly died the 
next turn, but it hampered his advancing Forgeguard, kept up the pressure on my opponent, and 
forced Siege to focus his attention on taking them out. Which also means he wasn’t shooting at 
other things in my army. Positioning in this game (and dictating order of activations for your 
opponent) is as important as killing models in many cases, and this is a great example. They only 
put 9 damage into the Stormwall and later killed one Dwarf, but I consider their performance key 
to my victory in this game.

2. You do not always have to kill the big guys (colossals/gargantuans) to win. While I don’t 
think my opponent played his Stormwall perfectly, and he suffered from some bad dice rolling, I 
am fine with slowly losing models throughout the game to his shooting (I don’t think he racked 
up 19 points worth of kills) while I neuter the rest of his army. Only the mission objectives 
matter, including killing the caster.

3. Support models are usually there for a reason...identify that reason and target the ones your 
opponent depends on if you can. Because of the board setup, Travis felt the need to place his 
Stormlances in the forest Turn 1. I immediately recognized that a lack of pathfinder would 
hamper them, and so went after their source of Pathfinder: the Stormblade Captain. Incidentally, 
the only reason he was comfortable putting his cavalry in that position was because he thought 
he could rely on the Captain to give them Pathfinder. While your opponent will not always 
oblige you by putting support models in harm’s way (I never had a clear shot at Rhupert, for 
instance), it’s important to identify what support pieces your opponent has in his list and why 
they are there. That might give you an idea of his plans, and it might help you identify when it’s 
worth the effort to kill them and when you can leave them alone.

4. Power attacks win games. Ask any veteran and they will tell you that the biggest advantage 
they have over newer players is an in-depth knowledge of the rules and the models in this game. 
Power attacks are very situational, but when those situations come up they can absolutely win 
you games. I knew that Siege was going to camp Focus, and I knew that I would have to rely on 
some dice spikes to break his armor and kill him Round 4. That means I needed to make sure that 
I maximized the number of attacks that hit, and the best way to do this is to knock him down 
first. The line wasn’t right for the Mountain King to try to slam him, and I was definitely too far 
away to walk up and headbutt him. But I did have a whelp, and I knew that whelp did not have 
tough so that after Power Striking him he could not make a tough check and remain in play to 
mess up my assassination run. I also knew that Power Strike slams a small base model an 
additional +2 inches, so that if I placed the whelp within 3” of Siege I could not miss unless I 
rolled triple ones to hit with boosting. My knowledge of Power Attacks facilitated the 
assassination run, and I would have surely failed without it. Also, this is a good time to note that 
I love this trick with the Mountain King. I have killed a lot of warcasters/warlocks by Power 
Striking a whelp into them to knock them down, and it just so happens that the Mountain King 
generates his own ammunition. :-)

5. Don’t forget to double check your list and make sure you field all of the points you’re 
supposed to. :-)

*****

Arizona_Troll folks!  I think that's easily the best batrep I've ever had the pleasure of both reading and having the pictures for.  Everything was beautifully painted and the photography was devoid of the dungeon yellow that mine are usually accompanied by.   Lots of thanks to Alan and Travis, and we'll see you around!