Saturday, March 8, 2014

Making your own foam trays

  I don't know about you, but I don't care to spend money on my models.  It's a neccessary evil though, and it's not like the guys at Privateer Press haven't earned it.  At the end of the day though, when I save up and budget for my new army, it's depressing to realize that I need to put aside an easy 160$ for the carry case and foam for my models, because you all know they're going to be painted, and I don't want them just rattling around.

  Battlefoam is expensive.  KR Multicase isn't as bad, but it's still out there.  So, I set out on quest to figure out something cheaper.  My first attempt was a bunch of cardboard dividers for my Cygnar.  That's been working ok, but not great.  I've come a long ways painting since my trolls, and I definitely wanted foam involved, so I started with a trip to Hobby Lobby.  Let's take a look.

  First off, you'll need a few things.

 1.  Foamboard or cardboard.  Nothing crazy, just 1/4 foamboard, or cardboard.
 2.  3'' Foam for cushion upholstery.  Hobby Lobby, Michaels, any craft or DIY intensive store should have it.  There's a lot of size variation as far as depth, length and width.  I grabbed a 3'' tall chunk, 22'' by 22''.  Lots of material to work with, and it cost me 12$.
 3.  (Optional) 1'' foam of the same style.  I haven't done this yet, but I'm going to.  It's to go on the bottom of trays to cushion the models it's sitting on.
 4.  Hot glue gun.
 5.  Saw of some sort.  I have a small bandsaw that works fantastic, but a breadknife or hacksaw blade works fine too.
  6.  A box, if you're going super cheap like me.  It needs to be probably two feet long, and wide enough to set two large-based models, plus 3 inches.  Guestimate how much space you need for your bigger models, and don't go by their base size.  My Mauler sits on a large base, but his arms stick out much further.  Measure that, multply by 2, add 3 inches.

  So, here's my filthy work desk (One of 'em), and sheet of paper that came with the foam I got.


  It looks like this.  Thick enough for most models (My Axer is pushing it), and plenty of stuff to work with.


  Cut a foamboard or carboard piece that can drop into your box.  It needs to be pretty close, but NOT snug.  The foam will already snug the tray up in the box.  If the edges of the board are wedged too, this thing will be a beast to get out.  Looks like this.  


  That box measures out 11'' tall, 17'' long, and 8'' wide.  I'm telling you, add 3'' to your measurement on your heavies.  At least 2 1/2''.  I say because of experience.  This box will work for now, it's tall enough for 3 3'' trays with room to spare, two heavies side by side, 3 medium based side by side, and 8 medium bases lenthwise.  For right now, that's plenty.  Here in a few weeks, I'll need a bigger box to accomodate my Mt. King and War Wagon, but I'll probably build a box somehow.  I haven't decided on materials yet.  This box, I grabbed from the local grocery store's pile.  

  So, we've cut the tray base.  Measure out the length, and cut two pieces about .75'' to 1'' thick, your preference.  I get down to a half inch for the Fennblade tray, but I like thicker foam for the bigger, metal models like my Earthborn.  Lay beads of hot glue down and set your foam in.  You've got a few seconds of adjustment after you set the foam in the glue, so use it.


  Trim the ends if needed, and set a heavy in there to check measurements.  


  Not bad.  Now, doing some mental math, because I've magnetized my Mauler kit, it's unlikely that I will ever have more than 4 heavy models.  Earthborn, Mauler, Mulg, and whatever the new Trollblood heavy will be, lord willing.  So I'm not doing more than 4 spots.  If I'm wrong, it's a 6$ fix.


  Cut yourself some strips, again, half inch to an inch thick.  In this case, I'm going to do this tray half heavy, half medium based, so I cut a piece too thick, 10'' long, and laid it down the middle.  Then for the medium based dividers, I cut a brick that matched the width I needed, and then cut the dividers out of that.  When I glue them in, I glue the bottoms and sides, push apart the existing walls, set the divider in and push it all together so it glues into the foam beside it.


  As a side note, I dabble in a plastic called Kydex.  I bought the bandsaw to work with it, and you can see the saw particles all over this stuff.


  So here's my heavy tray.  I did the outer walls too thick, and could have squeezed more medium bases in there, and as it is, the last two spots aren't going to fit medium bases even.  Happily, I've got 2 units of whelps I can dump in there.
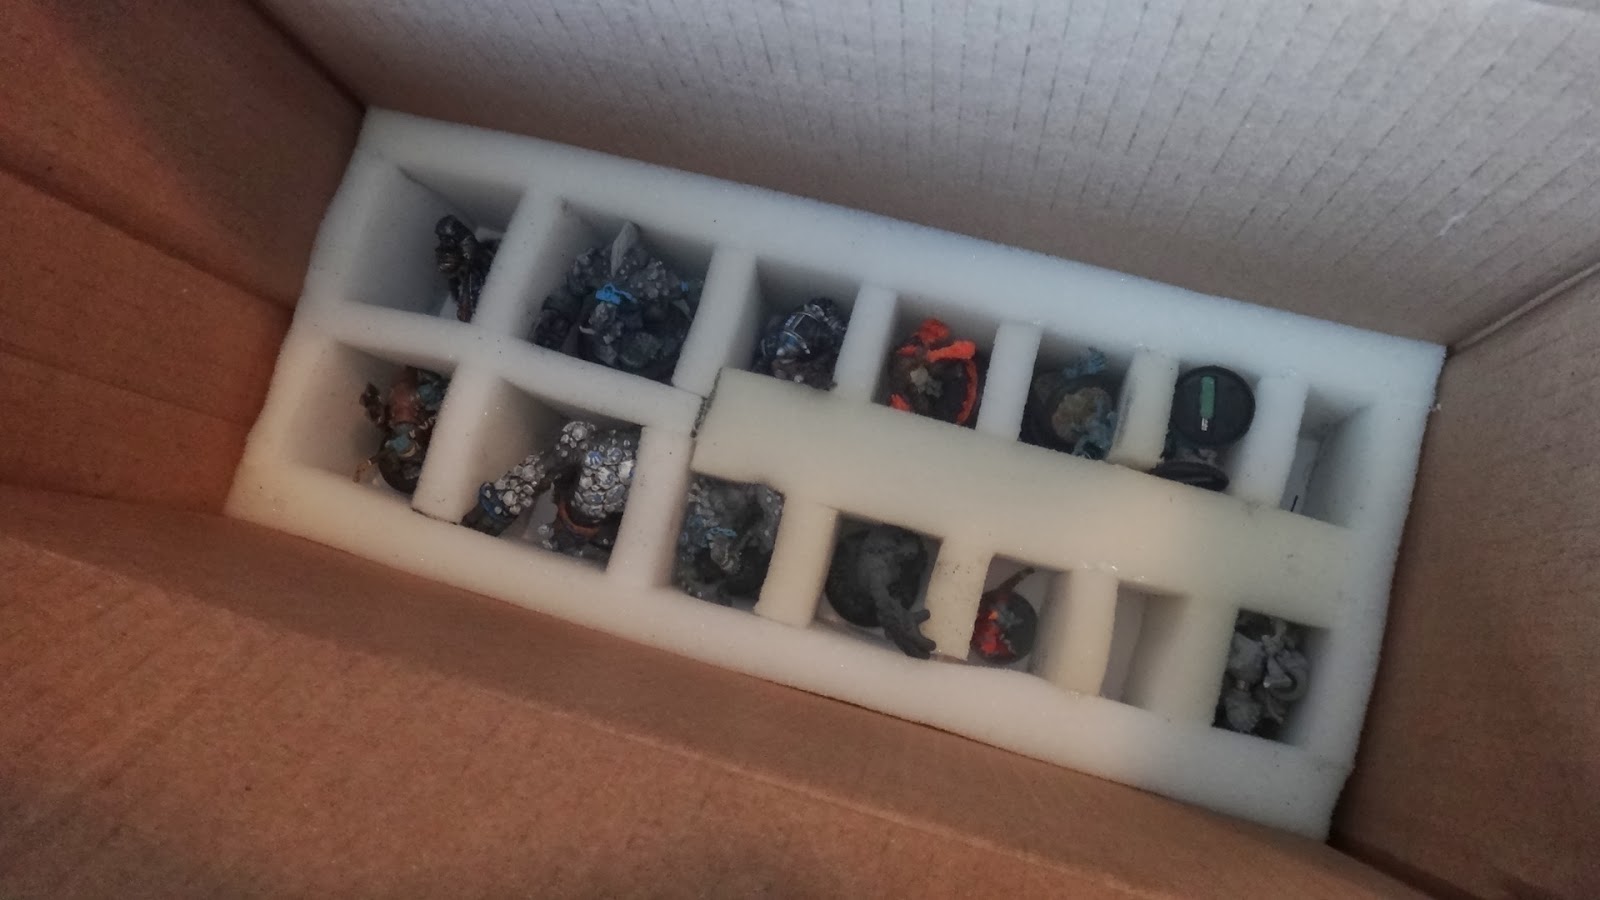

  Just like that.  So, take the lessons you learned here, and build the next tray.


    And viola, we're done!  Less than 20 dollars spent, and you've got a completely custom foam tray setup.  For colossals, you'll probably need to layer the foam to accomodate the height, but it's manageable.  I hope this helps you out and makes your wallet breathe a little easier.  Tune in later in the next few days for the first batrep with these guys!  eMadrak vs. Mohsar!  Where Jedianakinsolo remembers how much he hates pillars of sand.

Monday, March 3, 2014

Trollbloods in black. Highlighting, Drybrushing and the Tartan

  This morning started off strong with a solid cup of coffee and a fresh air tank.  If you hadn't seen below, I'd picked black/dark dark batman brick grey as my Trollblood base, with highlights of blue.  The main tartan will be St. Andrews, with variations.  I'll probably mix in some other tartans as well, trying to portray the idea of multiple kriels uniting under the same flag.  I also got away from the Desert terrain with these guys and am looking for a Scottish Highland look.  Lots of whitewashed rocks and tufts of wild grass.  So, let's take a look.

  I started with sealing my Axer.


  First off, I like how this turned out.  I think I pushed the highlights too hard on the armor, but was pleasantly happy with the Tartan, skin tones, and the base.  I actually used the P3 Armor wash on the armor, and it turned out pretty dark, which I like, but I still overdid the highlights.  The base is just cobbled together tree bark with Army Painter grass tufts, and extensive white drybrushing.  The Warpaint is something my wife started with our Nyss, and I carried it over to my Trolls.  The Tartan is a bit more subdued than I like, but I think eMadrak pulls it off better.  I mixed tones of blue too similar to eachother, and just really can't see the differences.


  I haven't decided if I like this sculpt yet or not.  It's a lot of armor for a trollblood caster, but it's ok I guess.  I did like the Warpaint here as well, and I think my tartan was considerably more successful.  I went straight out of the Vallejo Game Color bottles, using Electric Blue, Magic Blue, and Night Blue, and of course, Dead White.  This turned out considerably better than the Axer, and I really liked it. 

  Drumroll, please


  I wasn't planning on doing the Earthborn yet.  This model came painted, and I hated to prime it, but the Earthborn was a model I was looking forward to painting.  I kind of just cut loose on it, and absolutely loved it.

  So, let's hit the Tartan first.  On the Axer, I painted his cloth, highlighted it, then tartaned it, which completely destroyed the highlight...  So yeah.  The cloth here is painted a 1:1 Magic Blue/Electric Blue mix.  Then I did a crosshatch of Electric Blue.

  Then I stuck of dot of Night Blue in the middle of every square.


  Now a real thin white line through the middle of every Night Blue dot.  I worked my Army Painter "Insane Detail" brush to death on this.  I'll be using it a lot on these trollbloods.  I love my Master's Touch brushes, but that Insane Detail brush is awesome for tiny lines.


  Highlighting.  It was really easy.  This is basically the part where I brag about my Airbrush.  I highlighted 60pts of Trolls today in a half hour.


  Straight base color (Probably 1:2, 1:3 black grey).  Airbrushed 1:1 mix from above.


  Catches all those muscles, folds, everything.  Mixing up another one.  2:1 grey black.  Keep the brush farther away, lighter spray, just catch the tops.


  And tada!  After all this, my Earthborn was sitting here:


  I love this model.  Very aggressive, very detailed.  I'm not one that normally likes metal sculpts.  I hate most of Cygnar's (Except the Centurion), and the light trollblood sculpts are silly.  I have a Pyre troll now that's smaller than my Kithkar.  I do, however, love this sculpt.  Here, it's highlighted, and based by it's previous owner.  I'm going to leave the skintone pretty well alone, and focus on everything else.


  I have an old GW brush that I beat the heck out of today drybrushing.  My goal is to essentially look like like this guy came from the white cliffs of Dover.  I also painted the loincloth.  I thought about the tartan, and I might still go back over it at some point, but a rough brown leather cloth seemed more in line for this guy today.  


  Now I drybrush straight white.  I did my rocks below too, leaving the grass as much as I could.  
  

  Then I washed it with a black wash I made awhile back.  Mainly just trying to get into the recesses in the rocks and really outline them.  One more quick drybrush of white focusing on where the light is going to hit more, and we're done.  I came back through with Magic blue to add the warpaint, which I really feel added a lot to this model, and sealed it.


  That's all I've got for today.  My painting desk is still full, but the work week starts again for me tomorrow, and if I want to get these guys down to the shop Saturday for the league, I gotta figure out a way to pack them.  Look for more regular updates from here now that we're through the rough side of winter.


Saturday, March 1, 2014

Why airbrushing and White Russians are related.

  I thought about that title over the last two days quite a bit.  There were a lot of options.

  1.  How to Airbrush - Or - Why I drank six white russians last night.

  2.  Airbrushing Basics 101.  Give up.

  3.  Ratios are fun, but my brush still looks like it's throwing up.

  4.  Why Airbrushing is so expensive.  Because I'd throw it all away if I hadn't dropped 200$ on it.

  Long story short, my wife bought me an Iwata Neo Airbrush.  It's legit.  60$ Dual Action name-brand airbrush.  This one comes with a .35mm needle and seems to do good.  I had it sitting on my desk for a month, and finally got an air supply for it.  I yanked my air bubble out of the garage, built an assembly for it that included a gauge, and on/off, a regulator, and a quick disconnect. The thing still has to function for airing up a tire in an emergency, but my regulator and airbrush hose assembly comes off at the disconnect and that's that.  Maybe 30$ in the air setup, except I already had the tank.  You can get a bubble at walmart for 30$ though, so yeah.  Cheaper than a generator.  I work at an industrial plant that runs a million valves off of air pressure, so it's nothing to take the tank in Friday morning and fill it up before I head home.


    So that's exciting.  The other thing that happened is that I bought a bunch of trollbloods.


 I think I've posted the list already in a post or two ago.  The Trollblood battlebox (which I had no intention of ever buying) is in there, but I got most of the lot for 200$, so I can't complain.  Two axers and/or two impalers ain't alway a bad thing either.  

  This was pretty much perfect timing.  After the trollbloods showed up, I focused on getting the air supply going, and then spent the next two days being mad at myself.  See, there's a billion airbrushing tutorials out there, articles, videos, and it's still frustrating.  The first problems I had were:

  What air pressure do I want the tank at?  I can put air out at 80psi.  That's way too much.  I'm sitting right about 22psi right now, and that seems pretty nice.

  How do I mix the paint?  Do I mix it in the bowl?  Do I mix it in a jar and use a dropper to get it out and into the brush?  My first thought was little mouthwash cups, but that was really difficult to mix in, and I ended up spending 88 cents at Walmart to grab measuring spoons, using the teaspoon one to mix paint in and pour it into the brush.  That worked a lot better, but it didn't store the paint at all, which turned out to be a consideration because when I finally had a successful mix, I wanted to keep it.

  Actually getting paint out of the brush.  This was, hands down, the most frustrating part.  I could get the paint out, but it either splattered, gummed up the brush, or dried and stuck completely.  A lot of time, I could get the perfect spray for a split second if I pulled the trigger all the way to the back, and shoved it forward.  That was splotchy, and terrible.  I tried mixing all kinds of ratios.  1:1 water/paint, 2:1 water/paint, 1:2 water/paint, 3:1, 1:3, anything.  I bought isopropyl alcohol to start with, then read that Vallejo does NOT mix with alcohol, so I used distilled water.

  About this time, I grabbed a bottle of Kahlua, and whipped-cream flavored vodka.  My word, so good.  I got the ratios perfect here:

  1/4 shot of Kahlua
  1/4 shot of Vodka
  Cup of milk.  
  Tiny bit of creamer.  If you like creamer in your coffee, you'll like it in your White Russian.  It's like alcoholic cold espresso.  So good.  The 1/4 goes up and down depending on the evening.  I don't like to get drunk, but I do enjoy a White Russian.  

  So, painting.  Distilled water was doing better, but I was getting frustrated with the inconsistency of the paint.  I couldn't just keep it flowing.  So I grabbed Vallejo specific thinner medium and tried that.  Still no success.  I saw several figures saying 1:3 thinner/paint was the way to go, and simply wasn't working.  I finally gave up, dumped water into the brush bowl to spray through the gun and clean it out and-

  Bam.  Worked perfectly for like, two seconds.  Very wet, but the airbrush had perfect pattern, coverage, sprayed efficiently, and was the perfect color until it ran out (Which it did very quickly.)

  So I finished my White Russian and tried it again, but working backwards.  Instead of looking for a ratio, I mixed my paint to the color preferred, and then thinned it waaay down to just a few steps from a wash.  It sprayed decent, but would splatter very quickly, and the moisture would build up in the nozzle very quickly and start dripping wash everywhere.  So I added more paint.  A few more trials, and I ended up with a substance a hair thicker than milk.  

  Perfect.  I made this breakthrough probably about 10 last night, and sprayed a few Fenns and called it a night on that high note.

  All the spray tests...


  The other thing I had to figure out was storing this paint.  I finally grabbed some airtight pots from Hobby Lobby.


  That's been working great.  I poured some in this afternoon and tackled my basepaints.  It's all working good.  I'm excited.

  So that's my airbrushing experience.  I'm getting to wear the trigger is working instinctively for me now, to where if I need a bigger or smaller spray pattern I'm adjusting on the fly instead of trying to think about it.

  If you've noticed, I'm working with black a lot.  That's because I finally decided on a color scheme for my Trolls.  I'm going to do mostly black, with blue highlights.  I'm starting my base paints with a dark dark dark grey (Think shades of lego that Batman will willingly work with), and going from there.  Base painting is so easy with the brush.  I've enjoyed it. 


   This axer is my test model. The black is done, but the armor and tartan hasn't been finished.  I'm doing the St. Andrews tartan, if you're up for a google search.  I need to highlight the armor yet and do the pattern, and highlight the browns on the leather, but this will be the general idea.  I like it.


  My mountain king!  I'm really excited about this.  I really wanted this model, and I got a crazy good deal on it.  My goal is to win a painting competition this year with him, so I'll be putting a lot of time into this guy, which means that I'll be doing him after most of my other stuff so that I'll have a decent grip on my trollblood scheme.

  A lot of my trolls came painted.  Janissa, pGrim, the Earthborn, Slag, Winter and Pyre.  I'll probably paint the Earthborn again, but the others don't bother me too much.  I might change Janissa's skin color but meh.

  Right now I'm basing most of my infantry units.  In fact, I'm waiting for the glue to dry.


    These are for my fell caller, Champions, and some other stuff.  There's treebark in there, ballast and insulation foam, oh, and gravel from the driveway.  That's one godsend from the airbrush, is that I can prime the foam without sealing it first with glue and hoping that's enough.  

  Most of these bases are designed specifically for the model that belongs to it, so some of the rocks and whatnot are in specific locations to support the model.  


  Then I built a few more.  I used Corkboard instead, and cut it at an angle underneath to give it that slant.


  I'll prime this stuff next, and finish priming my Champions, Kithkar, Fenn UA and my Slag troll.  My goal is to have a based army to take gaming next weekend.  Painted would be nice, but just based would be quite the accomplishment.

  That's all I've got today!  Enjoy the last weeks of winter, folks.

Tuesday, February 18, 2014

Putting a bug in your ear for Play-By-Email Warmachine

  What's that?  Play by Email you say?  Sure thing.  I've been doing it for probably three months now.  It's great.   If you missed out on the Vassal tutorial last year, it's here.  About three months ago, a buddy of mine brought up an old way of playing 40k that involved people on the forums.  Two players would build lists based on suggestions and run them at eachother based on advice from the same people.  We gave it shot on PPForums, and it went over like calling Nemo3 an A-list caster on the Cygnar forums.

  Heck, it went over like saying anything on the Cygnar forums.  Someone, somewhere out there, throws tomatoes at you, says you're doing it wrong, and that PP hates Cygnar, otherwise we'd have weaponmaster medium-based infantry by now.

  Anyways.

  First off, this isn't the kind of format that you message the first dude on the forums you meet and ask him if he's up for a game.  It's not too hard to cheat this way, and if you're worried about the other guy cheating at all, then he's not someone you want to PBE with.  Same goes for how well you know the rules.  If one of you guys doesn't know the rules all the well, there'll be a lot of emails bouncing around back and forth until finally, a turn goes right.  This isn't saving anyone time, and it's not enjoyable.  If you just started Warmachine last week, you still have a lot of trips to the LGS or the Vassal server before you fire off your first email.

  How it works is fairly simple.  There's a "Begin Logfile" option in the main menu that essentially records the game.  You can open the file just like you would a savegame, and press the forward button on the program or the page down key on your keyboard to scroll through the game.  At any point in the game, you can measure, take a look at stuff, make sure your opponent didn't miss something or do something wrong, and go pack to the slideshow.

  What's this do for you?  For one, this goes at your pace.  Our games last about two weeks.  During the holidays, it gets so long I forgot what spells I cast a turn ago.  But it goes at our pace, we go about our jobs, catch up in the evening if we get a chance.  I'll save the logfile, attach it to an email, let him know in the email what happened, and harass him on facebook.

  It also solves timezone problems.  The guy I normally play is a Norwegian.  I'm a Nebraskan.  He's going to bed when I get ready to have my first break at work.  It's very rare that our days line up well enough to play a whole game through, and even then, we'll do 35pts because a 50pt game on Vassal borders becoming a 4hr event.

  It solves distance problems.  I've a brother that plays Retribution, and he lives 3 hours away and works 2nd shift.  This works great.

  It lets you think.  This is a double-edged sword.  I like to log on in the morning before I go to work and see how badly my guys did.  Hopefully, that evening, I can come back and play a solid turn with well-thought out decisions.  I find that I do much, much better in this format.  That kneejerk reaction to assault with the Nyss because I can turns into a much better idea of shifting around and shooting CRA at a couple of solos vs. loosing all of my dudes in the assault.  I like that I have time to think about my choices.  The flipside to this is that if you get used to that, the day you go to a tournament, you'll have zero ability to make a decision in 7 minutes.  So keep that in mind.  Enjoy your time, but make sure you're still being competitive at the LGS or something so that you're not losing that speed.  The middle ground is the best here.  The experience to make the right decision, and the speed at which you arrive at it.

  I suck at both.  I played Saturday 2-2.  Ignore strategy articles from me.  Although my Kraye list trashed an eHaley single-Wall list.  Anyways.

  The other downside to this format is some of your playability goes out the window.  Tough rolls might be your first clue, but no worries.  If you're playing a friend, and doing the logfile, they can roll the tough roll for you there, no problem.  I never roll my tough rolls in PBE, my opponent does, and the results are right there for my logfile to record and show me.  No problem.

  Countercharge, however, is an issue.  No Ol' Rowdy, or at least, no countercharging.  Things like Hyper-Aggressive become complicated, and take more time to resolve.  The worst thing is Fury transfers.  You can't just say "Here's all the damage I did, what do you want to do?"

  "Well, uh, I'll transfer this one, and... (quick math) this one, and I live!  And kill your dude!"

  So there is that.  Either the game takes considerably longer at that point, or you just make an agreement to transfer as soon as the damage would kill him, or damage over a certain point, or whatever.  It's up to you.  This isn't a format you play with someone you don't know, that's just frustrating.  But, if you're looking for a way to play more games with that buddy of yours you don't see as often as you'd like, here it is.  It's been great, I've gotten to test out a lot of lists and ideas I normally wouldn't get to because I want to play the stuff that works when I get the chance.  With PBE, I can play that janky 4 minuteman Kraye list and see how it goes because it's a no-pressure learning game at an easy-going pace.

  Just dropping the idea out there.

Tuesday, February 11, 2014

Magnetizing the Dire Troll Mauler kit

  It's been a busy season, but we're getting back into Warmachine.  In two weeks, my collection of trollbloods is exploding from eMadrak, an Axer, a Kithkar (Thanks honey!) and a Dire Troll Mauler kit to:

Max Fenns w/ UA
Pyre Troll
Swamp Troll
Slag Troll
2x Whelp units
Fell Caller
Kriel Stone Bearer
Janissa
Champions
Borka Kegslayer
pDoomy
pGrim
2x Impalers
War Wagon
Mt. King
Winter Troll
Earthborn Dire Troll
All the GF9 dice and tokens and stuff.

  All for less than 250$ If you weren't here for the post awhile back talking about getting into Warmachine on a budget, I'm currently practicing what I preach.  I'm buying everything above used, and mostly unpainted.  I got really lucky, and found a dude that was fed up on trolls and getting out, and had pretty nearly exactly what I wanted.  I'm missing Mulg, eDoomy, a Chronicler and a Runebearer, but otherwise, I've got my 2 lists pretty nearly where I want them.  I'd like to have Sons of Bragg for eMadrak, but the Champions were the other choice, so it works out.

  In other news, my wife bought me an airbrush.  It's an Iwata Neo, so we'll be getting into airbrushing in this blog before too long, once I bite the bullet and find a compressor (Or break down and run a tube from my air bubble).  I still don't know what color to paint my Trolls, but it's ....probably going to be tan...  and brown...  but mainly tan...

  To the main point of our blog post today though.  Magnetizing the Dire Troll kit.  I'm a huge advocate of magnetizing whenever possible.  It's basically saving you 60$.  The downside, especially with an organic model like the Mauler, is that the seams inbetween parts are still fairly visible, e.g., specifically the troll's back.  It's worth 60$ to me though, so let's go.

  Break open the kit.  We have a lot of parts.  The first thing I'm going to do is pick out what I want, and glue what isn't moving.  The two major things I'm not keeping is 1.  The whelp from the bomber pack.  It's ugly, useless, and a pain to magnetize, though it's probably easier than the gun dude.  2.  The angled forearm.  The left arm has two options for the forearm.  A 90 degree that matches the right one, and a straighter one.  For variation, I'm taking the straighter one.

  Next, I'm gluing the legs together, and to the main body.  I'm gluing both upper arms.  Then because I'm doing a tutorial for you guys, I'm laying them out in a pretty picture, and accidentally previewing my unbased Kithkar, and the bases for my Axer and eMadrak.


  You'll notice right away that the back panels do Not like sliding into their spot when the torso is glued into the pants.  The main culprit here is the belt buckle.  You can cut this if you like, but I'm leaving it.  Instead, I'm cutting most of the insert off.  In the picture above, you can see the bomber back vs. the mauler back, and I've cut most of the insert off of the mauler back.  It's still kind of a pain, but it's doable to slip the back in now.  

  Now let's magnetize the easy stuff first.  The neck is recessed enough that I don't really have to hollow it out any.  You can a little bit if you'd like to, but it's not necessary.  If you do hollow it out, I'm using a 3/8 drill bit in a dremel.  It's the size of my smallest magnet, and I can use it in a circular mixing motion to widen it out to whatever magnet I want to use.  

  What I actually do is drop some glue in the back of the recess, and press a little ball of green stuff in there.  Add a little (little) glue to the ball, and press your magnets in.  This is the tricky part here.  Sticking magnets in holes is really hard.  I like to leave them on the stick of magnets they came on.  Push it in, seperate them at 2 magnets thick in the hole with an exacto knife, and then press a head in.  This will push the magnets in as far as needed, in the position needed.  Now, theoretically, you securely glued the back magnet, but didn't get any glue on the front magnet, thereby glueing it to the back one.  I'm not that lucky.  Generally, once I've got them pressed in, I'll pry the front magnet out with the exacto and let the back one dry in place.

  Now, for some reason, my Bomber head has a shorter neck and fits in there like a champ.  My Blitzer and Mauler head have a bit longer neck and stick out a bit.  I'm not worried about it, but if you are, cut the neck short like the Bomber and call it a day.


  To the right arm!  Right arm is the same exact process as the head.  Glue, greenstuff, glue, press magnets, try to pull your fingers apart.  Normally I don't greenstuff the plastic joints unless I'm trying to hide seams, simply because glue adheres to the resin waaay better than the metal.  In this case though, I want to make sure the magnets are secure.


  The left arm is a bit trickier.  It doesn't have that recess (unless you went with the 90 degree arm).  Power up the dremel!  Again, 3/8 bit.  I like to start on the low setting, and kinda scratch the surface a bit till I have about the right size of hole marked for the magnet.  Start in the center, circle out from there in a stirring motion.  You're beating eggs right now.  Flip the dremel to high speed and carve out that hole.  The hand insert fits flush into the the indent in the wrist, so you want to carve out a whole about 2 magnets deep.  
  If you did really good, don't worry about the green stuff, just press the magnet in on top of some glue and call it a day.  Try really hard to keep magnets lined up though, it's really easy to forget which polarity is facing out until you try to put your Avenger's gun on his wrist, right before the tournament.  You can usually hover close with the magnets and find out which way you've got it facing, but if you do it before the glue is set, you're going to suck the magnet out.


  For the hands, simply glue magnets to the face of the wrist, with a teeny bit of greenstuff in the middle for adhesion.  And they're done.  Keep it simple.

  The back is more complicated, but easier than I thought.  The difficult part is figuring out the angle to slide it in at.  Mine also don't fit perfectly, so there's a tiiiiny gap where the top of the back meets my mauler's neck.  Normally I'd greenstuff that, but for a magnetized kit, no can do.  So.  Stack two magnets on the top sheld of the torso, gluing the bottom one.  

  Now dryfit both backs and make sure there's room to sit on top of those magnets just fine.  Mine both have enough room, but my mauler back sits a little low.


  Greenstuff!  Add a bit to the top of the back panel where the magnets you have on the torso will meet it.  Glue the greenstuff in, add a little bit of glue for the magnet, and set it in the back again on top of the magnet.  The goal here is to glue the magnet in the appropriate place, fitted into the back so everything is lined up, and NOT gluing both magnets to eachother.  Should look like this when you're done.


  With both of them done, we now have this.
  

  We're almost there.  Our heads are good, backs are good, hands are good.  The remaining piece is the Blitzer gun.  If it weren't for the tutorial, I probably wouldn't even worry about the Blitzer.  In fact, I'd glue the mauler back in place and when I want the bomber, I'd swap hands and heads.  But that's me.  Maybe I'll do that after this.  Who knows?

  ...I probably will.  It's a good idea...  I have 0 use for a Blitzer, but then I'd find out "Oh, hey, I need a Blitzer for the new Warlock." and it's too late...  Meh.

  Anyways.  Blitzer gun.  Drill straight into the top of the barrel thing on the Bomber/Blitzer back panel.  Two magnets deep.  Glue a magnet way in the bottom, pressing it in with a toothpick or something, and glue the other magnet to the bottom of the Blitzer.  Mines too for forward and doesn't allow the feet to sit, but since I'm probably never using it...
  

  And we're done with the magnets!  Let me turn on the dining room light, set this bad boy up on last night's game of Zombiecide and see what we think.


  I really like it.  It was actually easier than a Cygnar jack.  The Jacks require every hole recessed by a dremel.  The downside though is that a magnetized jack normally has regular joints and gaps, and doesn't flow like an organic model does (e.g., the troll's back) so it looks way better magnetized than a Troll does.  The plus side is that I didn't spend another 30$ - 60$ on another Troll.

  I hope this has been instructional and helpful for you.  Once the Airbrush is figured out, we'll base and paint this guy.  I need to paint my Axer and Madrak first though, figure out my scheme exactly, and push on from there.  Again, hope you enjoyed this.  

  Oh, and go watch the Lego movie.  It's good.